Reconditioning of radiator
|
|
|||||
|
20—425 Reconditioning of radiator
|
|||||
|
|
|||||
|
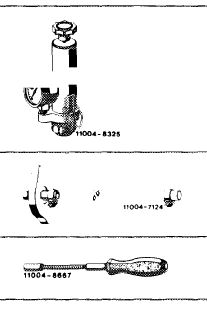
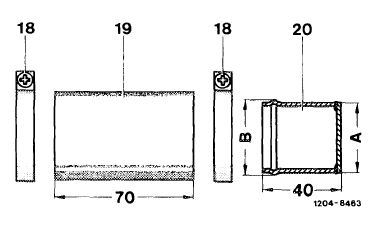
Special tools
|
|||||
|
|
|||||
|
Tester for cooling system
|
 |
|
|||
|
g%\ I
|
001 589 48 21 00
605 589 00 25 00 123 589 12 09 00
|
||||
|
Radiator cap with hose for leak test
7 mm socket on flexible shaft for hose clamps
|
|||||
|
|
|||||
|
Note
|
|||||
|
|
|||||
|
Since light alloy radiators with plastic coolant tanks cannot be repaired by soldering, a sealing compound has been developed.
This compound can also be applied to seal heavy-metal radiators (non-ferrous metal radiators).
The sealing compound is a product on a silicon rubber base which remains permanently elastic in its end condition. Temperature resistance extends from —50 °C to + 200 °C.
Because of the different accessibility on radiator (e.g. in core more difficult than on coolant tank) the sealing compound is available in diluted and non-diluted condition.
The different sealing compound versions and the priming fluid are combined in a repair kit, part No. 123 989 00 20.
|
|||||
|
|
|||||
|
20.8-425/1 F 2
|
|||||
|
|
|||||
|
|
|||||||||||||||||||||||||
|
|||||||||||||||||||||||||
|
|
|||||||||||||||||||||||||
|
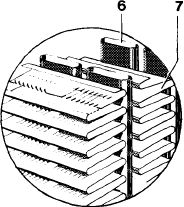
Sealing compound diluted
|
For sealing poorly accessible areas (e.g. laterally on cooling tubes)
|
||||||||||||||||||||||||
|
|
|||||||||||||||||||||||||
|
Sealing compound and primer have a service life of approx. 1 year provided they are always closed airtight upon use.
Cloudy primer fluid can no longer be used.
|
|||||||||||||||||||||||||
|
|
|||||||||||||||||||||||||
|
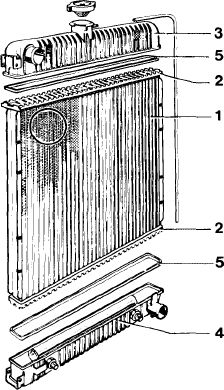
Individually, the sealing compound can be used to seal the following parts or areas in coolant circuit:
a) Plastic coolant tanks (3 and 4).
b) Heavy-metal coolant tanks (holes up to 1.5 mm dia.).
c) Light and heavy-metal cooling tubes (6).
d) Tube plate (2).
e) Bead connection (connection between radiator core and coolant tank).
f) Heat exchanger of heating system.
|
|||||||||||||||||||||||||
|
|
|||||||||||||||||||||||||
|
1 Radiator core
2 Tube plate
3 Coolant tank top
4 Coolant tank bottom
5 Sealing
6 Cooling tubes
7 Radiator ribs
|
 |
 |
|||||||||||||||||||||||
|
1204-8461
|
|||||||||||||||||||||||||
|
|
|||||||||||||||||||||||||
|
20.8-425/2 F 2
|
|||||||||||||||||||||||||
|
|
|||||||||||||||||||||||||
|
|
||
|
Damaged areas on coolant tanks which are subject to higher loads, such as cracked or broken fastening elements, cracked in fillet radius to fittings, fractured spots and very long or large cracks at top should not be repaired, since the sealing compound can take only a very low load.
Plastic coolant tanks of radiators made by Behr can be exchanged with the assistance of special tools or fixtures in Behr radiator repair shops or in Inter-Radia service stations. If required, the nearest Behr repair shop or Inter-Radia service station should be consulted concerning such an exchange and information as to whether such repairs can be made should be requested.
If there is not such a possibility, the radiator should be replaced.
On heavy-metal radiators with plastic coolant tanks soldering (brazing) should be performed only up to a distance of 20 mm from coolant tank, since otherwise the high soldering (brazing) temperature will damage the sealing (5) and the coolant tank (3 or 4). Leaks which are closer to coolant tank should be sealed with sealing compound only.
If the leaking spot can be clearly located in installed condition, the radiator need not be removed. In such a case it will be enough to drain the coolant and to pressure-test the cooling system upon sealing.
|
||
|
|
||
|
When handling priming fluid and sealing compound, observe the following:
The priming fluid is easily inflammable (observe safety rules dangerous materials class A 1).
Acetic acid will be released up to complete setting of sealing compound. For this reason, prevent skin contact. Clean involved spots immediately with water and soap. Rinse eyes with water or see a doctor.
|
||
|
|
||
|
20.8-425/3 F 2
|
||
|
|
||
|
|
|||
|
Sealing
1 If the leaking spot cannot be perfectly located in installed condition, remove radiator (20—420). Unscrew air-oil cooler from radiator.
2 Clean radiator.
|
|||
|
|
|||
|
3 Close hose connections with self-made caps.
|
 |
||
|
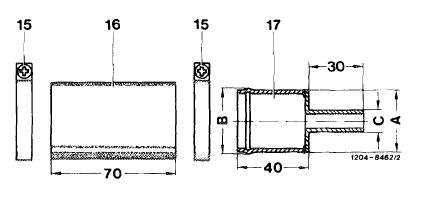
Required parts for upper hose connection:
15 2 clamps L 40-50, part No. 916026 040000
16 Individual piece from hose, part No. 126 501 02 82
17 Reduction element made of two tubes A 38 mm dia.
B 39 mm dia.
C 12 mm dia.
|
|||
|
|
|||
|
Required parts for lower hose connection:
18 2 clamps L 40-50, part No. 9126026 040000
19 Individual piece from hose, part No. 126 501 02 82
20 Cap made from tubing A 38 mm dia.
B 39 mm dia.
|
 |
||
|
|
|||
|
Overflow connection on upper coolant tank must be closed.
Required parts for inflow from expanding tank:
18 2 clamps L 28-35, part No. 916026 028000
19 Individual piece from hose, part No. 126 501 10 82
20 Cap made from tubing A 21 mm dia.
B 22 mm dia.
|
 |
||
|
|
|||
|
20.8-425/4 F 2
|
|||
|
|
|||
|
|
||
|
4 Close transmission fluid cooler connections with plastic caps or plugs made from old oil cooler lines. For this purpose, saw off oil cooler lines shortly behind nipple and close by soldering.
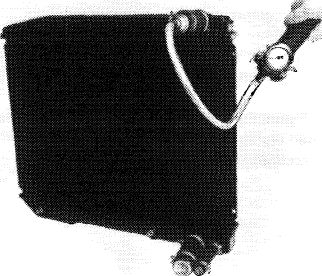
5 Connect tester to radiator.
For leak test, pull hose from radiator cap and attach to reduction at upper hose connection of radiator.
|
||
|
|
||
|
120-18176
 |
||
|
|
||
|
6 Place radiator into a water bath.
7 Put radiator under pressure by means of tester and watch where air bubbles are rising.
8 Mark leaking spot.
9 Remove radiator and evacuate pressure.
10 Blow radiator dry with compressed air.
11 Clean spot about to be sealed with a conventional cleaning compound (e.g. Tri or benzine). Always clean area slightly larger than spot to be sealed (e.g. in the event of cracks approx. 20-30 mm beyond ends of cracks).
Paint removal is not required. Then blow radiator dry with compressed air at pertinent area.
No dust and grease residue should remain.
|
||
|
|
||
|
12 Apply very thin layer of priming fluid uniformly with a brush.
Similar to cleaning, apply priming fluid beyond area or spot to be sealed. To make sure that the priming fluid is not getting dirty in tank, pour quantity required for repairs into a separate vessel.
Attention!
When handling priming fluid, pay attention to safety rules. Dangerous materials class A 1, inflammable.
|
||
|
|
||
|
20.8-425/5 F 2
|
||
|
|
||
|
|
|||
|
13 Let priming fluid dry for approx. 10 minutes at ambient temperature.
14 Position radiator in such a manner that the sealing compound cannot run off the spot to be sealed.
15 Depending on accessibility, apply diluted or non-diluted sealing compound. Use brush, spatula or the like for distributing sealing compound.
|
|||
|
|
|||
|
Attention!
During application and distribution, make sure that no air bubbles will be included.
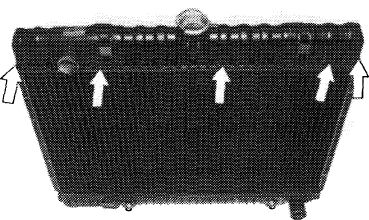
Apply sealing compound beyond spot about to be sealed, similar to cleaning and priming. In the event of several leaking spots on bead flange (arrows) it will be of advantage to seal the bead flange all-around.
Seal leaks in core from both sides.
At end of sealing procedure, close tube immediately. Acetic acids will be released up to full linking of sealing compound. Prevent skin contact. Clean respective spots immediately with water and soap, rinse eyes with water and see doctor, if required.
16 Leave radiator alone for at least 3 hours until sealing compound is dry. Depending on quantity of applied sealing compound and size of spot or area to be sealed, complete linking of sealing compound into a permanent, elastic connection will take max.
24 hours.
17 Pressure-test radiator in water bath for approx. 5 minutes at 1.5 bar gage pressure.
If there should still be leaks, repeat sealing procedure starting at item 8.
18 Remove tester and closures.
19 Attach air-oil cooler to radiator and tighten fastening screws to 5—7 Nm.
20 Install radiator (20-420).
21 Pressure-test cooling system with tester (approx. 1 bar gage pressure).
|
 |
||
|
120-15953
|
|||
|
|
|||
|
20.8-425/6 F 2
|
|||
|
|
|||