Checking and correcting air valve adjustment of stage 11
|
|
||||
|
07.2—170 Checking and correcting air valve adjustment of stage 11
|
||||
|
|
||||
|
Testing and adjusting values
|
||||
|
|
||||
|
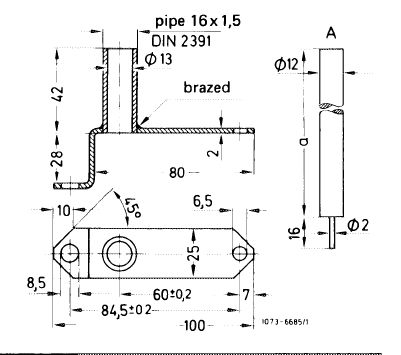
National version
|
Adjusting weight Length1)
|
|||
|
|
||||
|
1976
|
170 ±2
|
190
|
||
|
|
||||
|
1976
|
160 ±2
|
180
|
||
|
|
||||
|
<®> Federal 1973/74
|
112 ± 2
|
125
|
||
|
|
||||
|
California 1974
|
143 ±2
|
160
|
||
|
|
||||
|
Federal and California 1975/76
|
170 ±2
|
190
|
||
|
|
||||
|
These dimensions apply to St 37. When using other materials, the specified testing weight must be maintained. The respective length results from this weight.
|
||||
|
|
||||
|
Air valve gap
|
||||
|
|
||||
|
When loaded with adjusting weight
|
1.5 mm
|
|||
|
|
||||
|
Conventional tool
|
||||
|
|
||||
|
Hex. socket wrench 2.5 mm
|
||||
|
|
||||
|
Self-made tool
|
||||
|
|
||||
|
Adjusting device for air valve stage II
|
 |
|||
|
|
||||
|
07.2.2 la—170/1
|
||||
|
|
||||
|
|
|||
|
Note
The correct adjustment of the restoring spring for air valve of stage II has a large influence on bypass from stage I to stage II. When the spring preload is too low, the air valve will open too fast, the mixture will become leaner and bypass faults (stage jump) will result. When the spring preload is too high, the air valve opens too slowly and the mixture will become overrich. Bypass faults and high fuel consumption will result.
|
|||
|
|
|||
|
If the dashpot for the air valve is leaking, sudden acceleration will make the mixture too lean and bypass faults may result.
|
|||
|
|
|||
|
Testing, correcting
1 Check air valve for easy operation. For this purpose, actuate air valve, which should close again automatically.
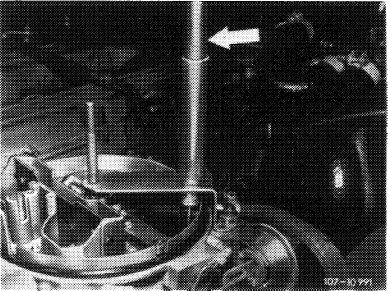
2 Adjust air valve preload. For this purpose, attach adjusting device (self-made) to carburetor. Unscrew air filter fastening screw and insert instead a suitable stud or round rod for centering adjusting device.
|
 |
||
|
|
|||
|
3 Carefully place test weight (arrow) on air valve (do not drop) and check gap.
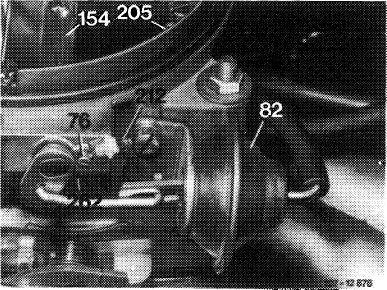
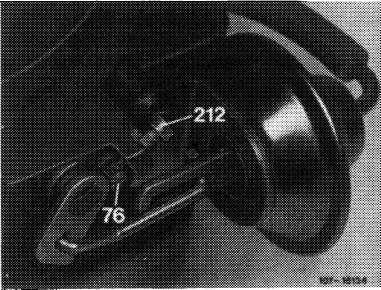
4 If the air valve is not pushed open or not more than 1.5 mm, change tension of restoring spring (262) by setting adjusting pin (76) accordingly. Prior to adjustment, slightly loosen locking screw (212) and then tighten again well.
Attention!
To avoid wrong adjustments, lift test weight from air valve while making adjustments.
|
 |
||
|
5 Check dashpot for leaks. For this purpose, run engine, pinch vacuum hose of dashpot (82). Push air valve (154) open and release, the air valve should then snap back to stop (205). If not, replace vacuum control unit. With the engine stopped, check whether air valve (154) is easily operating and returns automatically to stop (205) when pushed-open lightly.
|
|||
|
|
|||
|
07.2.2 la-170/2
|
|||
|
|
|||
|
|
|||
|
Note: If the adjusting pin (212) has been automatically released, or if the restoring spring must be replaced, install a modified adjusting pin, which is knurled at contact surface of locking screw (76).
Subsequent installation of knurled adjusting pin is generally possible (07.2—175).
|
 |
||
|
|
|||
|
07.2.2 la-170/3
|
|||
|
|
|||