Renewing and tensioning of V-belt
|
|
|||||||||||||||||||||||||||||||||||||||||||||||||||
|
13—340 Renewing and tensioning of V-belt
|
|||||||||||||||||||||||||||||||||||||||||||||||||||
|
|
|||||||||||||||||||||||||||||||||||||||||||||||||||
|
V-belt dimensions and adjusting values
|
|||||||||||||||||||||||||||||||||||||||||||||||||||
|
|
|||||||||||||||||||||||||||||||||||||||||||||||||||
|
|||||||||||||||||||||||||||||||||||||||||||||||||||
|
|
|||||||||||||||||||||||||||||||||||||||||||||||||||
|
l) Double V-belts may be installed in pairs and from one manufacturer only.
|
|||||||||||||||||||||||||||||||||||||||||||||||||||
|
|
|||||||||||||||||||||||||||||||||||||||||||||||||||
|
Conventional tool
|
|||||||||||||||||||||||||||||||||||||||||||||||||||
|
|
|||||||||||||||||||||||||||||||||||||||||||||||||||
|
Measuring instrument (Krikit)
|
e.g. made by Gates GmbH
Gravener StraBe 191-193, D-4018 Langenfeld 2
e.g. made by Gates Rubber Company
999 S. Broadway, USA-80217 Denver/Colorado
|
||||||||||||||||||||||||||||||||||||||||||||||||||
|
|
|||||||||||||||||||||||||||||||||||||||||||||||||||
|
Note
|
 |
||||||||||||||||||||||||||||||||||||||||||||||||||
|
The Krikit measuring instrument is recommended for testing V-belt tension.
|
|||||||||||||||||||||||||||||||||||||||||||||||||||
|
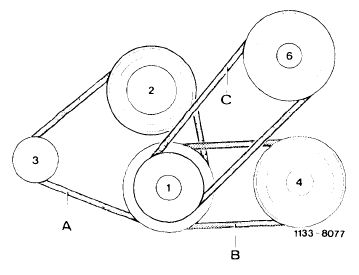
1 Crankshaft
2 Coolant pump
3 Alternator
|
4 Refrigerant compressor 6 Power steering pump
|
||||||||||||||||||||||||||||||||||||||||||||||||||
|
|
|||||||||||||||||||||||||||||||||||||||||||||||||||
|
Handling of measuring instrument
|
 |
||||||||||||||||||||||||||||||||||||||||||||||||||
|
For testing V-belt tension the measuring instrument can be handled in various ways:
a) With thumb and forefinger against rubber loop, with the finger tips resting on pushbutton.
|
|||||||||||||||||||||||||||||||||||||||||||||||||||
|
|
|||||||||||||||||||||||||||||||||||||||||||||||||||
|
13.8-340/1 F 2
|
|||||||||||||||||||||||||||||||||||||||||||||||||||
|
|
|||||||||||||||||||||||||||||||||||||||||||||||||||
|
|
|||
|
b) With forefinger from above in rubber loop.
|
 |
||
|
|
|||
|
c) With forefinger laterally between rubber loop and pushbutton.
|
 |
||
|
|
|||
|
Testing
|
 |
||
|
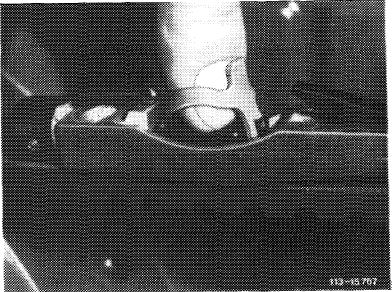
1 Lower indicator arm on measuring instrument.
2 Place measuring instrument on V-belt in center between pulleys. The lateral stop of the measuring instrument should rest laterally against V-belt (arrow).
Attention!
On double belt drive, make sure that the measuring instrument rests on one V-belt only.
|
|||
|
|
|||
|
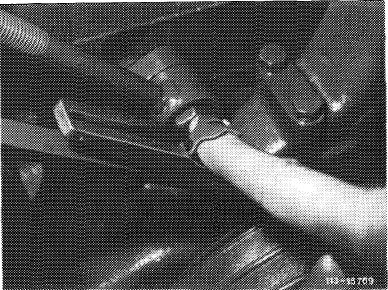
3 Exert a uniform, vertical pressure on V-belt upper surface by means of pushbutton, until click spring is audibly (or noticeably) disengaging.
Note: Upon disengagement of click spring, do not continue pushing on measuring instrument, since otherwise a wrong measuring value will be indicated.
|
|||
|
|
|||
|
13.8-340/2 F 2
|
|||
|
|
|||
|
|
|||
|
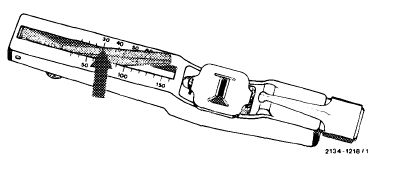
4 Carefully lift measuring instrument from V-belt. Avoid knocks against instrument and do not change position of indicator arm.
5 Read tensioning value at point of intersection of indicator arm and upper scale (KG scale, arrow).
The respective adjusting values refer to upper scale of measuring instrument.
|
 |
||
|
|
|||
|
Replacement
|
|||
|
|
|||
|
Check condition of V-belt
Replace cracked, porous, burnt or worn V-belts.
Attention!
If one of the two V-belts of double belt drive for alternator and coolant pump fails due to wear, always replace both V-belts on principle.
Use only V-belts in pairs made by one and the same manufacturer.
V-belts are available as spare parts in sets only.
|
|||
|
|
|||
|
1 Move tensioning device or units into starting position.
2 Mount V-belt without using force.
3 Tension V-belt.
|
|||
|
|
|||
|
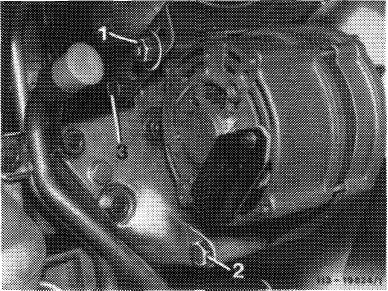
Tensioning
|
 |
||
|
V-belt A Alternator — coolant pump
|
|||
|
1 Loosen nut (1) and screws (2 and 3).
|
|||
|
|
|||
|
13.8-340/3 F2
|
|||
|
|
|||
|
|
|||
|
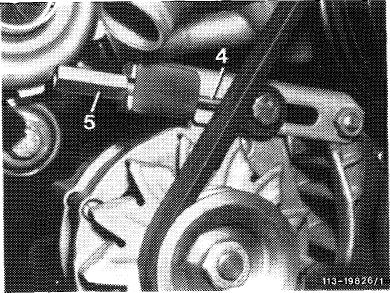
2 Tension V-belt by means of nut (5) of tensioning screw (4).
3 Tighten nut (1) and screws (2 and 3).
4 Continue turning nut (5) by approx. 1 /4 to 1 /2 turn (to tight seat).
|
 |
||
|
|
|||
|
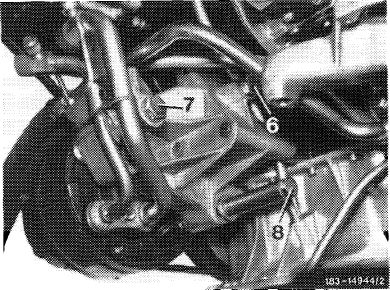
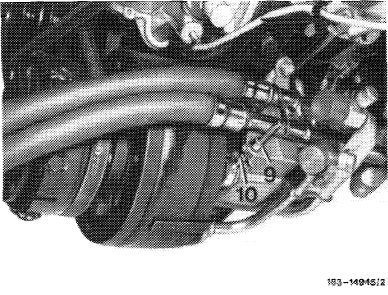
V-belt B Refrigerant compressor
|
 |
||
|
1 Loosen screws (6, 7 and 8).
|
|||
|
|
|||
|
2 Tension V-belt by means of nut (9) of tensioning screw (10).
3 Tighten screws (6, 7 and 8).
|
 |
||
|
|
|||
|
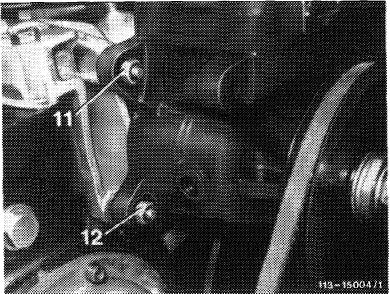
V-belt C Power steering pump
|
 |
||
|
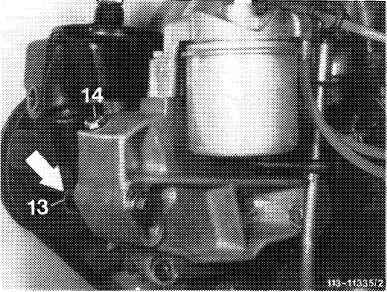
1 Loosen nuts (11, 12 and 13).
|
|||
|
|
|||
|
13.8-340/4- F2
|
|||
|
|
|||
|
|
|||
|
2 Tension V-belt by means of tensioning screw (14).
|
 |
||
|
3 Tighten nuts (11, 12 and 13).
|
|||
|
|
|||
|
13.8-340/5 F 2
|
|||
|
|
|||