Removal and installation of thermostat for intake air preheater
|
|
|||
|
09—405 Removal and installation of thermostat for intake air preheater
|
|||
|
|
|||
|
Testing and adjusting value
|
|||
|
|
|||
|
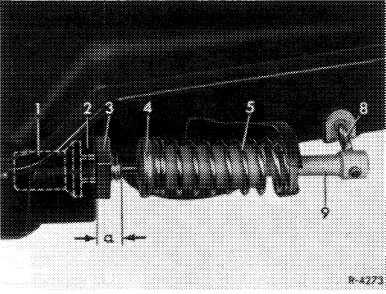
Thermostat, dimension „a”
|
7—8 mm
|
||
|
|
|||
|
A. Knecht version
|
|||
|
|
|||
|
Removal
|
 |
||
|
1 Compress compression spring (5) and push actuating bolt (9) from air valve shaft (8) and out of fastening eye.
2 Pull actuating bolt (9) together with guide sleeve (4) out of actuating pin of thermostat.
3 Unscrew square nut (3) and remove air filter cover.
4 Remove thermostat from inside out of intake pipe.
Attention!
Do not turn or push out plastic fastening nut (2).
|
|||
|
|
|||
|
Installation
|
|||
|
|
|||
|
5 Screw thermostat (1) from inside into plastic fastening nut (2) until dimension „a” = 7—8 mm is attained. Lock thermostat by means of square counternut (3).
6 Install actuating bolt (9) with guide sleeve (4) and compression spring (5).
|
|||
|
|
|||
|
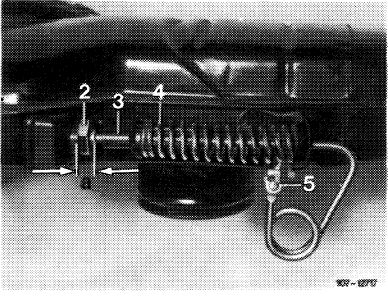
B. Mann und Hummel version
|
 |
||
|
Removal
|
|||
|
1 Push guide sleeve (3) against spring (4) and disconnect from pressure pin.
2 Remove air filter cover. Unscrew hex nut (2), unscrew thermostat from inside out of air filter housing.
|
|||
|
|
|||
|
09.2 lb-405/1
|
|||
|
|
|||
|
|
||
|
Installation
|
||
|
|
||
|
3 Install thermostat in vice versa sequence and set dimension „a”.
|
||
|
|
||
|
09.2 lb-405/2
|
||
|
|
||