Checking fuel pressures and for internal leaks
WIS 07.3-120
A. Standard version
Test values
5.0–5.6 bar gauge pressure System pressure at idle with engine cold or at operating temperature
3.5–3.8 bar gauge pressure Warm-up compensator at 530 mbar’) Control pressure at idle cycle completed with engine at operating Engine 116 Full load enrichment temperature at idle speed with warm-up compensator with (vacuum hose pulled off) Bosch end no.028 2.5–2.9 bar gauge pressure Engine 116 and 117 with warm-up compensator with Bosch end no. 010 and 056 2.8–3.2 bar gauge pressure
min. 0.5 bar gauge pressure Control pressure according to ambient (refer to diagram) teperature at idle speed with engine cold
1) If the control pressure is not attained, check intake pipe vacuum (refer to section ‘“‘Checking control pressure at idle with engine at operating temperature’).
Special tool
a XS Ae Pressure tester – 102 589 00 21 00
prog 669
\ \ Clamp for hose lines – 000 589 40 37 00
Conventional tools
Voltmeter, ohmmeter
Screwdriver element 992—T 30 e.g. Hazet, D—5630 Remscheid
Note Prior to working on injection system, check firing point, spark plugs and idle speed adjustment.
Perform leak test only in the event of complaints about hot starting.
After stopping the engine, the fuel pressure after 30 minutes should still amount to 2.5 bar gauge pressure.
Visual checkup
1 Remove air filter.
2 Check all fuel connections for leaks.
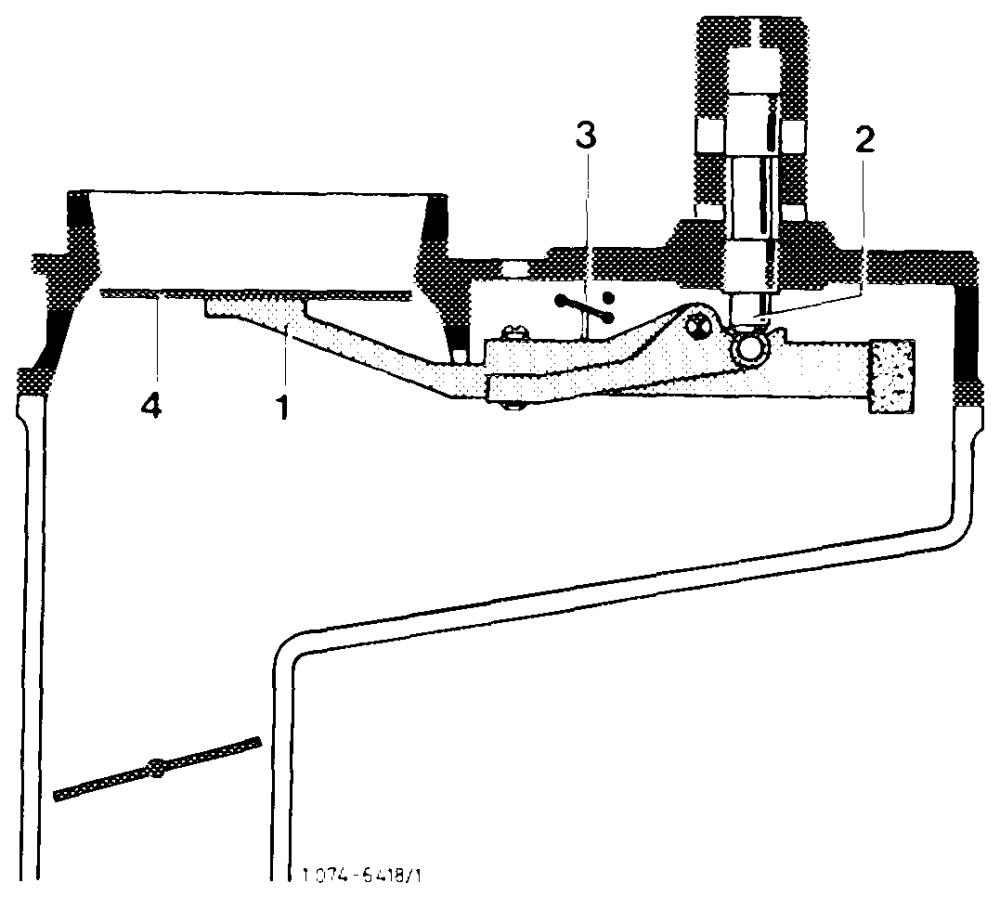
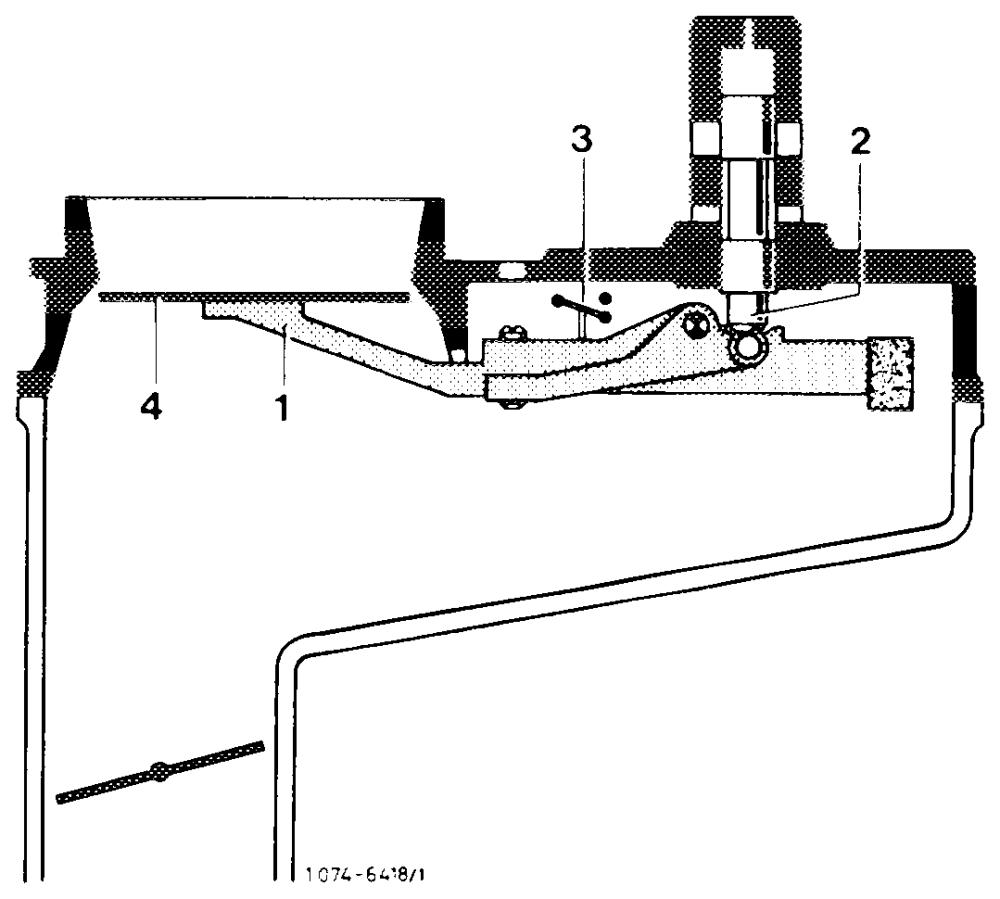
3 Check adjusting lever (1) in air flow sensor and control piston (2) in fuel distributor for easy operation. For this purpose, pull plug from safety switch (3). Switch on ignition for a short moment to establish control pressure. Push air flow sensor plate (4) manually downwards. A uniform resistance should be felt along entire path. When moving up fast, no resistance should be felt, since the slowly following control piston lifts off from adjusting fever. During the slow upward movement, the control piston should smoothly follow.
4 Check control piston in fuel distributor visually for leaks.
Push air flow sensor plate for a short moment down and hold in this position, during which no fuel should be seen in air guide housing.
If fuel emerges, renew fuel distributor (07.3–205).
Connecting pressure measuring device
The pressure measuring device remains connected for all pressure measurements.
The pressure measuring device can be connected to warm-up compensator or to fuel distributor.
The pressure measuring device 102 589 00 21 00 is now provided with only one valve screw on three-way valve.
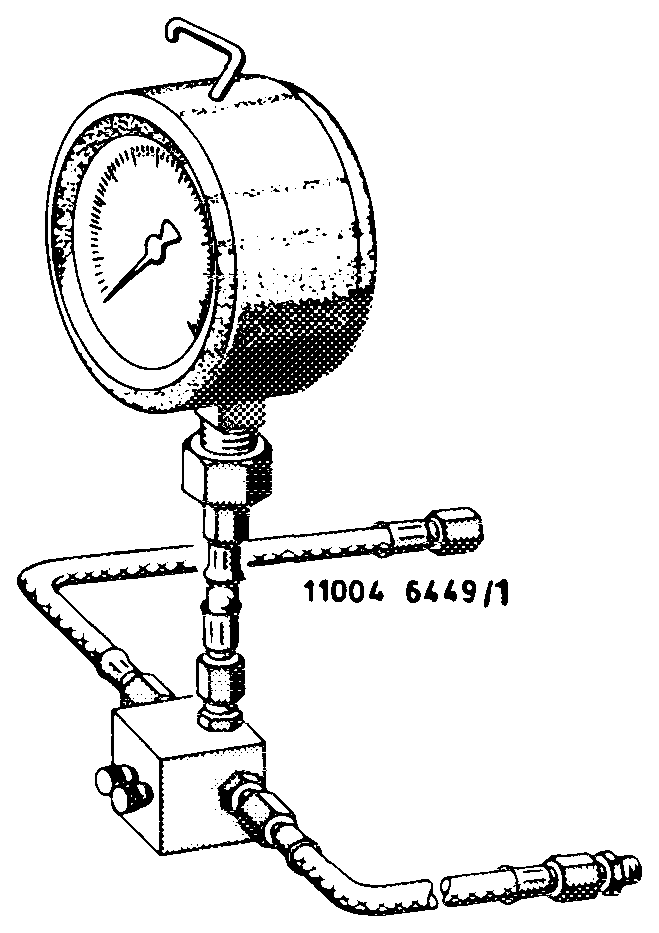
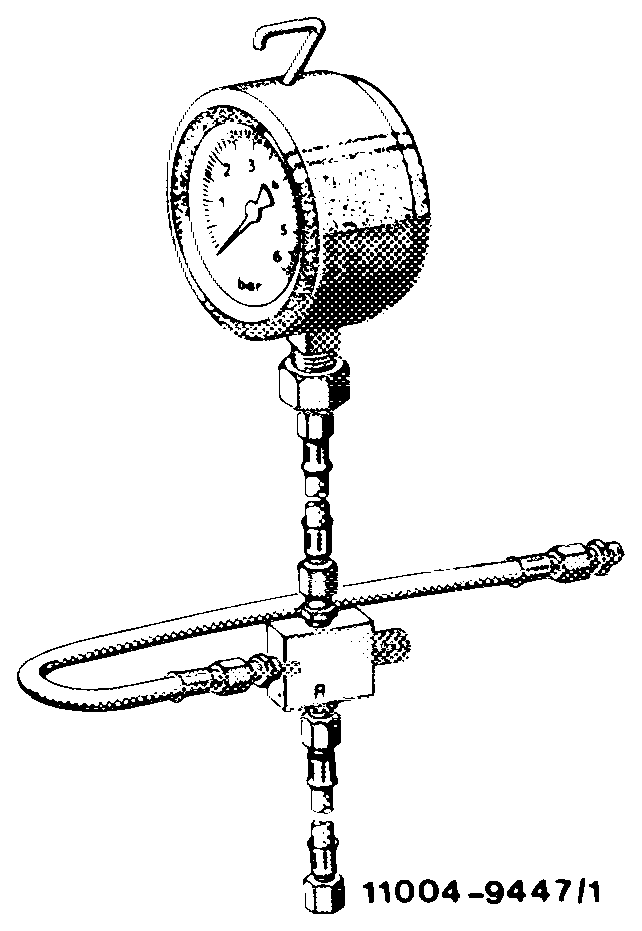
To relieve sealing rings, keep valve screw or valve screws always opened. Connections of three-way valve are numbered.
Pressure measuring device 1st version Connection 1 Hose line on fuel distributor wonon Connection 2 Hose line on pressure gauge Connection 3 Hose line on released control pressure line
Pressure measuring device 2nd version Connection A = Hose line on fuel distributor Connection B = _ Hose line on released control pressure line
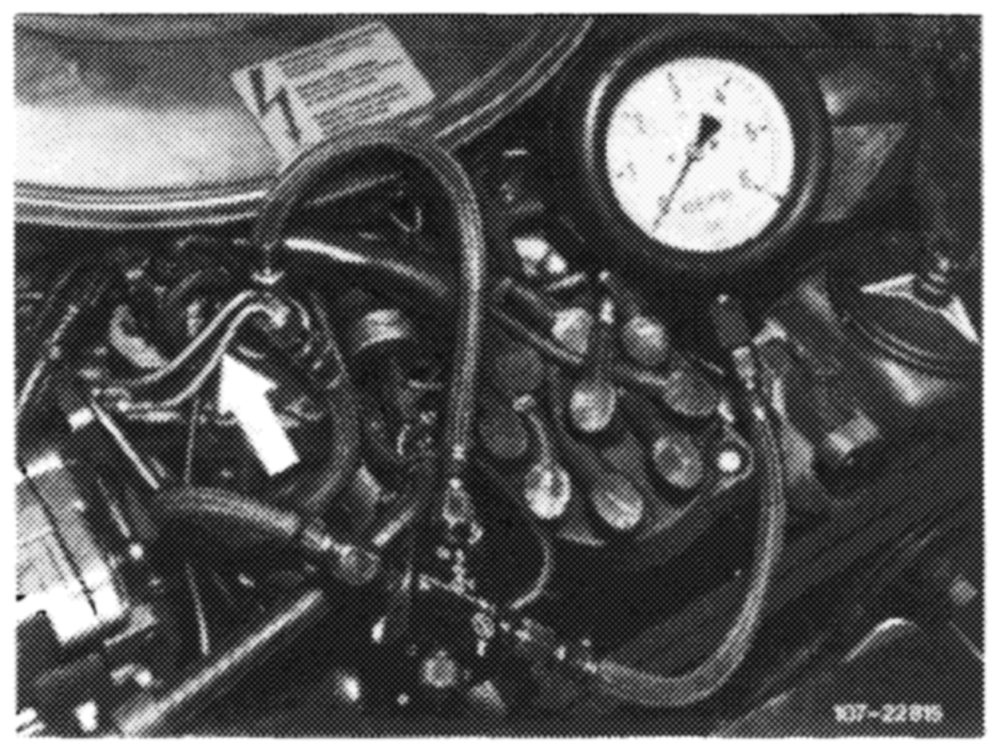
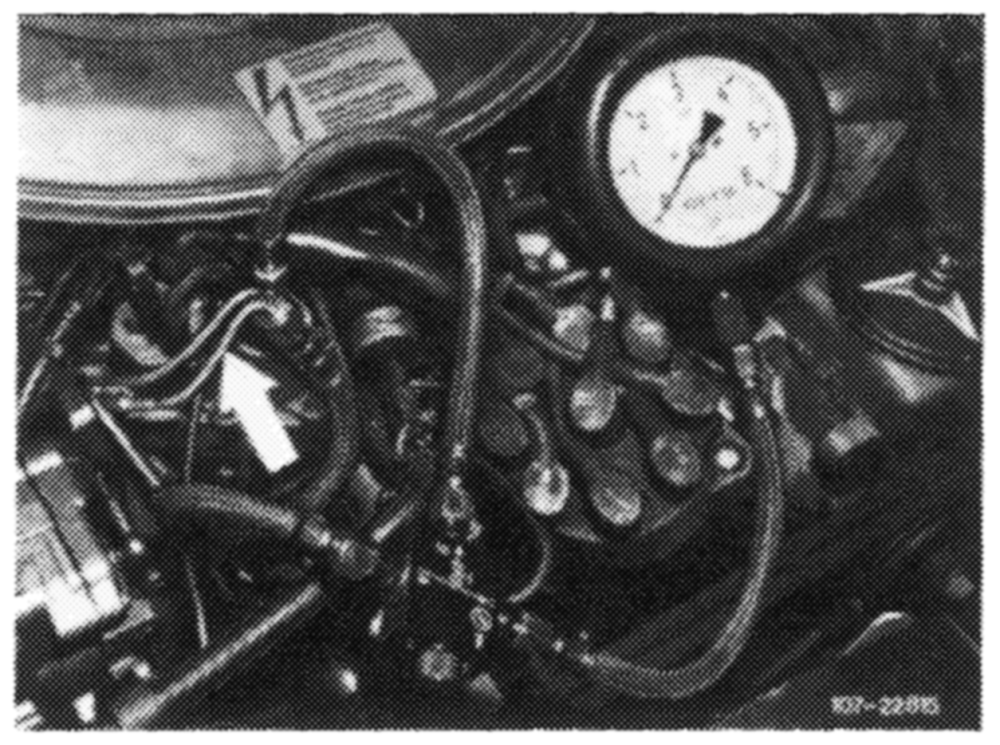
a) Connect pressure measuring device to warm-up compensator (air cleaner mounted).
Unscrew control pressure line (arrow) from warm-up compensator, while catching fuel with a rag.
Connect hose line with double-thread connection from connection ‘‘1 or A’’ to control pressure line. Screw connecting line from connection “3 or B“ to warmup compensator.
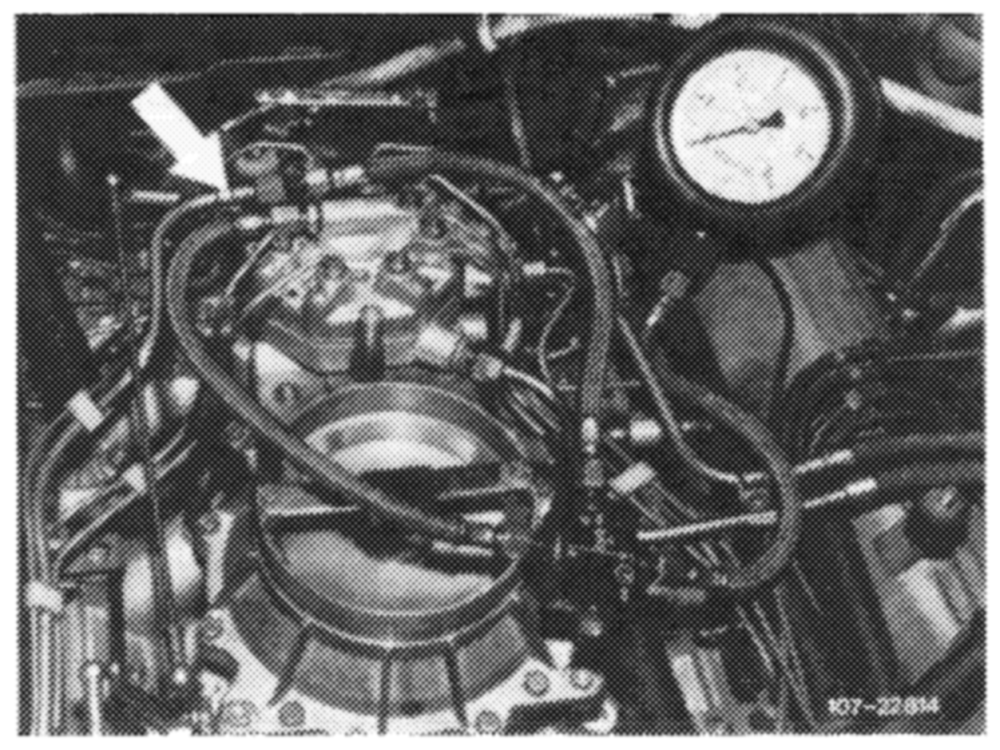
b) Connect pressure measuring device to fuel distributor (air cleaner removed).
Unscrew control pressure line (arrow) from fuel distributor, while catching fuel with a rag.
Connect hose line from connection “1 or A’’ to fuel distributor and connect hose line from connection “3 or B’’ to control pressure line (arrow).
Checking control pressure at idle with engine cold
1 Open valve screw or valve screws on pressure measuring device.
2 Runengine at idle and immediately read control pressure.
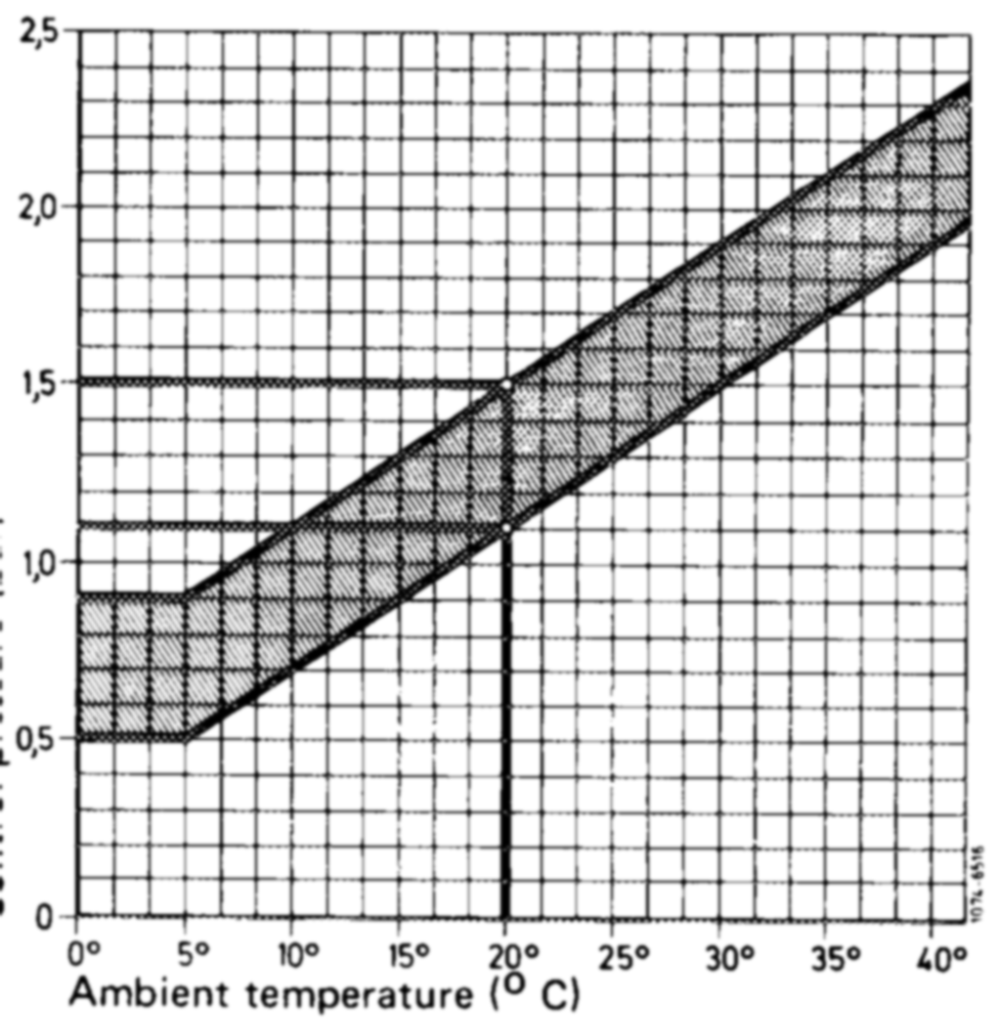
The nominal pressure is taken from control pressure diagram in accordance with ambient temperature. lf the nominal value is not attained, recondition system pressure regulator (07.3–210) or check input screen in warm-up compensator. Renew warm-up compensator, if required.
Example engine 117:
Warm-up compensator with Bosch end No. 010 Ambient temperature + 20 °C = 1.1–1.5 bar gauge (bar) Control pressure pressure. Breakaway time at + 20 °C 3–6 minutes.
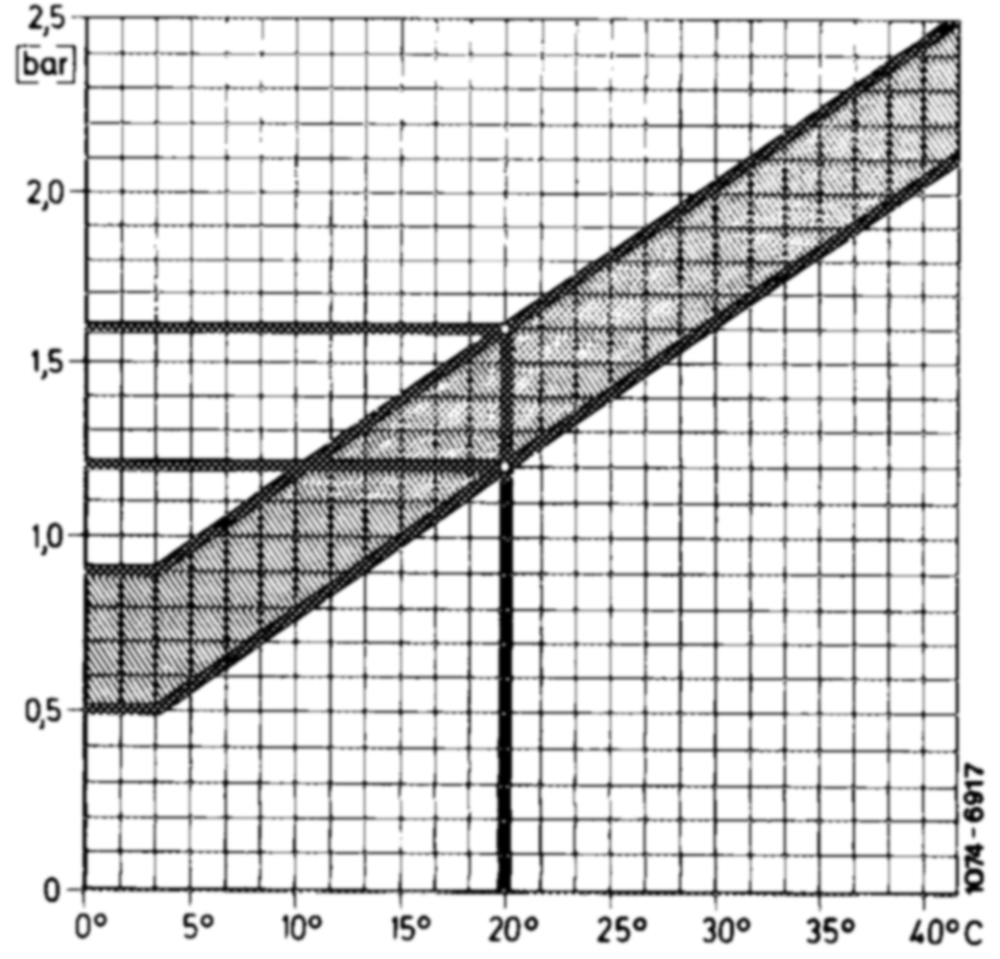
Note: Check breakaway time of warm-up compensator. All additional electrical consumers switched off and a minimum voltage of 12 volts. Read initial control pressure at + 20 °C. Breakaway time should be at 3.4 bar gauge pressure within tolerance.
Example engine 116, 117:
Warm-up compensator with Bosch end No. 028 and 056 Ambient temperature + 20 °C = 1.2–1.6 bar gauge pressure.
Breakaway time at + 20 °C: Warm-up compensator with Bosch end No. 028 = 3–6 minutes. Warm-up compensator with Bosch end No. 056 = 2–4 minutes.
Checking system pressure at idle with engine cold
or at operating temperature
3 Close valve screw on pressure measuring device. On pressure measuring device with 2 valve screws, close valve screw on connection 3.
4 The system pressure should be 5.0—5.6 bar gauge pressure.
5 If the system pressure of 5.0—5.6 bar gauge pressure is not attained, check up as follows:
a) Check delivery of fuel pump (07.3–130).
b) Recondition system pressure governor (07.3–210).
c) Check fuel return line for unobstructed passage.
6 Open valve screw again.
Checking control pressure at idle with engine at
operating temperature
7 Open both valve screws or valve screw at pressure measuring device.
8 Control pressure should rise to 3.4—3.8 bar gauge pressure (warm-up compensator cycle completed).
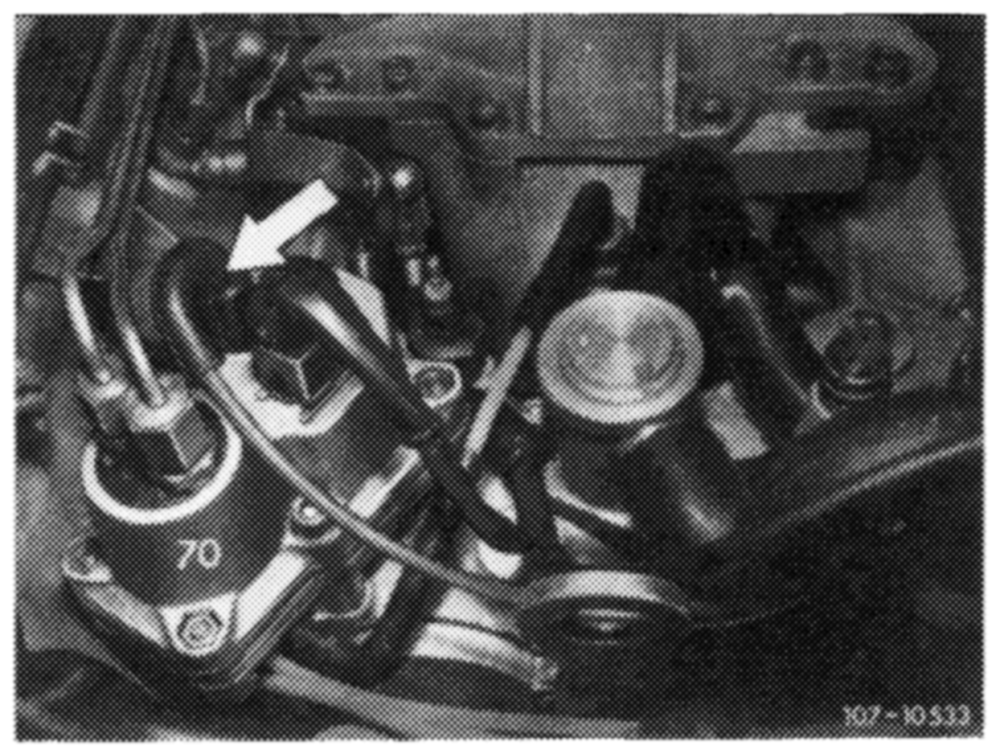
If the control pressure of 3.4–3.8 bar gauge pressure is not attained, check up as follows:
a) Check intake pipe vacuum. For this purpose, pull vaccum hose from warm-up compensator and fit a T-piece for pressure gauge.
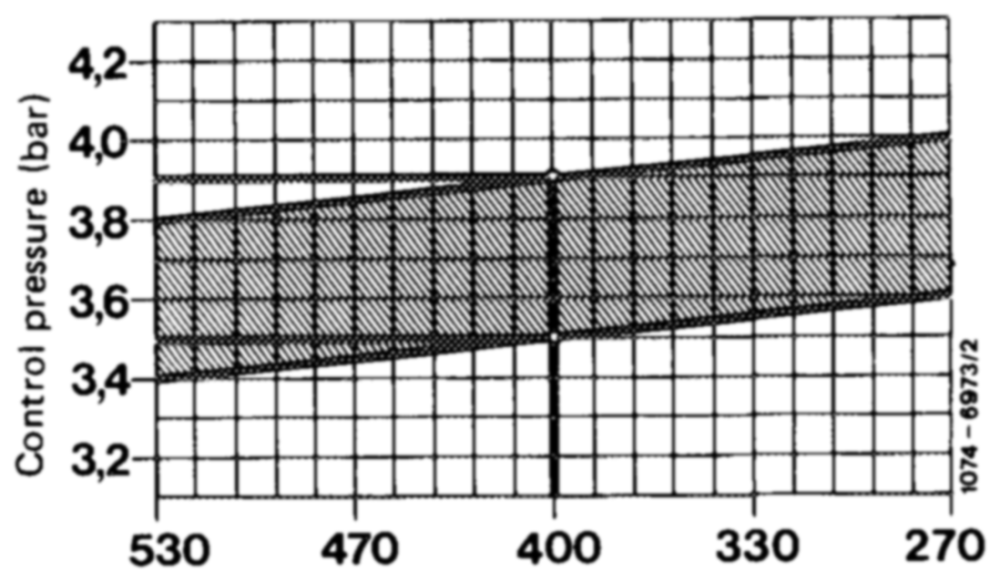
Read intake pipe vacuum and transfer to vacuum diagram.
Example:
Intake pipe vacuum 400 mbar = 3.5–3.9 bar gauge pressure.
Intake pipe vacuum (mbar)
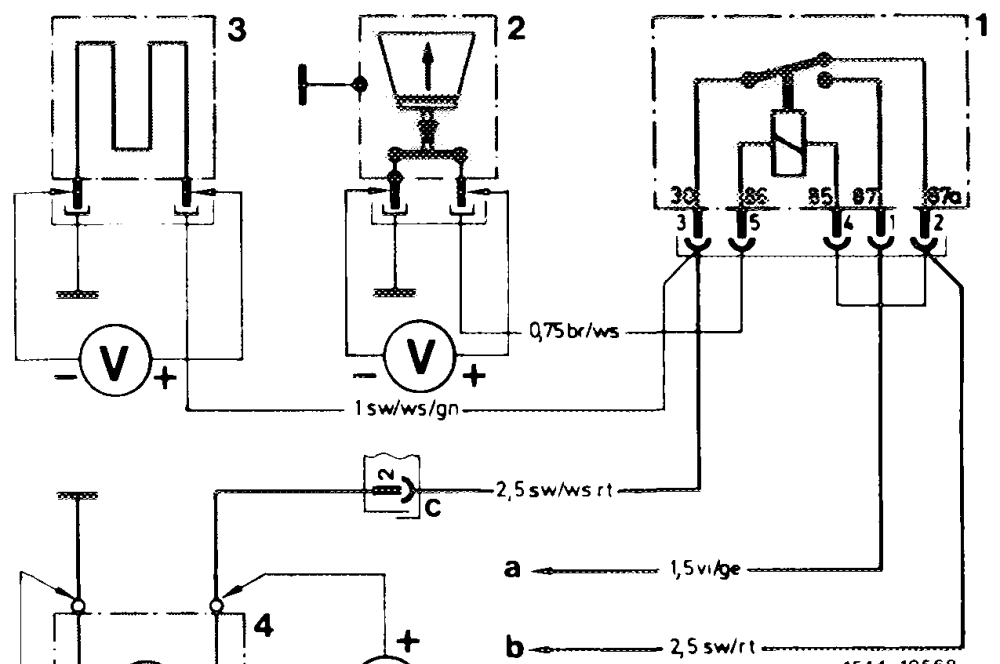
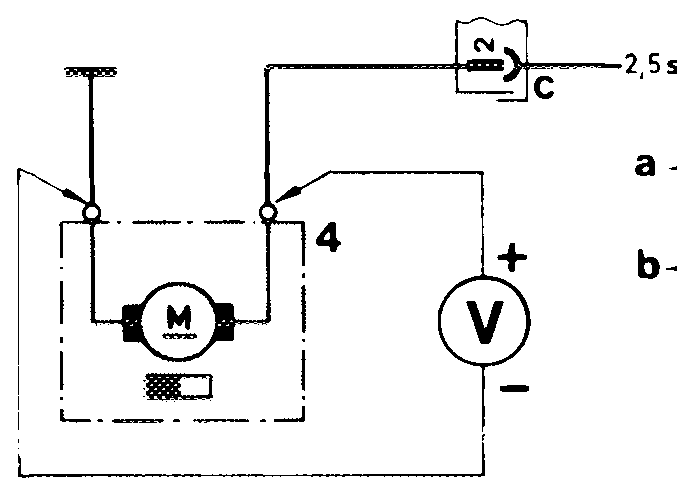
b) Check voltage on warm-up compensator with engine running. Pull electrical connection from warm-up compensator and check voltage. Minimum voltage 12 volts (without electrical consumers).
c) Check heater coil with an ohmmeter. If interrupted, renew warm-up compensator.
Fuel pump relay 9702 BWN Safety switch air flow sensor plate Warm-up compensator Fuel pump Terminal 50 (starting) Terminal 15/54 (ignition) Plug connection 14-point Tail lamp harness
d) If control pressure is above 3.8 bar gauge pressure, recondition system pressure regulator (07.3–210).
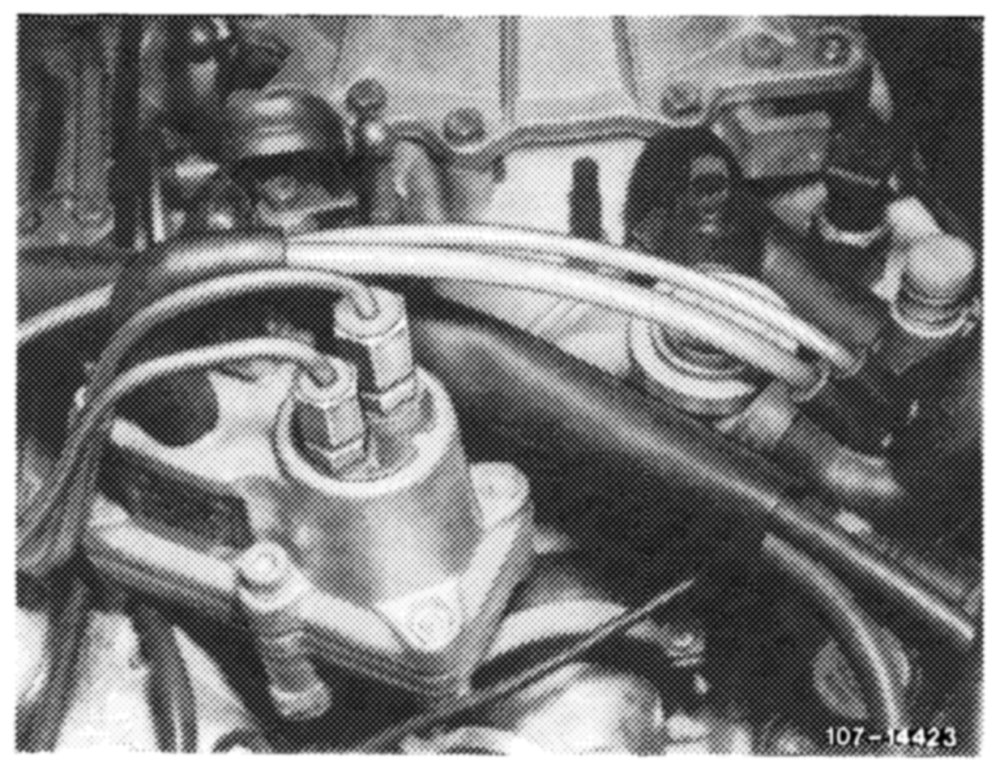
9 Check full load enrichment. For this purpose, pull vacuum hose from warm-up compensator, control pressure should then drop to 2.8-—-3.2 bar gauge pressure.
If the control pressure of 2.8–3.2 bar gauge pressure is not attained, replace warm-up compensator.
Checking fuel distributor and fuel pump for leaks
10 Shut off engine. The control pressure will drop below opening pressure of injection valves (approx. 2.8 bar gauge pressure).
11 If the control pressure drops immediately to 0 bar gauge pressure, renew check valve on fuel pump or subsequently install.
12 If the pressure drops slowly, unscrew fuel return line on fuel distributor. With a leak on control piston or pressure compensation valve, fuel will emerge. If there is more than 1 drop in 5 seconds, recondition system pressure regulator or pressure compensating valve (07.3210).
Note: There may also be a leak on fuel reservoir or cold starting valve.
To check for leaks on fuel reservoir, pinch the leak line between the fuel reservoir and the intake damper. Then loosen leak line on intake damper and pull off. Loosen clamp, a pressureless amount of leaking fuel is allowed. Renew fuel reservoir, if required (07.3–270).
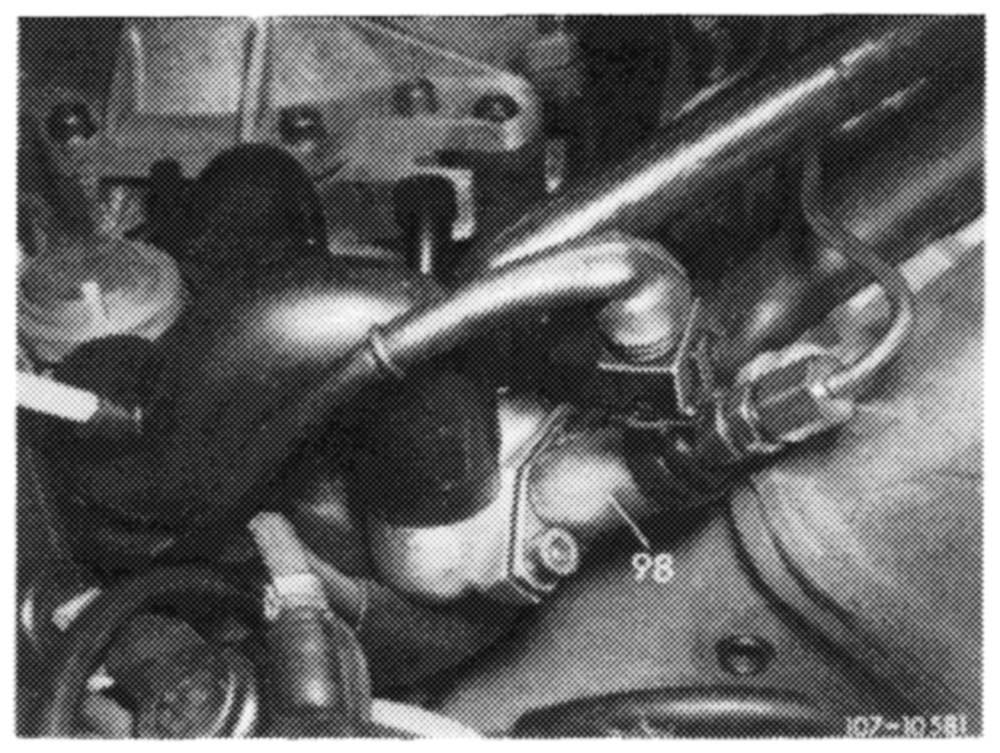
Remove cold starting valve (98) for leak test (07.3-125 section ‘Checking for leaks“).
13 Disconnect pressure measuring device, while catching fuel with a rag.
14 Connect fuel lines, run engine once again and check all fuel connections for leaks.
B. National version @s) G2 G) GD
Fuel pressures in bar gauge pressure engine 117

starting 1977 Information plate: color code silver CG) starting 1976 Information plate: in Japanese language Cs) starting 1976 tnformation plate: color code blue
015 starting 1976 5.0–5.6 3.4–3.8 3.0—-3.4 _
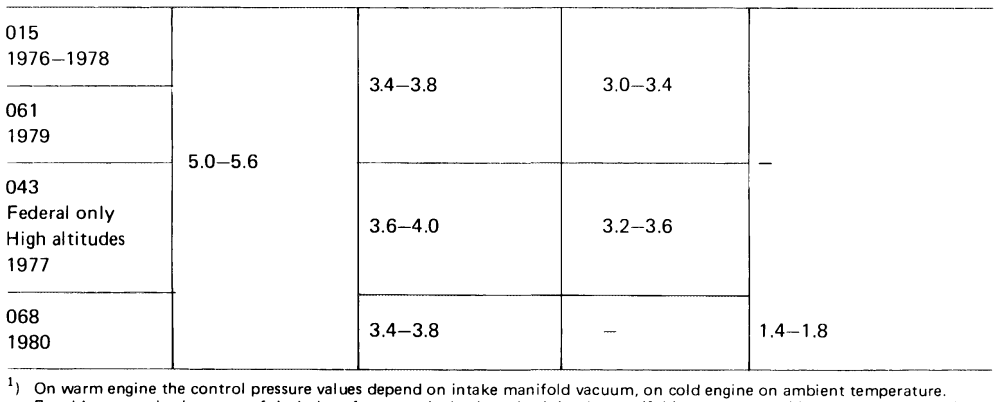
Information plate: color code black Federal 1976–1980 green California 1976 yellow California 1977–1979 red Federal high altitudes 1977
For this reason, in the event of deviations from nominal value, check intake manifold vacuum or ambient temperature and transfer to respective diagrams. Transfer control pressure at idle on cold engine according to ambient temperature on diagram.
Special tools
Pressure measuring device – 102 589 00 21 00
Clamp for hose lines – 000 589 40 37 00
Conventional tools
Voltmeter, ohmmeter
Screwdriver element 992—T 30 e.g. Hazet, D—5630 Remscheid
Vacuum pump e.g. Mityvac
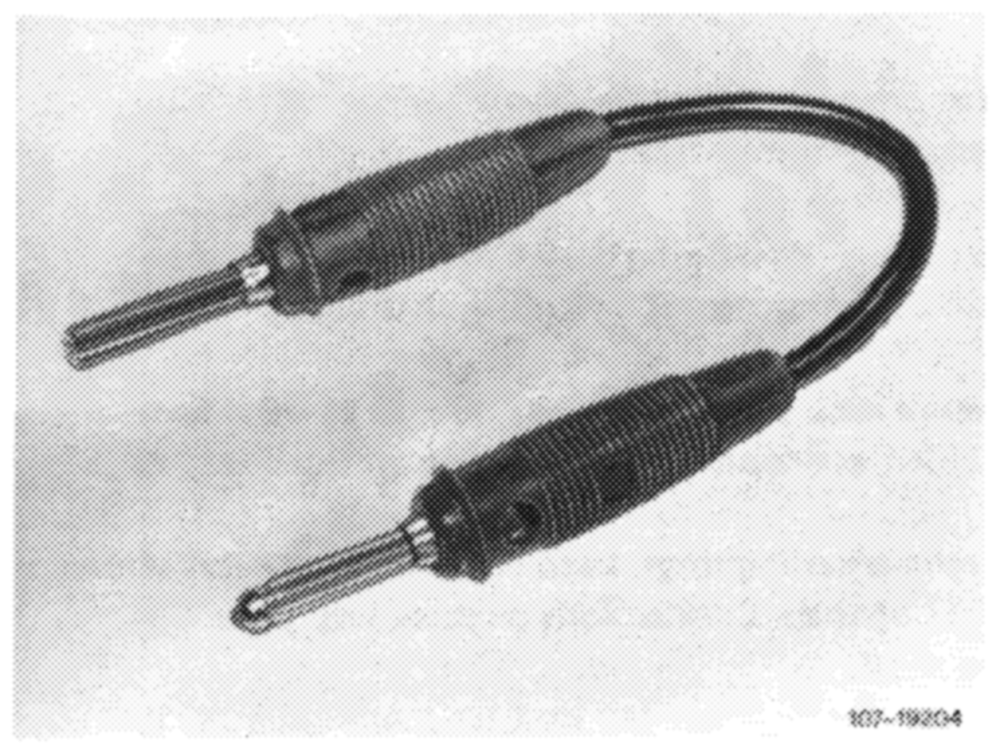
Self-made tool
Contact bridge
Note Perform leak test only in the event of complaints about hot starting.
After stopping engine, the fuel pressure should amount to 2.5 bar gauge pressure after 30 minutes.
07.3.1 la~120/9 F2
Visual checkup
1 Remove air cleaner.
2 Check all fuel connections on fuel distributor for leaks.
3 Check adjusting lever (1) in air flow sensor and control piston (2) in fuel distributor for easy operation. For this purpose, pull plug from safety switch (3). Switch on ignition for a short moment to establish control pressure. Push flow rate sensor plate (4) manually downwards. A uniform resistance should be felt along entire path. When moving up fast, no resistance should be felt, since the slowly following control piston lifts off from adjusting lever. During the slow upward movement, the control piston should smoothly follow.
4 Check control piston in fuel distributor visually for leaks.
Push flow rate sensor plate for a short moment completely down and hold in this position, no fuel should show up in air guide housing.
If fuel emerges, renew fuel distributor (07.3–205).
Connecting pressure measuring device
Leave pressure measuring device connected for all pressure measurements.
The pressure measuring device can be connected to warm-up compensator or to fuel distributor.
Pressure measuring device 102 589 00 21 00 is now provided with only one valve screw on three-way valve.
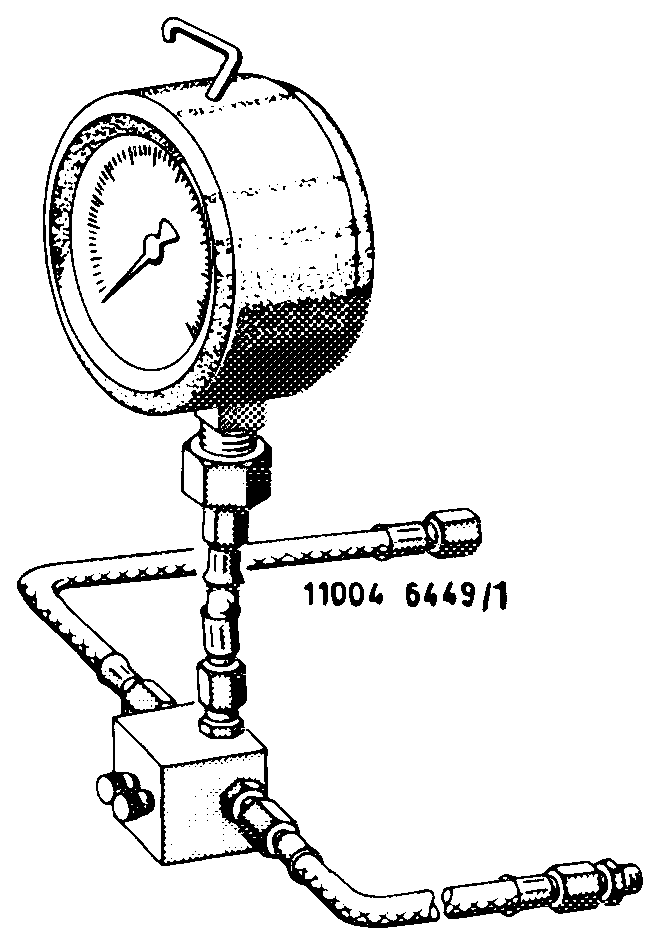
To relieve sealing rings, keep valve screw or valve screws always opened. Connections of three-way valve are numbered.
Pressure measuring device 1st version Connection 1 = Hose line on fuel distributor Connection 2 Hose line on pressure gauge Connection 3 Hose line on released control pressure line uo
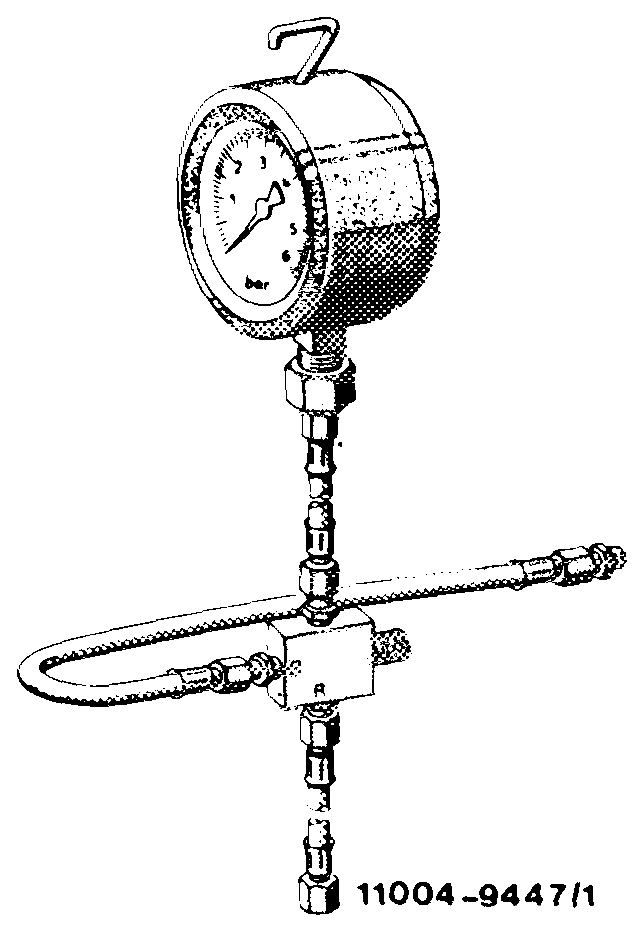
Pressure measuring device 2nd version Connection A Hose line on fuel distributor How Connection B Hose line on released control pressure line
a) Connect pressure measuring device to warm-up compensator (air cleaner mounted).
Unscrew control pressure line (arrow) on warm-up compensator, while catching fuel with a rag.
Connect hose line with double-thread connection of connection ‘‘1 or A‘ to control pressure line. Screw connecting line of connection “3 or B“ to warm-up compensator.
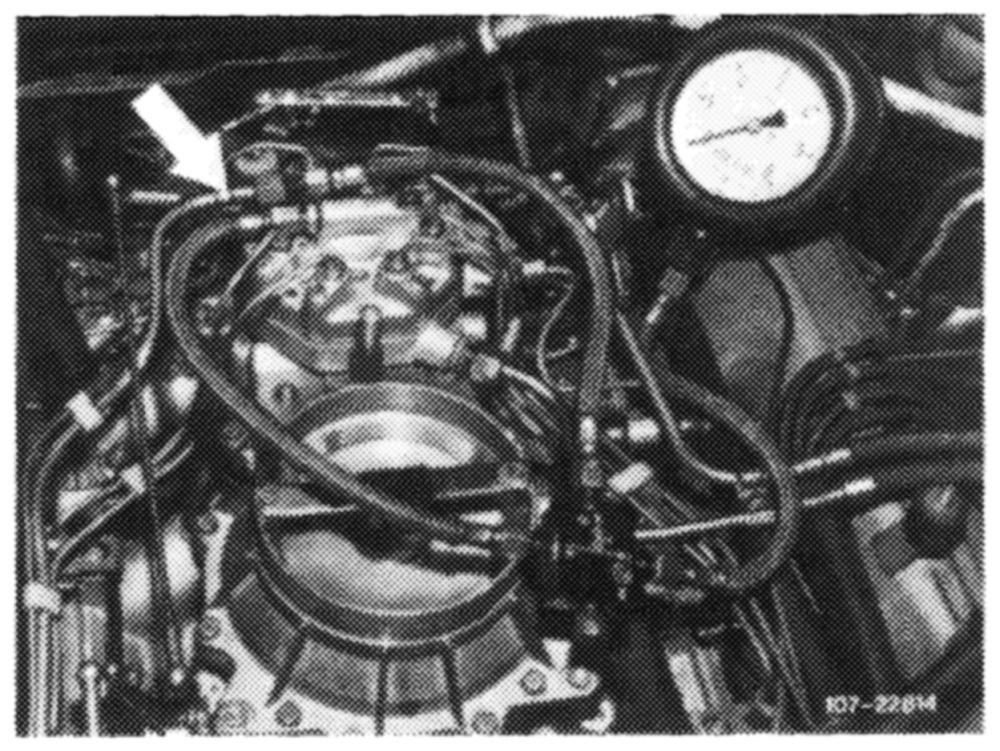
b) Connect pressure measuring device to fuel distributor (air cleaner removed).
Unscrew control pressure line (arrow) on fuel distributor, while catching fuel with a rag.
Connect hose line of connection “1 or A’’ to fuel distributor and connect hose line of connection ‘’3 or B’’ to control pressure line (arrow).
Checking control pressure at idle on cold engine
1 Open valve screws or valve screw on pressure measuring device.
2 Runengine at idle and immediately read control pressure.
Take nominal pressure according to ambient temperature from control pressure diagram. If the nominal value is not attained, recondition system pressure regulator (07.3–210), or check input screen in warm-up compensator. Renew warm-up compensator, if required.
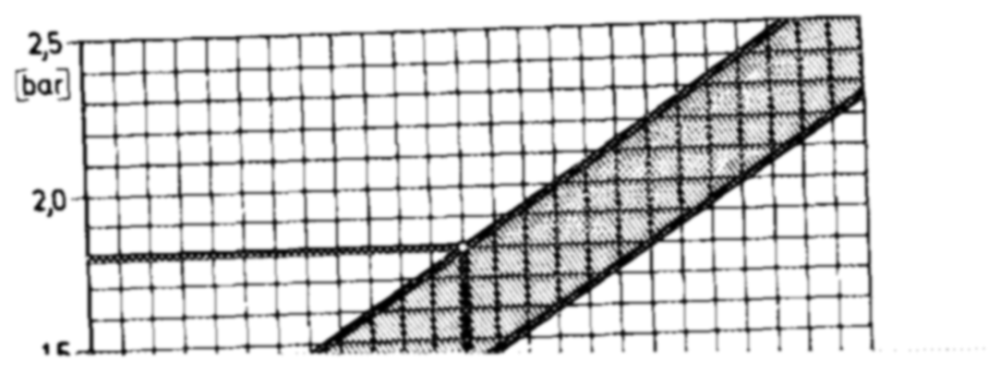
@G® 1976-1980 @sH 1976-1978
Warm-up compensator Bosch end No. 015.
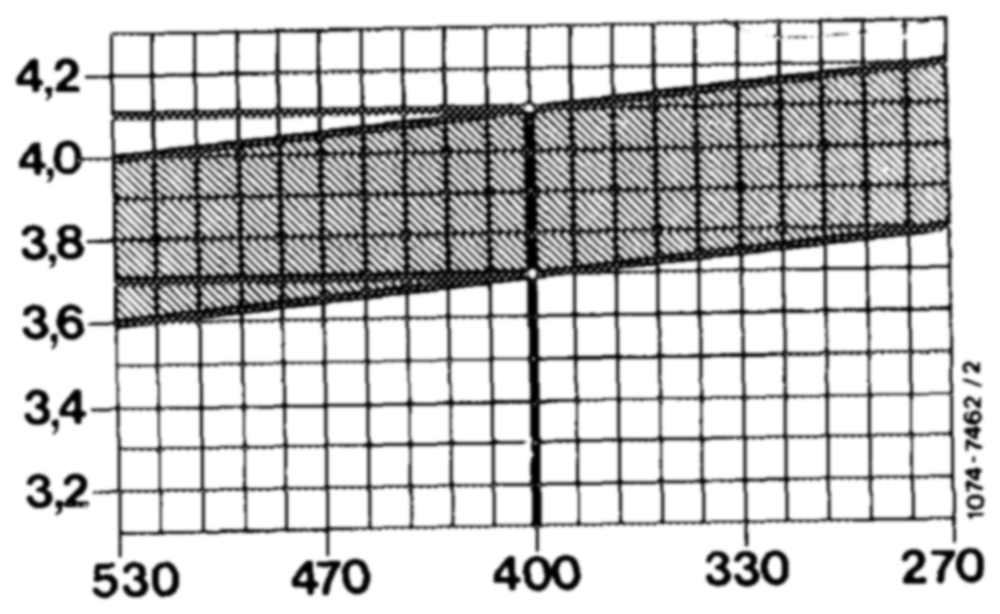
@sd) Federal higher altitudes 1977
Example:
(bar) control pressure Intake pipe vacuum 400 mbar = control pressure 3.7–4.1 bar gauge pressure
intake pipe vacuum (mbar)
b) Check voltage on warm-up compensator with engine running. Pull electrical connection from warm-up compensator and check for voltage. Minimum voltage 12 Volts (without consumers).
c) Check haeter winding with an ohmmeter.
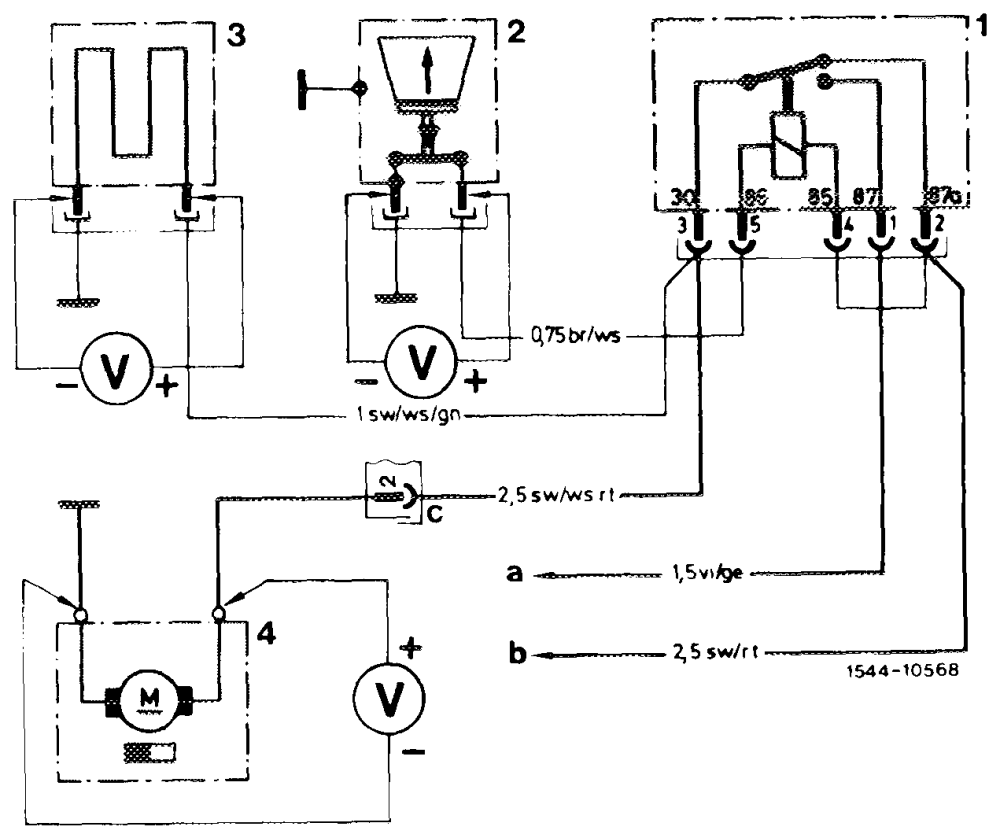
If interrupted, replace warm-up governor.
Fuel pump relay o7T% bwWnN= Safety switch air flow sensor plate Warm-up compensator Fuel pump Terminal 50 (starting) Terminal 15/54 (ignition) Plug connection 14-point Tail lamp harness
d) If contro! pressure is above nominal value, recondition system pressure regulator (07.3–210).
9 Check full load enrichment. For this purpose, pull vacuum hose from warm-up compensator, control pressure should drop to specified value.
If the control pressure is not attained, replace warm-
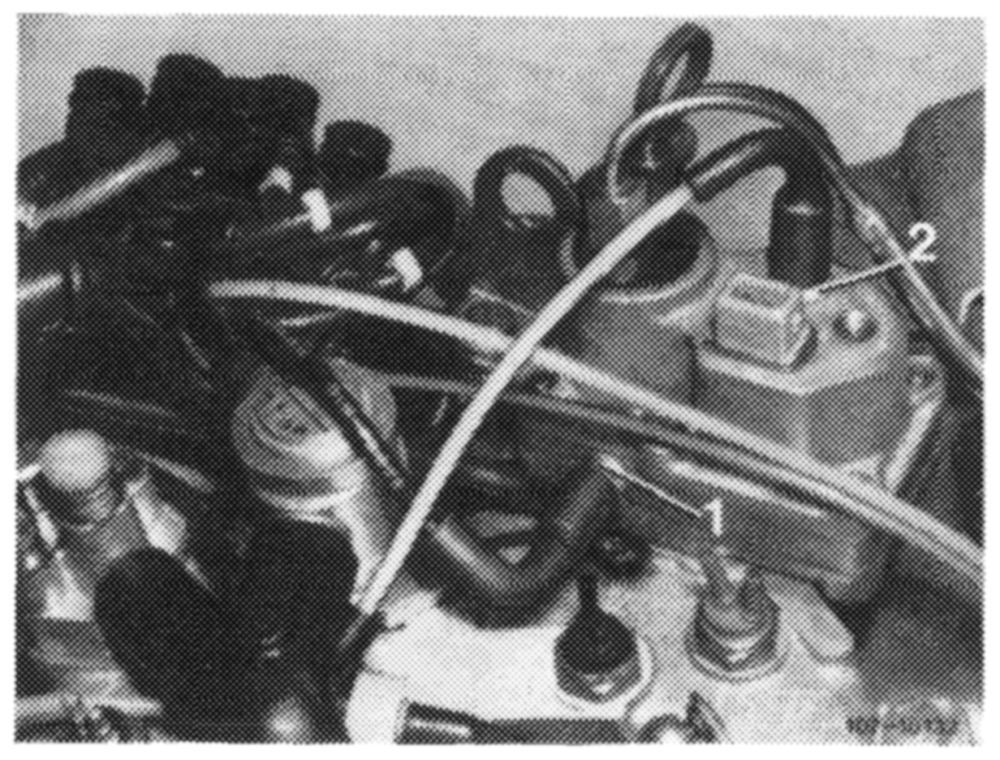
Gs 1979
Connection (1) for full load enrichment has been placed on intermediate plate. Connection (2) is for venting. For this reason, pull vacuum hose from connection (1) for checking full load enrichment.
If full load enrichment is not attained, renew warmup compensator.
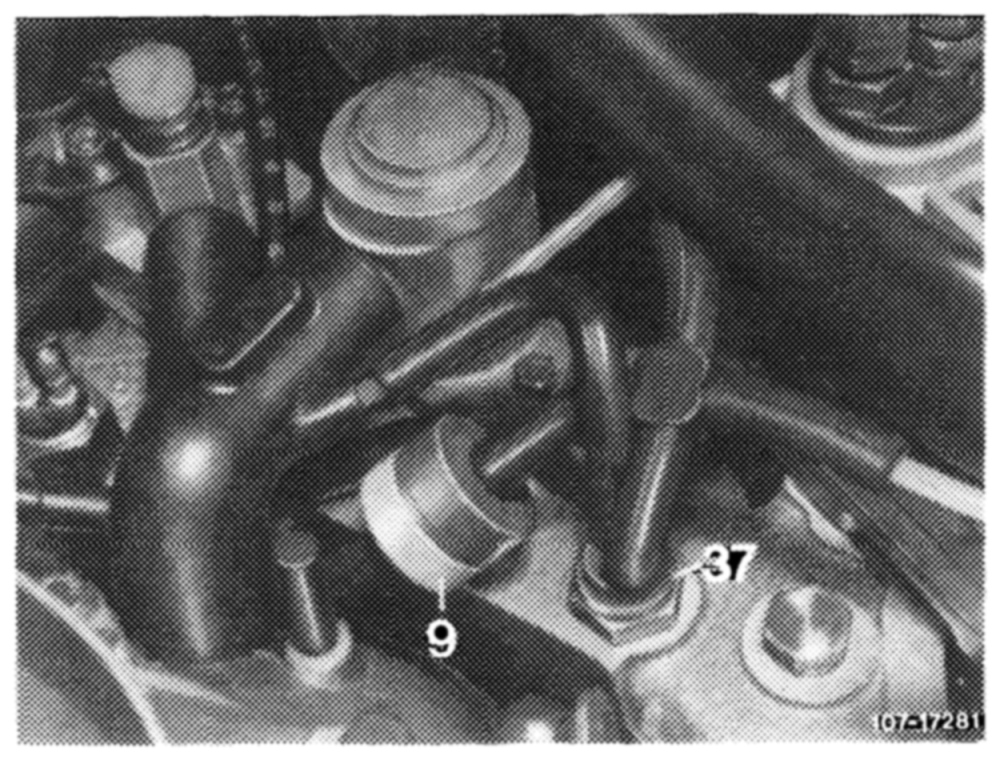
1980
Checking acceleratiop enrichment
10 Check thermovalve 50 °C (37) for passage. For this purpose, pull off vacuum hose (arrow), thermovalve is closed below approx. 50 °C, passage must be available above approx. 50 °C coolant temperature. If not, renew thermovalve (37).
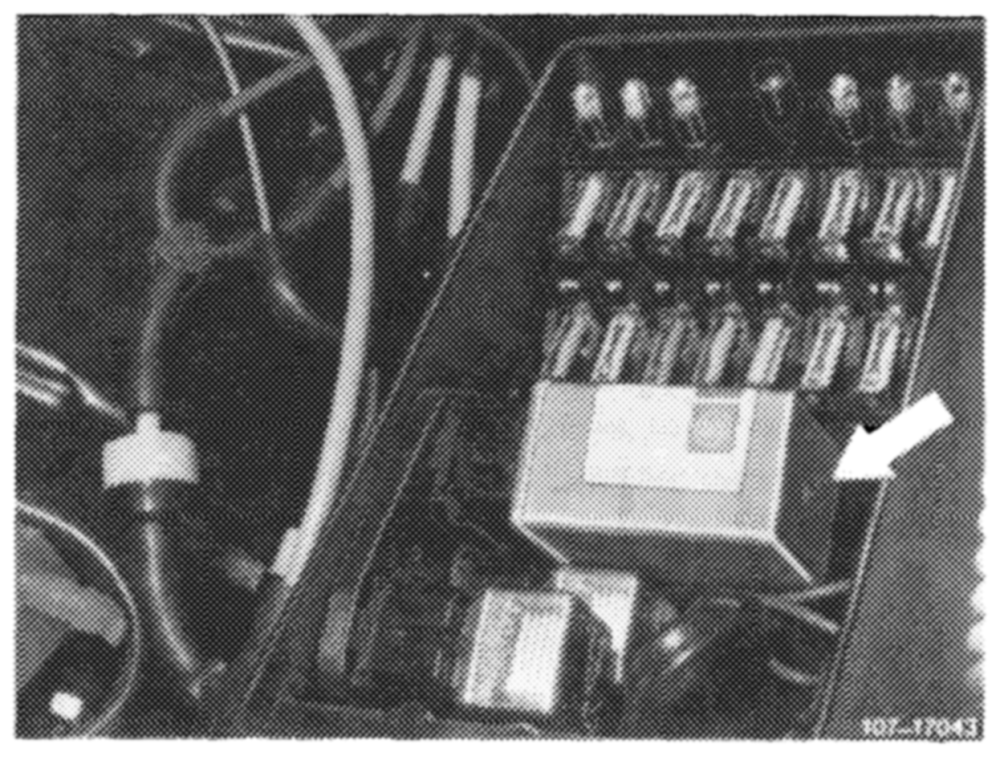
11. Runengine until warm-up compensator is stabilized (3.4–3.8 bar gauge pressure).
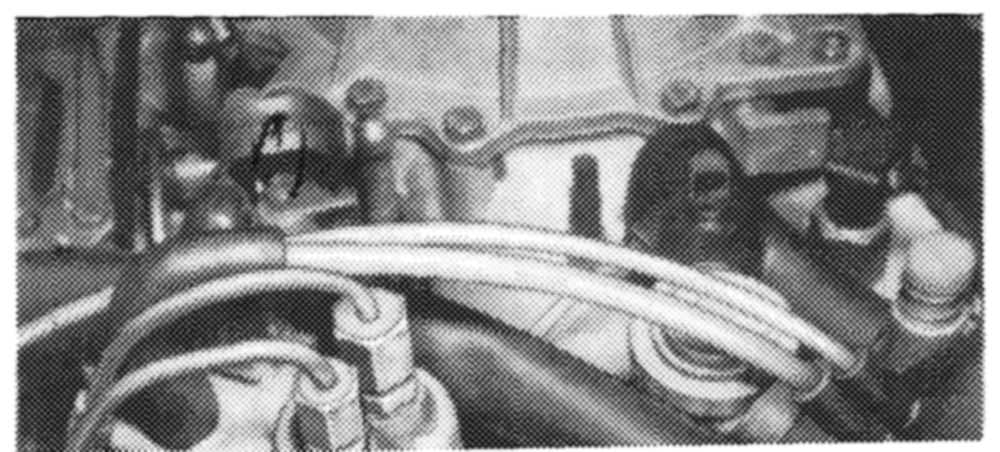
12 Stop engine, pull off fuel pump relay (arrow).
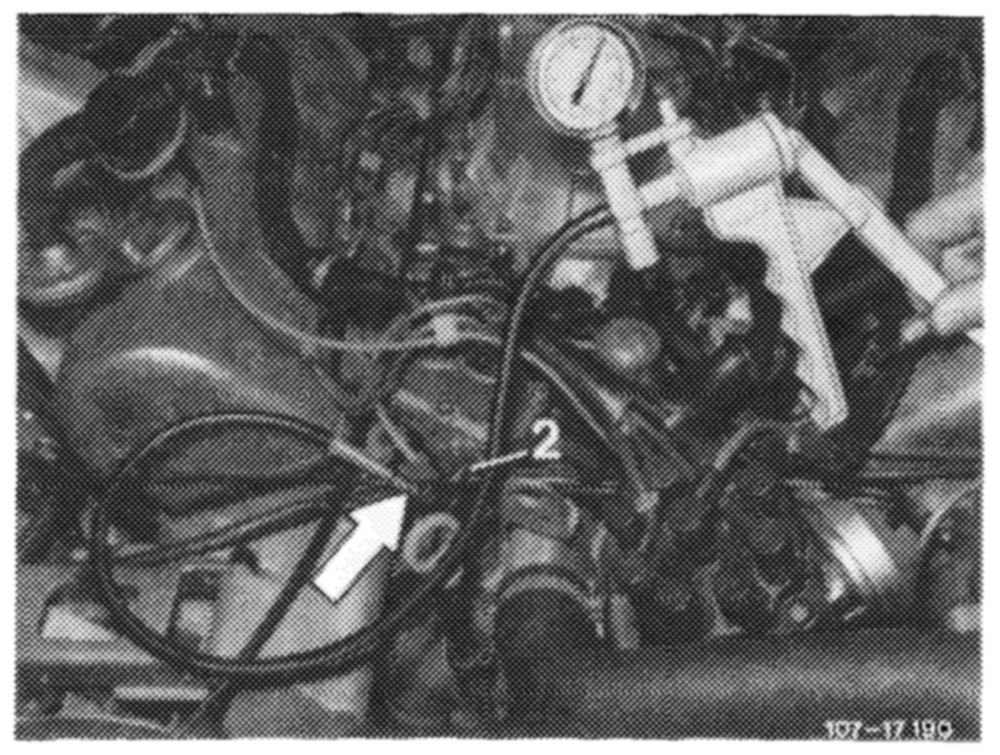
13 Pull vacuum line of vacuum chamber from warmup compensator (2).
14 Plug vacuum pump on contour hose (arrow) and energize warm-up compensator with 0.5 bar vacuum.
07.3.1 la~120/15 F2
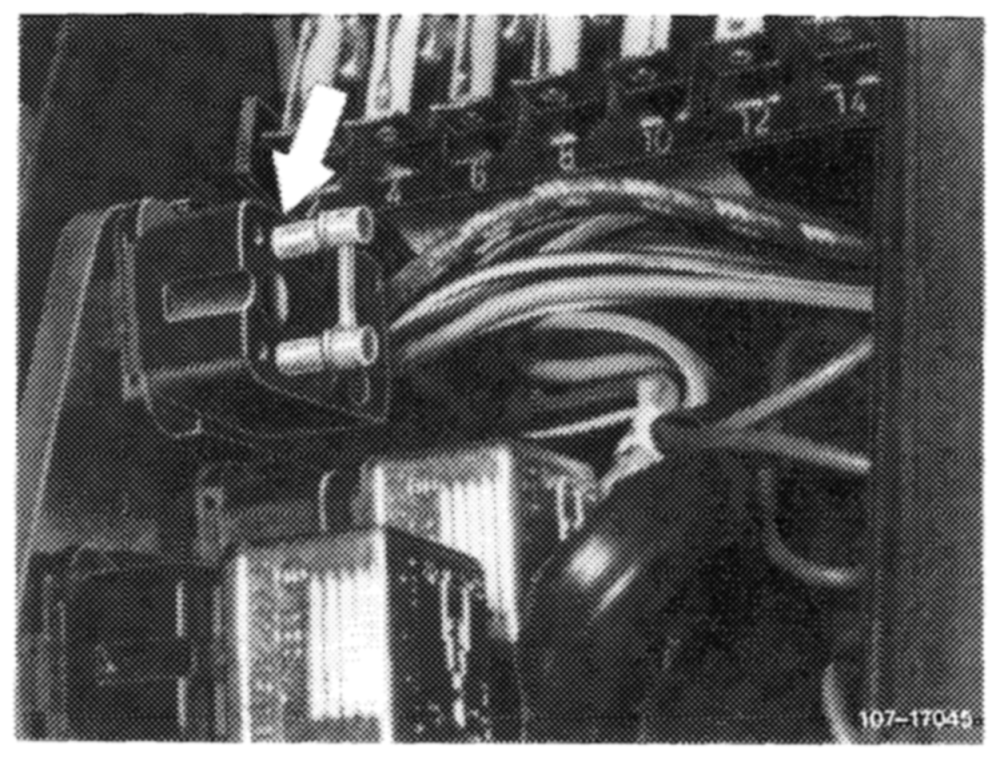
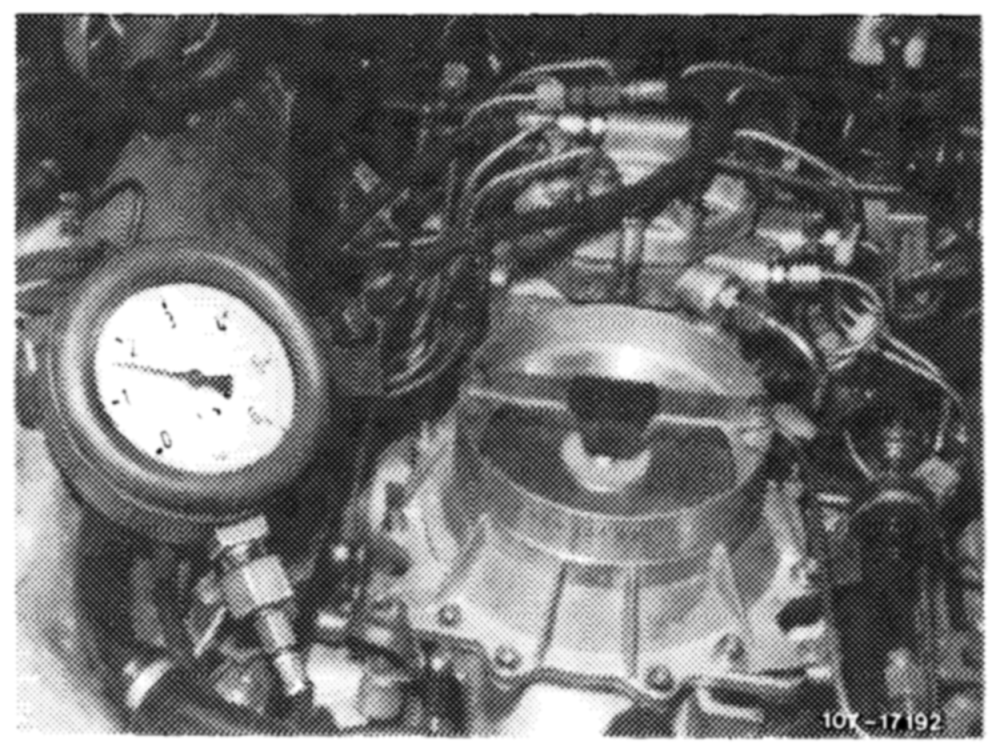
16 Control pressure should then amount to 1.4— 1.8 bar gauge pressure. If control pressure deviates from nominal value. renew warm-up compensator.
Checking fuel distributor and fuel pump for leaks
17 Stop engine. Control pressure will then drop below opening pressure of injection valves (approx. 2.8 bar gauge pressure).
18 If the control pressure drops immediately to O bar gauge pressure, renew check valve on fuel pump or subsequently install.
19 If the pressure drops slowly, unscrew fuel return line on fuel distributor. Fuel will emerge with a leak on control piston or pressure compensating valve. If there is more than 1 drop in 5 seconds, recondition system pressure regulator or pressure compensating valve (07.3—2 10).
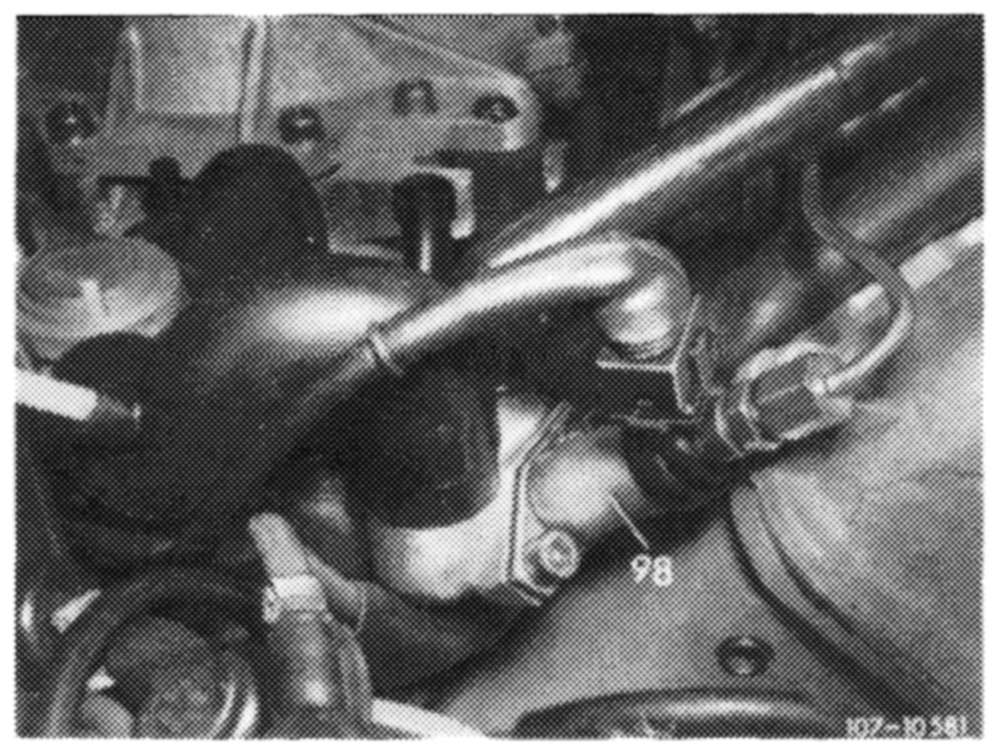
Note: Another leak may be located on fuel reservoir or cold starting valve.
To check fuel reservoir for leaks, pinch leak line between fuel reservoir and intake damper. Then loosen leak line on intake damper and pull off. Loosen clamp, a pressureless quantity of leaking fuel is allowed. Renew fuel reservoir, if required (07.3–270).
Remove cold starting valve (98) for leak test (07.3—-125 section ‘Checking for leaks’).
20 Disconnect pressure measuring device, while catching fuel with a rag.
21. Connect fuel lines, run engine once again and check all fuel connections for leaks.