Adjusting throttle linkage
WIS 30-300
A. Model 123.193 standard version
1st version
Length of regulating rods in mm
Free travel rod (13) in pulled out condition 154
| Connecting rod (14) | 140 |
| Pushrod (41) | 190 |
| Pushrod (5) | 200 |
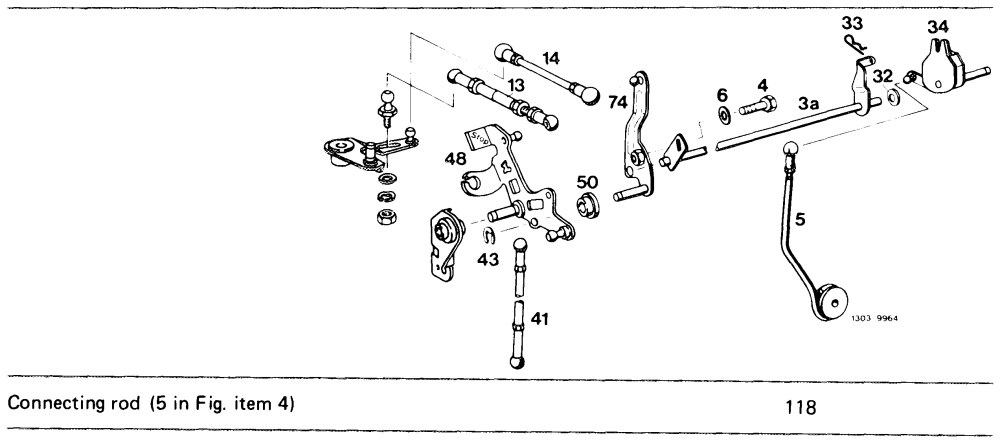
Auxiliary tool (spare part)
Adjusting sleeve (5 in Fig. item 5) 180 072 03 93 so0e-9998,
1 Check throttle linkage for easy operation and bends. Replace damaged parts, if any.
2 Disconnect a!l regulating rods.
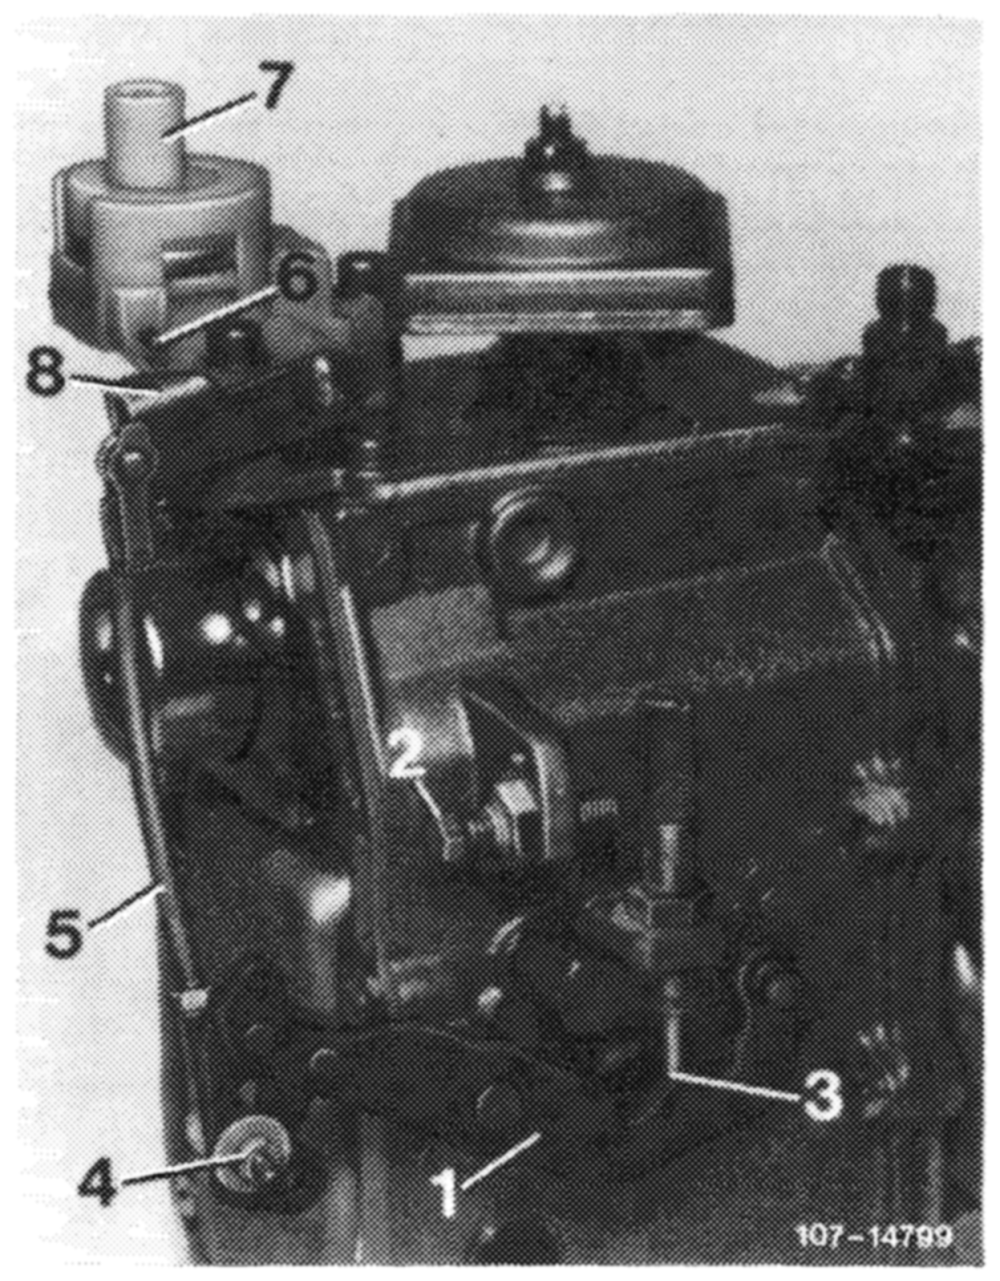
3 Check whether regulating lever (1) of injection pump rests against idle speed stop (3).
4 Check whether connecting rod (5) is correctly set. For this purpose, push regulating lever (1) against full load stop (2). Actuating lever (8) should have a max. play of 0.5 mm up to full load stop (6). If required, adjust connecting rod (5) by means of adjustable ball head (4). Connecting rod (5) should be set to 122 mm, measured from center of bal! socket to center of linkage.
Regulating lever OrIOORWN— Full load stop Idle speed stop Adjustable ball head Connecting rod Full load stop on vacuum control valve Vacuum control valve Actuating lever for vacuum contro} valve
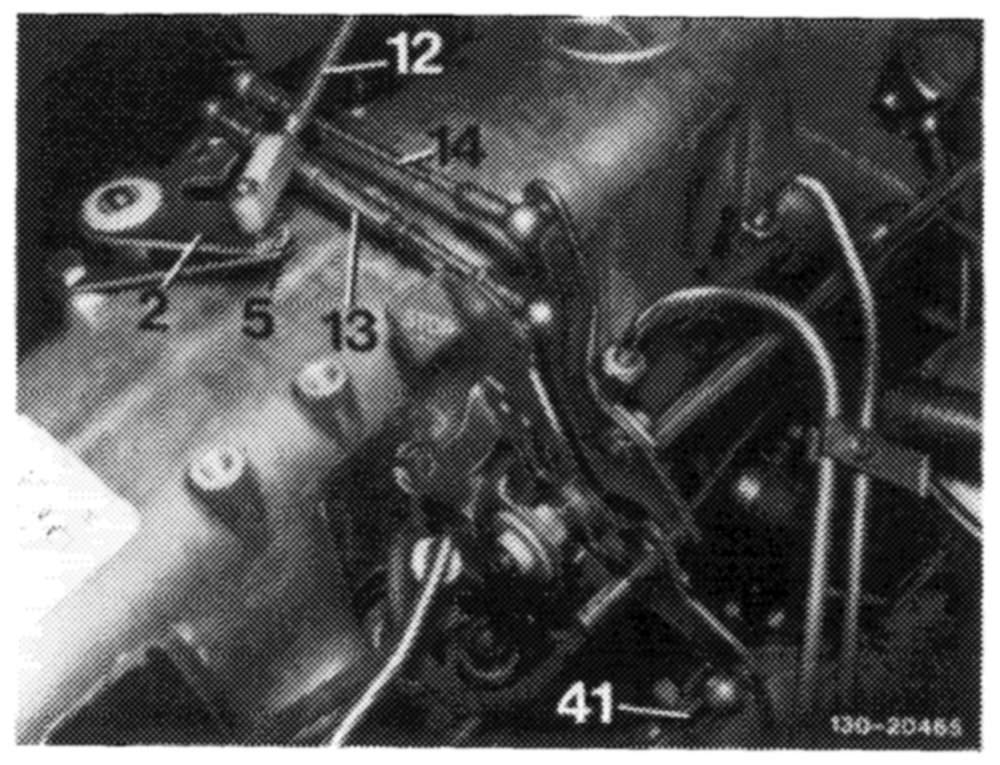
5 Plug-on adjusting sleeve (5). Guide lever should rest against sleeve.
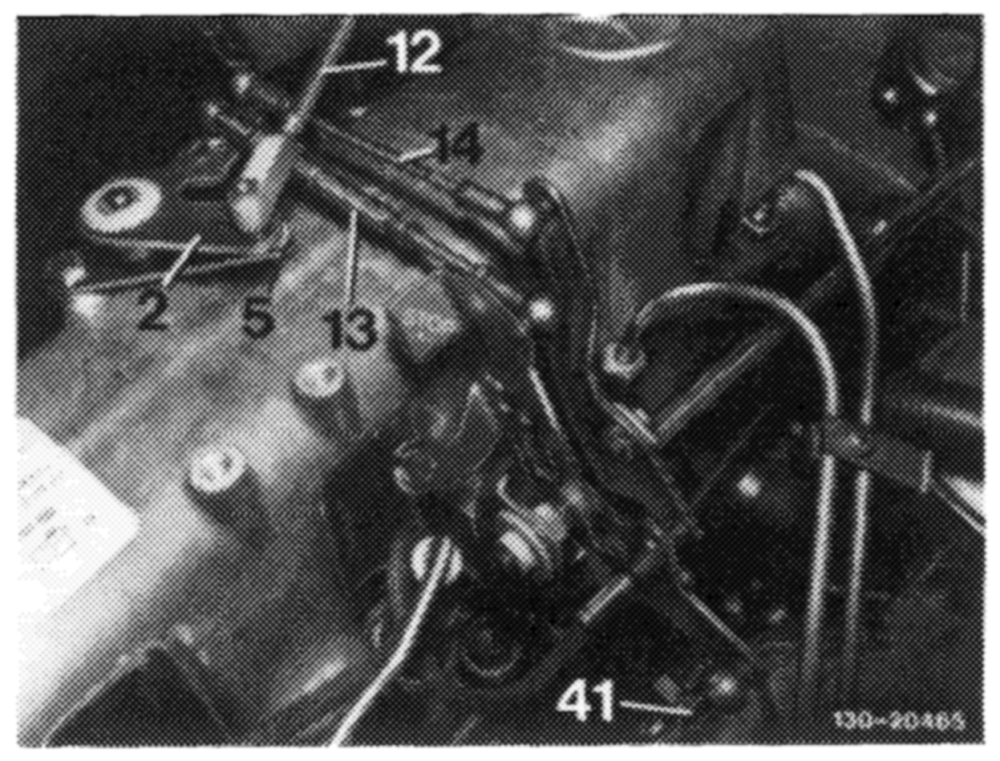
6 Set free travel rod (13) in completely pulled out condition to 154 mm, measured from center to center of ball head and connect.
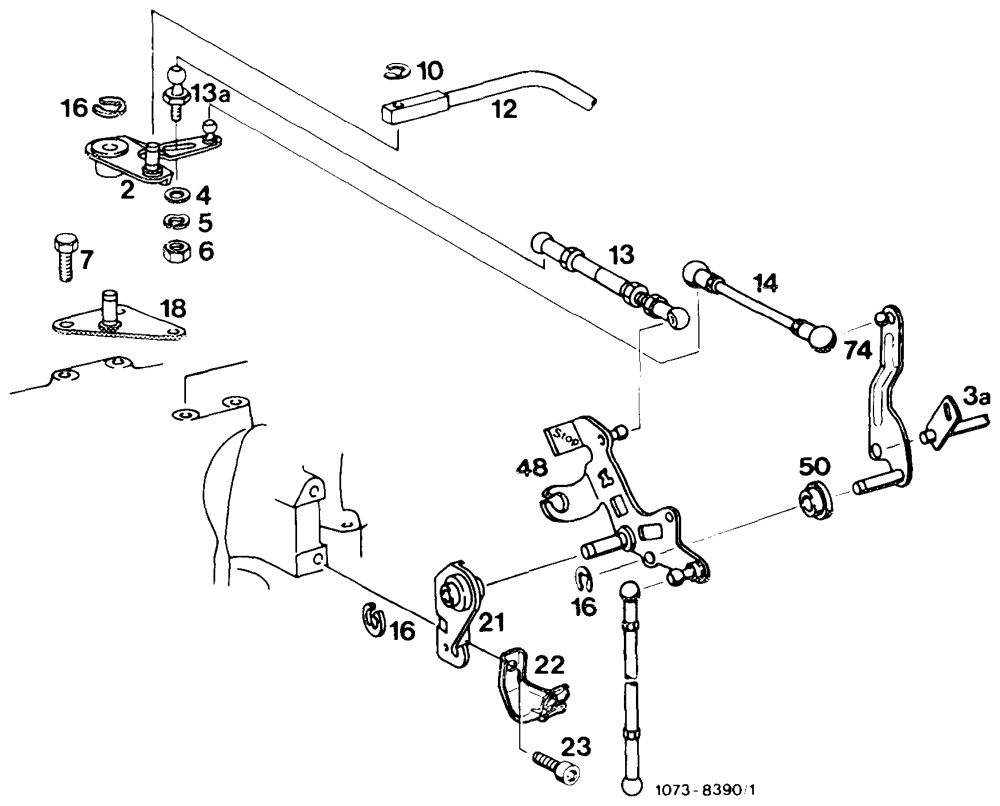
2 Guide lever 5 Adjusting sleeve 12 Control pressure rod 13 Free travel rod 14 Connecting rod 41 Pushrod
7 Push guide lever (2) against idle speed stop.
8 Adjust pushrod (41) in such a manner that rod can be connected free of tension.
9 Set connecting rod (14) to 140 mm, measured from center to center of ball head and connect.
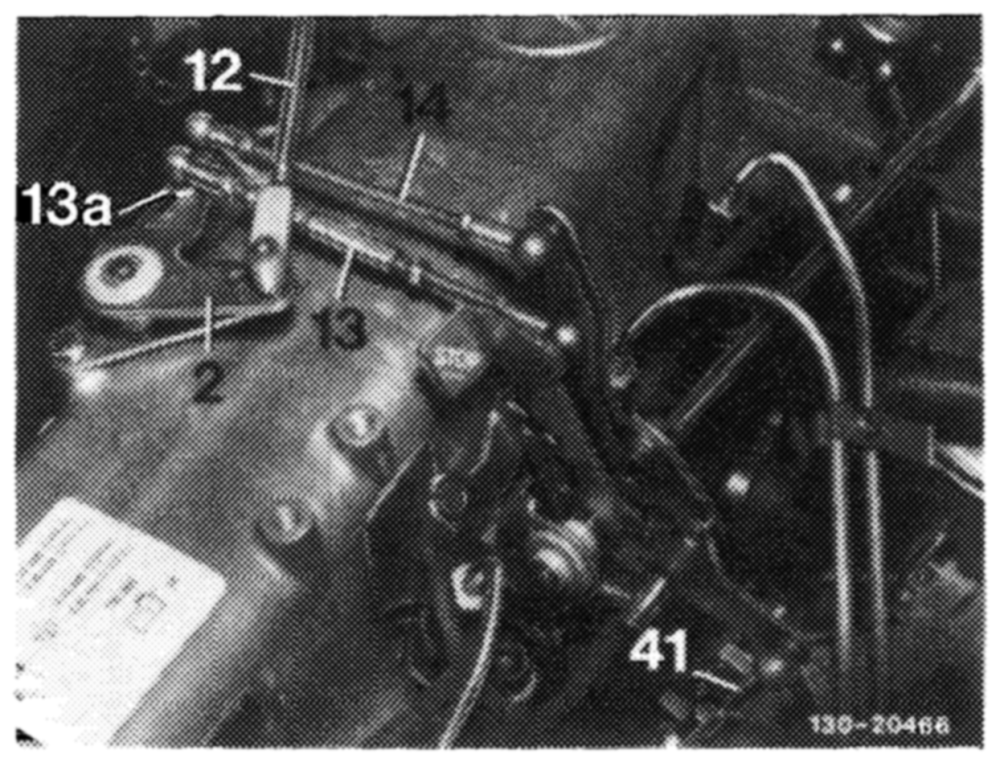
10 Set regulating lever on injection pump to full load.
Adjust adjustable ball head (13a) in slot, if required.
11. Adjust control pressure rod (12). Guide lever (2) should rest against idle speed stop. Push control pressure rod carefully against idle speed stop on transmission, set to tension-free length, connect and secure.
Note: To facilitate assembly, make sure that trademark faces in upward direction when end piece is connected.
During longitudinal checkup, hold control pressure rod above test bore adjacent to bolt.
12 Remove adjusting sleeve (5).
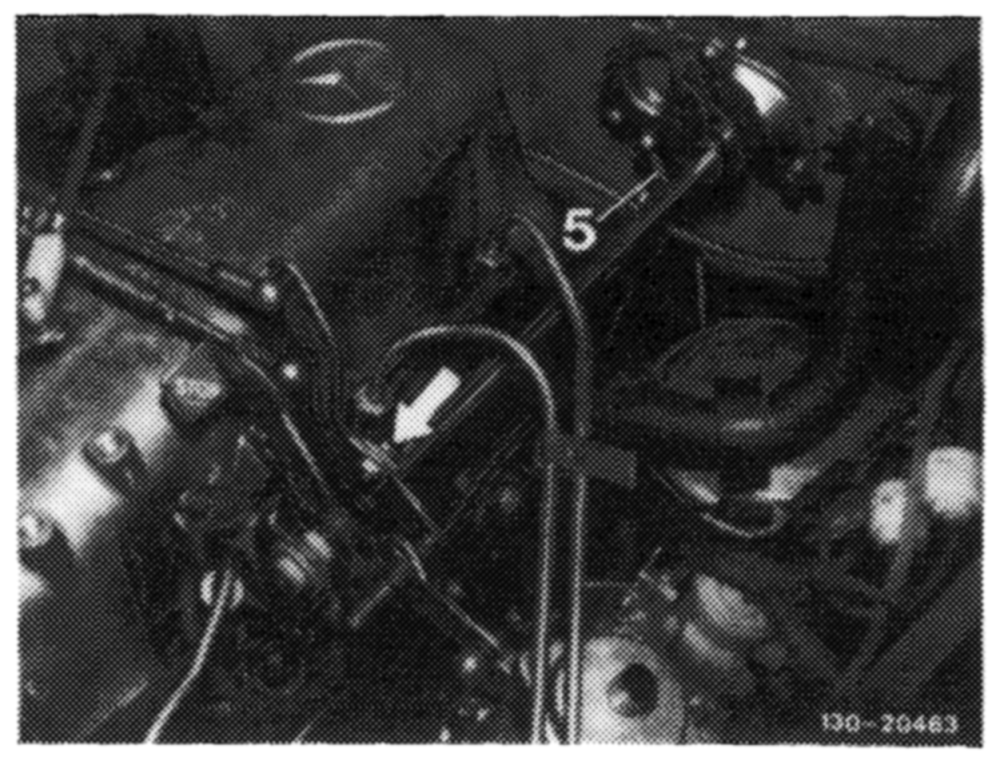
accelerator pedal from inside vehicle up to stop on kickdown switch. Accelerator peda! and regulating lever on injection pump should rest against full load stop. If required, loosen adjusting screw (arrow). Adjust throttle Jinkage in such a manner that the regulating lever rests against full load stop.
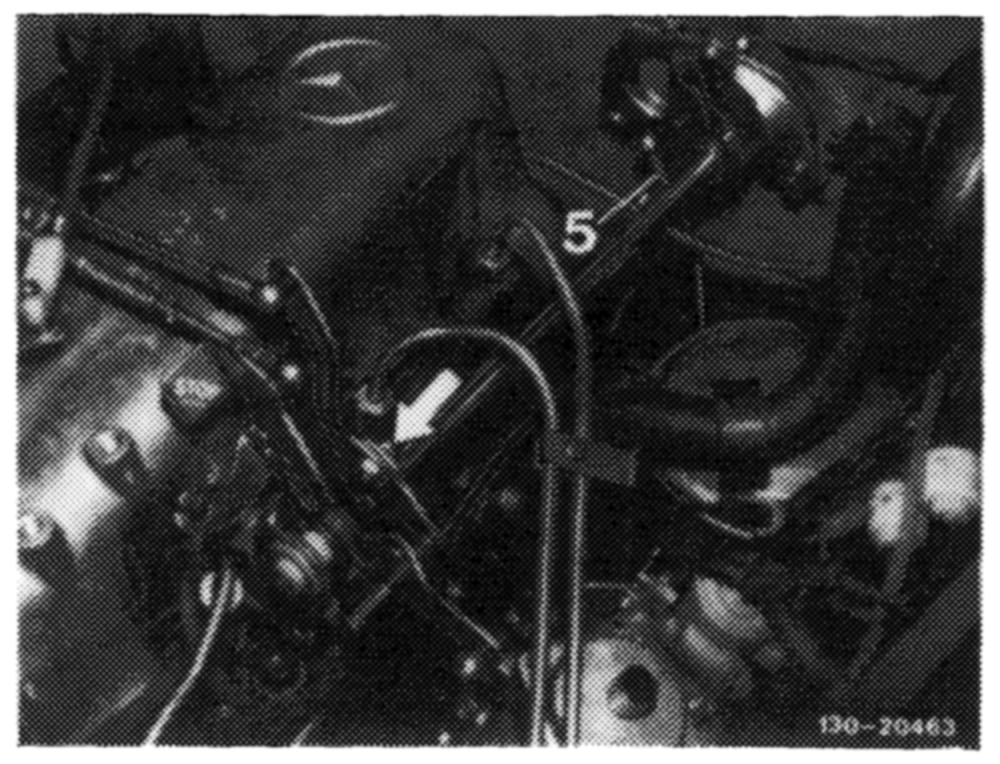
If this adjustment is not enough to attain full load or ‘dle speed stop, set pushrod (5) from longitudinal regulating shaft to accelerator pedal to 200 mm, measured from center of ball socket to center of damping ring.
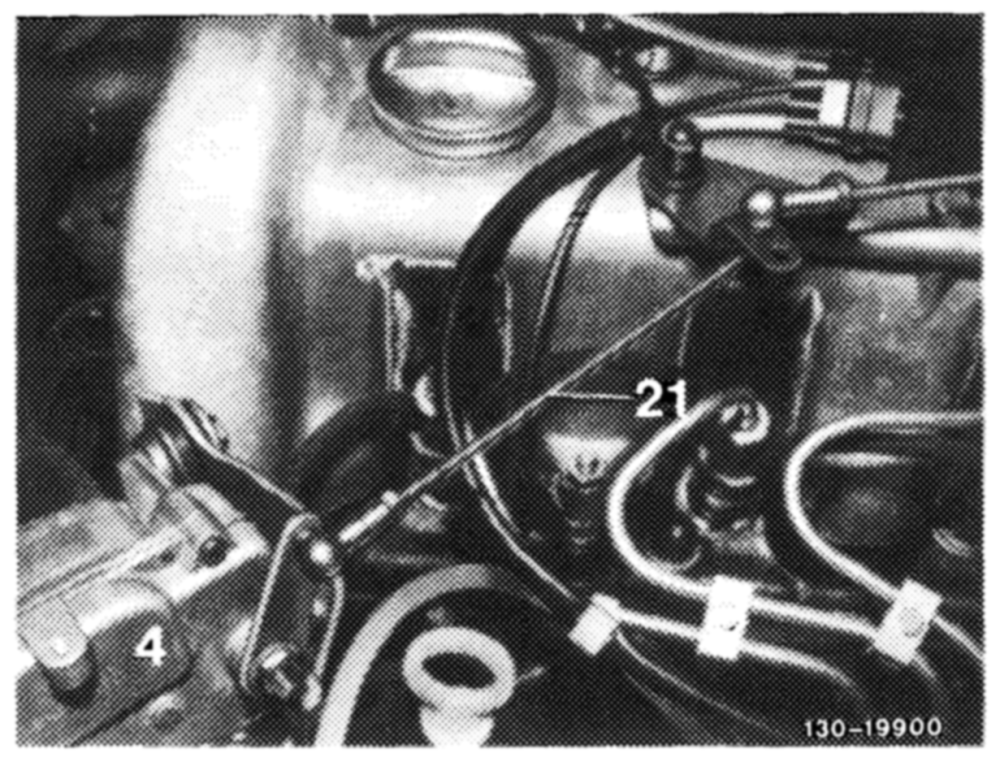
rests against idle speed stop of cruise control. For this purpose, disconnect connecting rod (21) and push lever of actuator (4) clockwise against idle speed stop. When attaching connecting rod (21), make sure that the lever of the actuator is pushed away from idle speed stop by approx. 1 mm. Adjust connecting rod, if required.
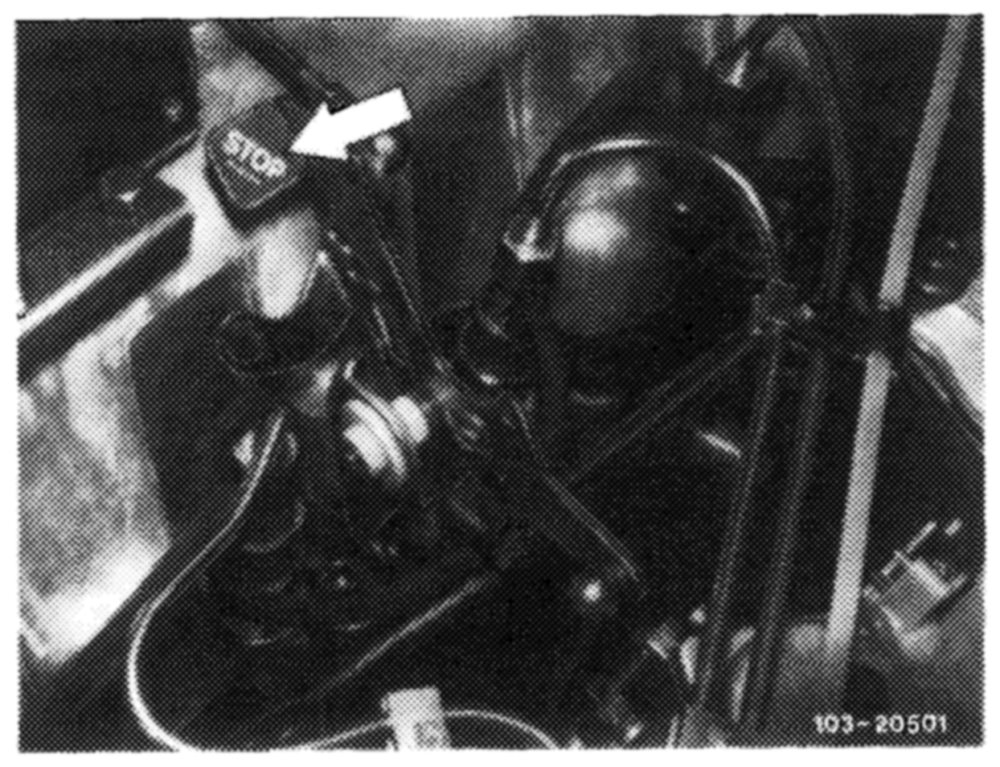
15 Check operation of emergency stop button. For this purpose, run engine at idle, push emergency stop button (arrow). Engine should stop, readjust pushrod toward injection pump, if required.
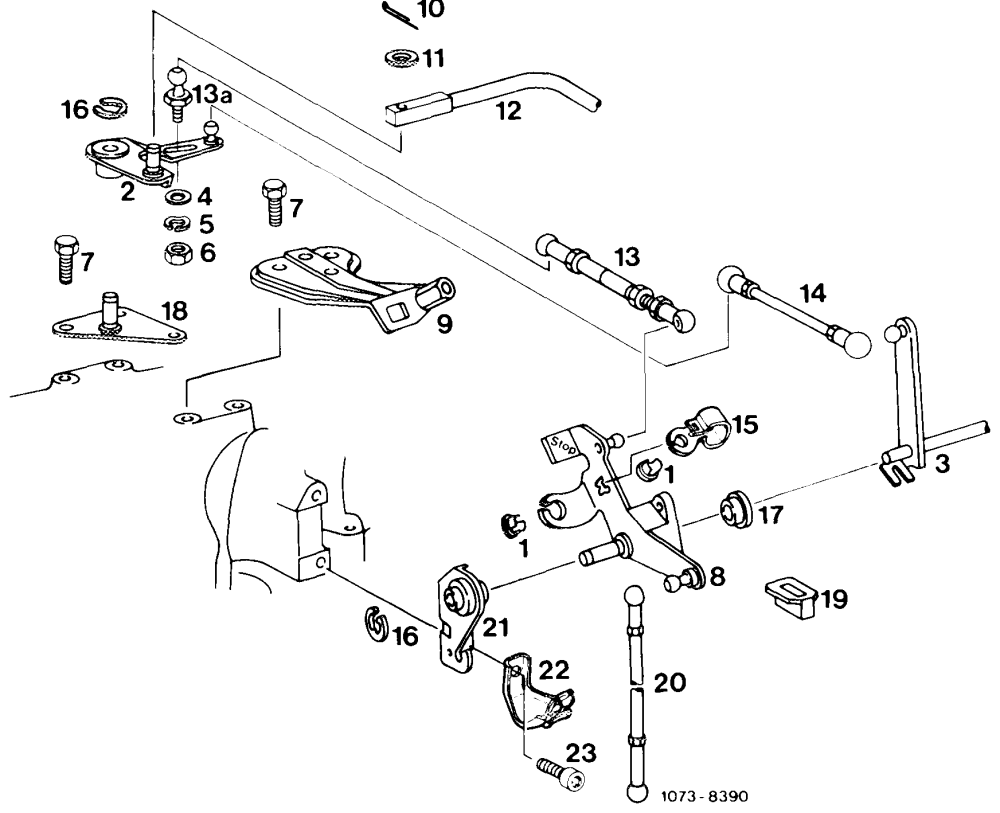
Engine regulation
2 Guide lever 3a Longitudinal regulating shaft
4 Washer
5 Corrugated washer
6 Nut
7 Screw
10 Lock
12 Control pressure rod
13 Free travel rod 13a Screw-type ball head
14 Connecting rod
16 Lock
18 Holder 21° Holder
22 Holder
23 Hex. socket screw
41 Pushrod
48 Angle lever
50 Plastic bushing
74 Guide lever
Chassis regulation
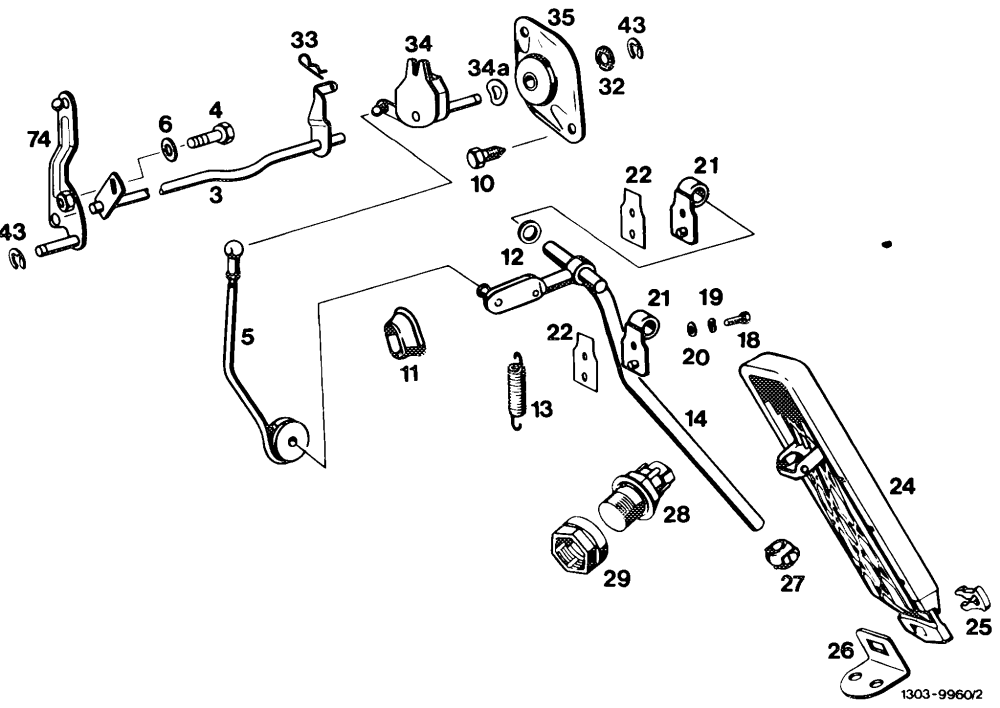
3a Longitudinal regulating shaft 14 Accelerator pedal lever 27 Joint automatic transmission 18 Hex. screw 28 Kickdown switch
4 Adjusting screw 19 Corrugated washer 29 Adjusting nut
5 Pushrod 20 Washer 32 Copper netting-graphite disk
6 Washer 21° Bearing 33 Lock
10 Screw 22 Gasket 34 Regulating lever with damper 11. Rubber grommet 24 Accelerator pedal 34a Corrugated washer
12 Plastic spacing ring 25 Clip 35 Bearing bracket
13 Return spring 26 Fastening plate 43 Lock
2nd version
Length of regulating rods in mm
Idle travel rod with elastic stop (5) 184
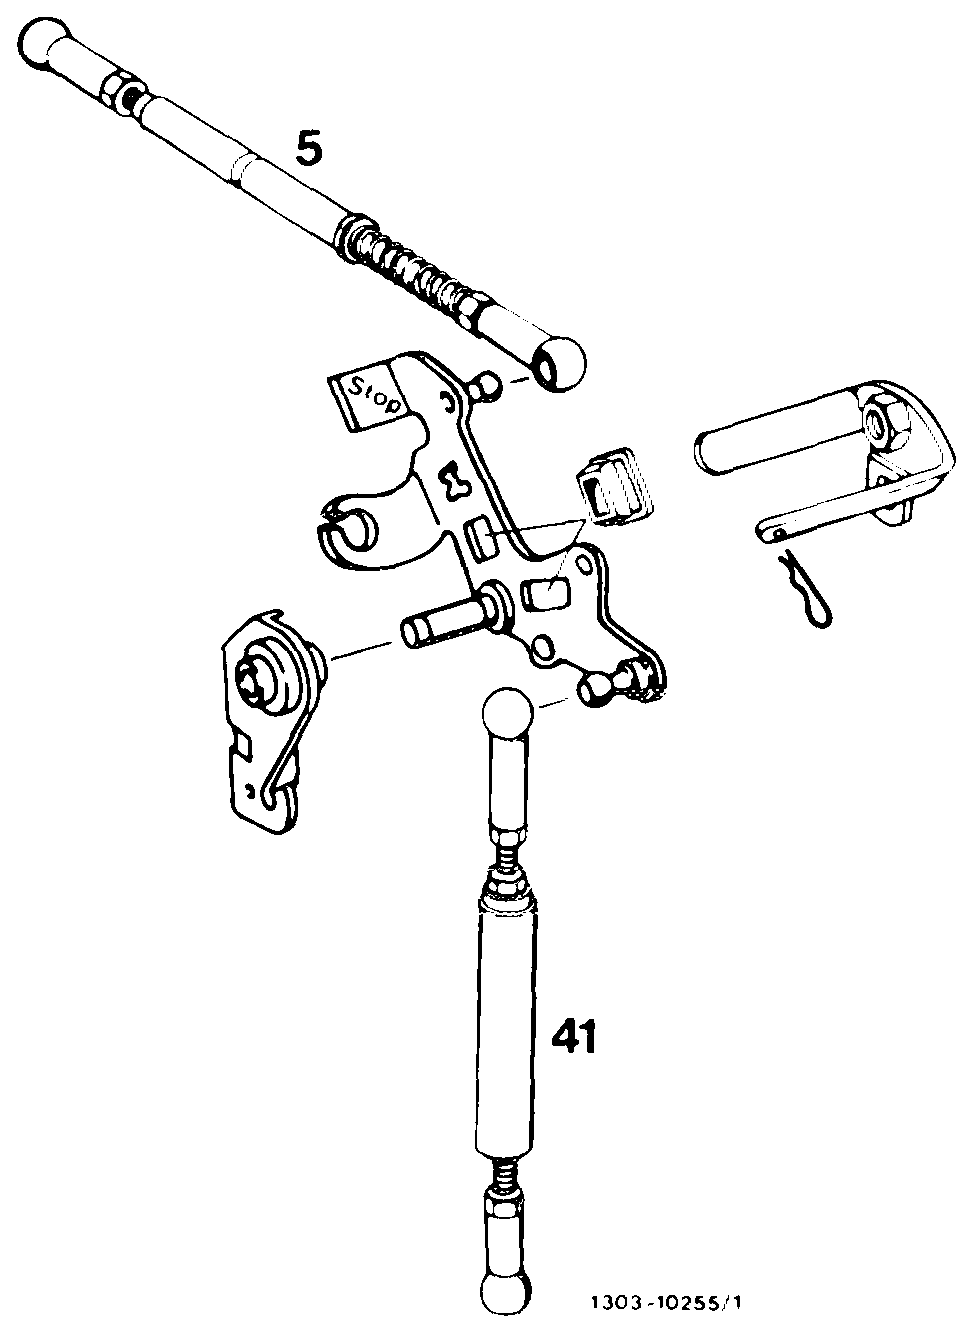
Connecting rod (41) 154
Auxiliary tool (spare part)
Adjusting sleeve (05 in Fig. item 1) 182 072 03 93
Start of series: April 1981
Model Engine Chassis end no.
123.193 617.952 003342
Adjusting
1 Check full throttle stop and adjust at longitudinal regulating shaft, if required.
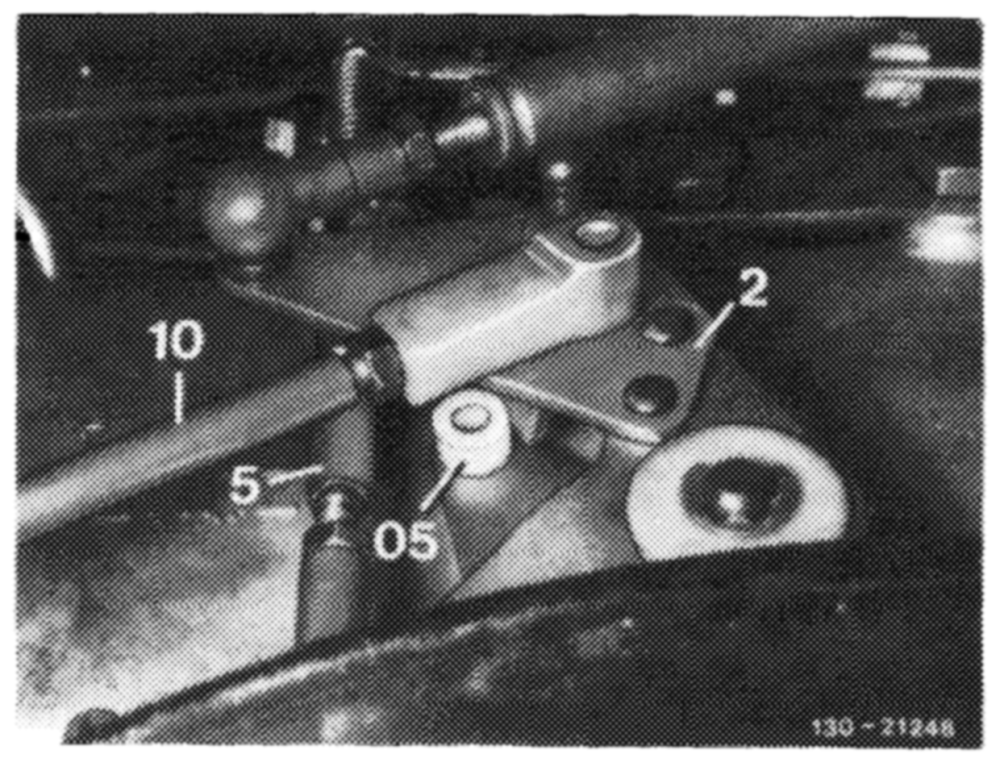
Force connecting rod (5) from angle lever (1). Disconnect control pressure rod (10). Place adjusting sleeve (05) on stop pin.
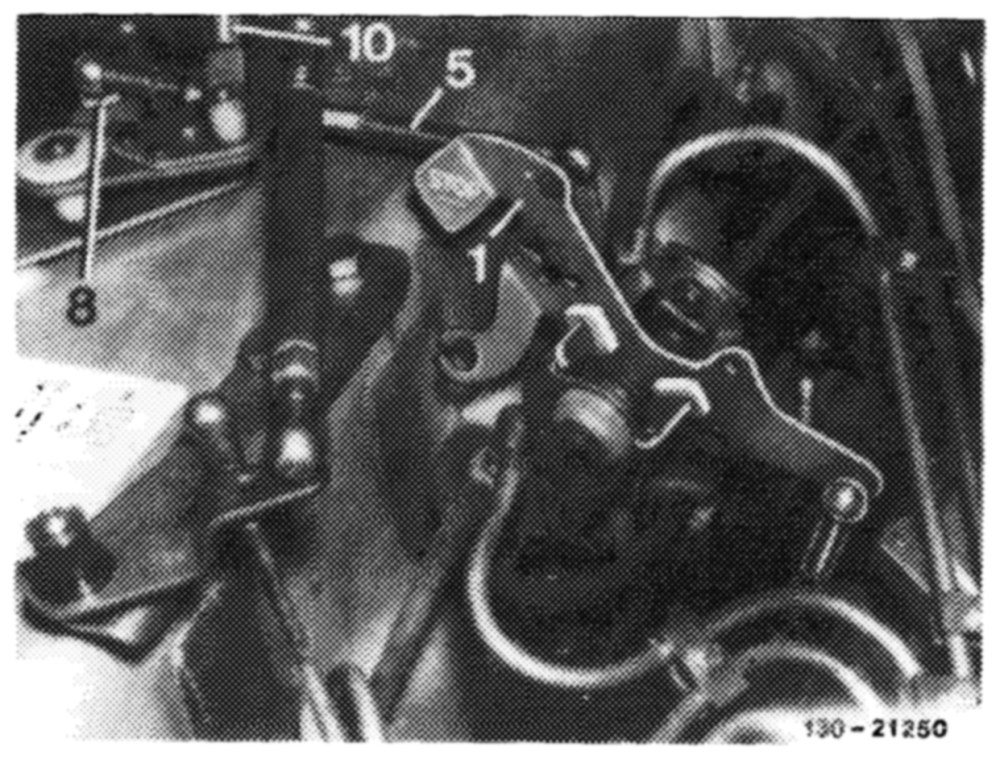
2 Push angle lever (1) into idle throttle position, so that it will rest against adjusting sleeve (05).
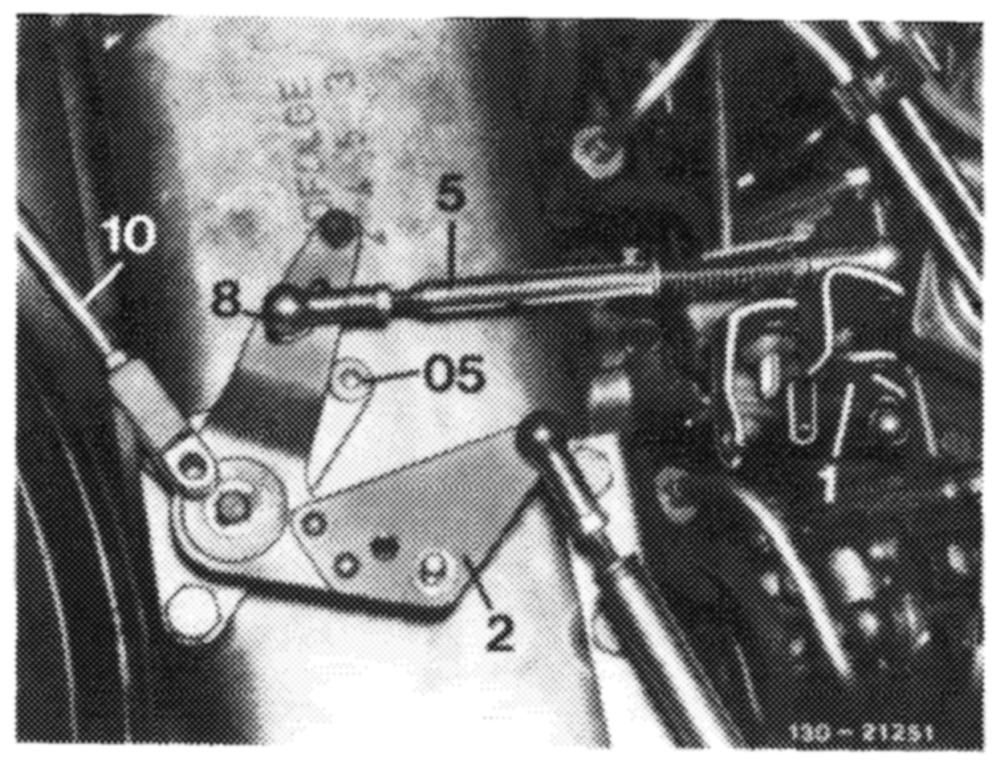
Adjust connecting rod (5) lengthwise in such a manner that it can be pushed in this position free of tension on angle lever (2).
3 Pull anige lever (1) to full load stop. Loosen ball head (8). Displace in slot until angle lever (1) rests against adjusting sleeve (full load stop). Tighten ball head (8) in this position.
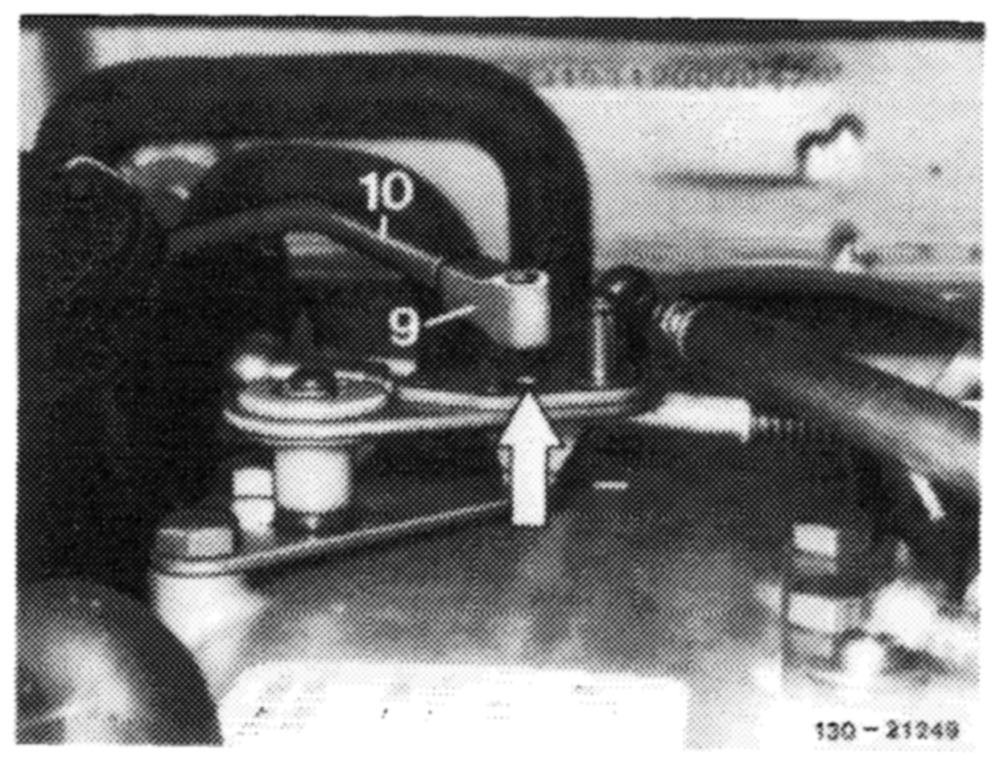
4 In idle throttle position, hold control pressure rod (10) above test bore (arrow) in angle lever (1). Adjust lengthwise at end piece (9) in such a manner that the bore in end piece is in alignment with test bore.
Remove adjusting sleeve (05). Connect control pressure rod (10) and adjust lock.
B. Mode! 116.120
@sa) 1978/79 Federal and California version Gsa) 1980 Federal version
Length of regulating rods in mm
| Free travel rod (13) in extended condition | 154 | |
| Connecting rod (14) | 140 | |
| Pushrod (20) | 7 | 190 |
| Pull rod (5) | 7 | 68 |
| Connecting rod (21) | 122 |
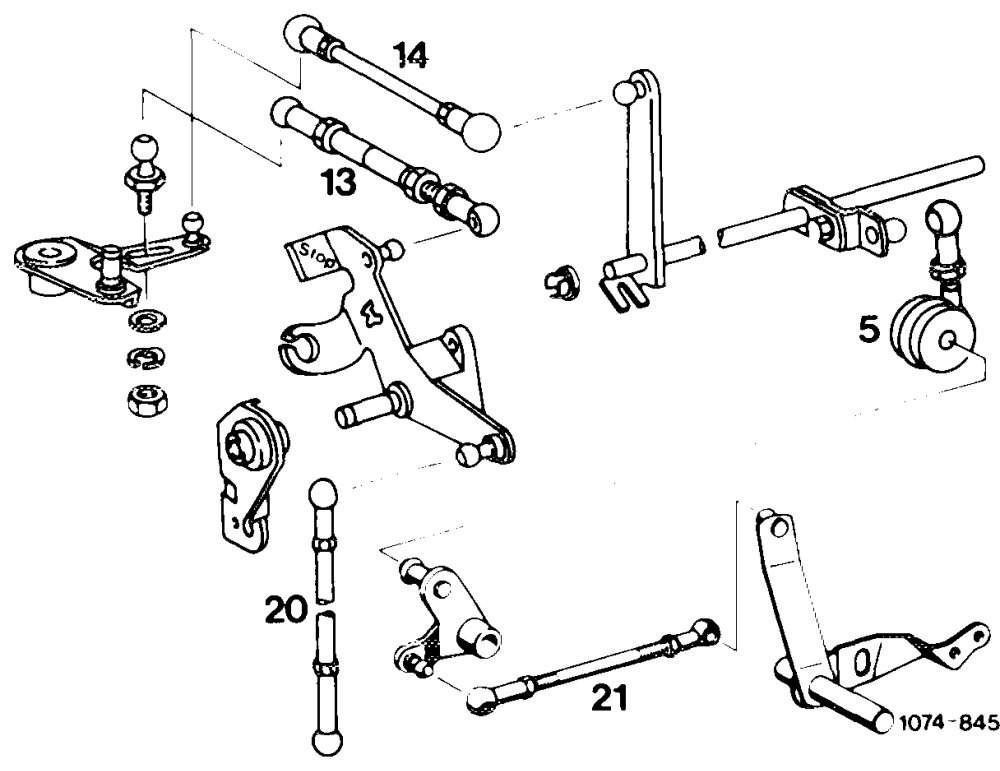
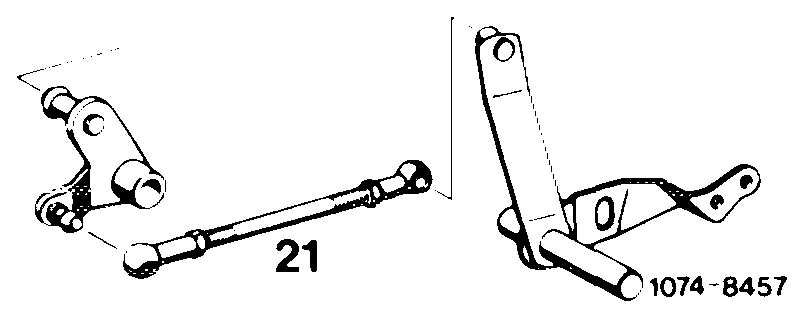
Connecting rod (5 in Fig. item 4) 122
Auxiliary tool (spare part)
Adjusting sleeve (5 in Fig. item 5) ~ 180 072 03 93 Boe 9986
Adjustment
1 Check throttle linkage for easy operation and bends. Replace damaged parts, if any.
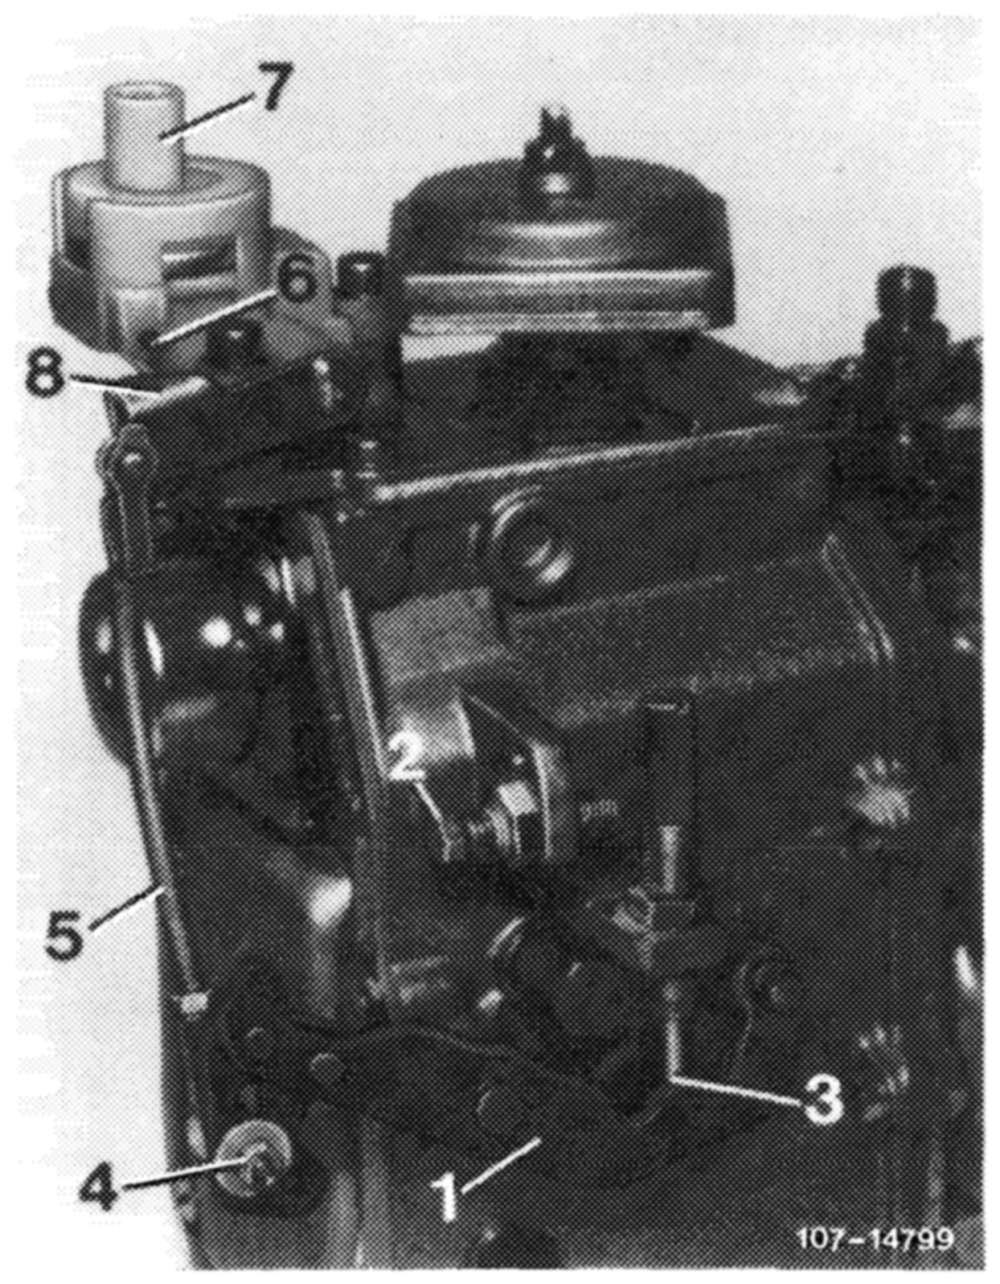
2 Disconnect all regulating rods.
3 Check whether regulating lever (1) of injection pump rests against idle speed stop (3).
4 Check whether connecting rod (5) is correctly set. For this purpose, push regulating lever (1) to full load stop (2). Actuating lever (8) should have max. 0.5 mm play up to full load stop (6). Adjust connecting rod (5) with adjustable ball head (4), if required. Connecting rod (5) should be set to 122 mm, measured from center of ball socket to center of linkage.
Regulating lever DAIOnsuwnFull load stop Idle speed stop Adjustable ball head Connecting rod Full load stop on vacuum control valve Vacuum control valve Actuating lever for vacuum control valve
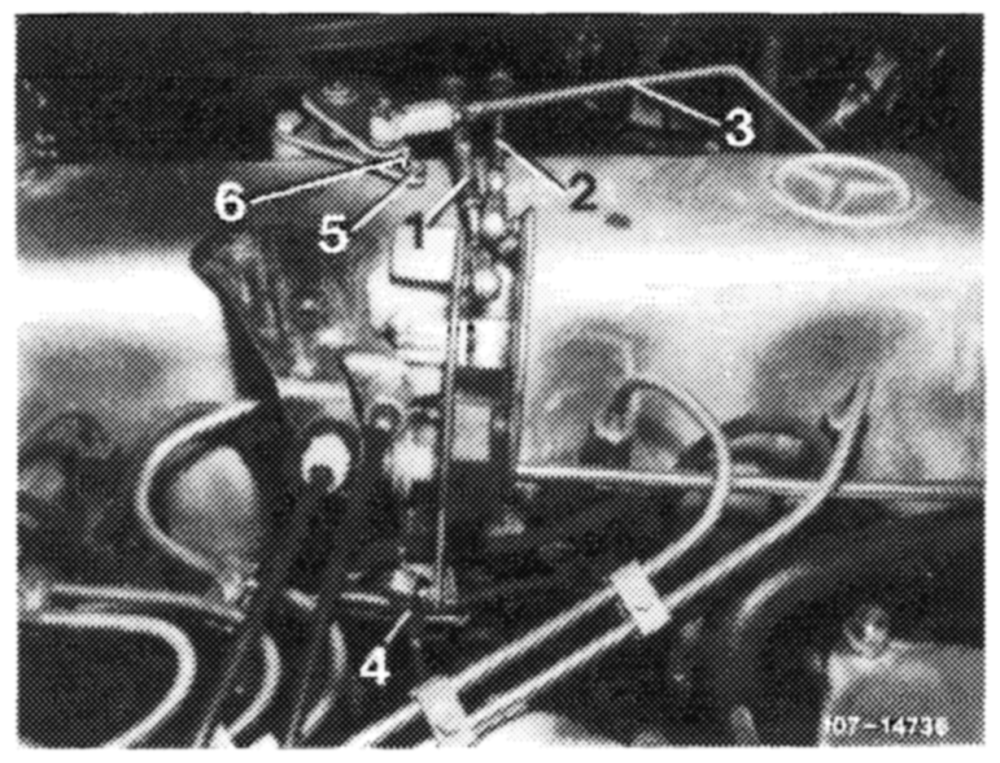
5 Plug-on adjusting sleeve (5).
6 Adjust free travel rod (1) in fully extended condition to 154 mm, measured from center to center of ball head and connect.
1 Free travel rod 4 Pushrod
2 Connecting rod 5 Adjusting sleeve 3 > Control! pressure rod 6 Regulating lever
7 Push regulating lever (1 and 6) against idle speed stop (Fig. item 3 and 6).
8 Adjust pushrod (4) in such a manner that rod can be connected free of tension (Fig. item 5).
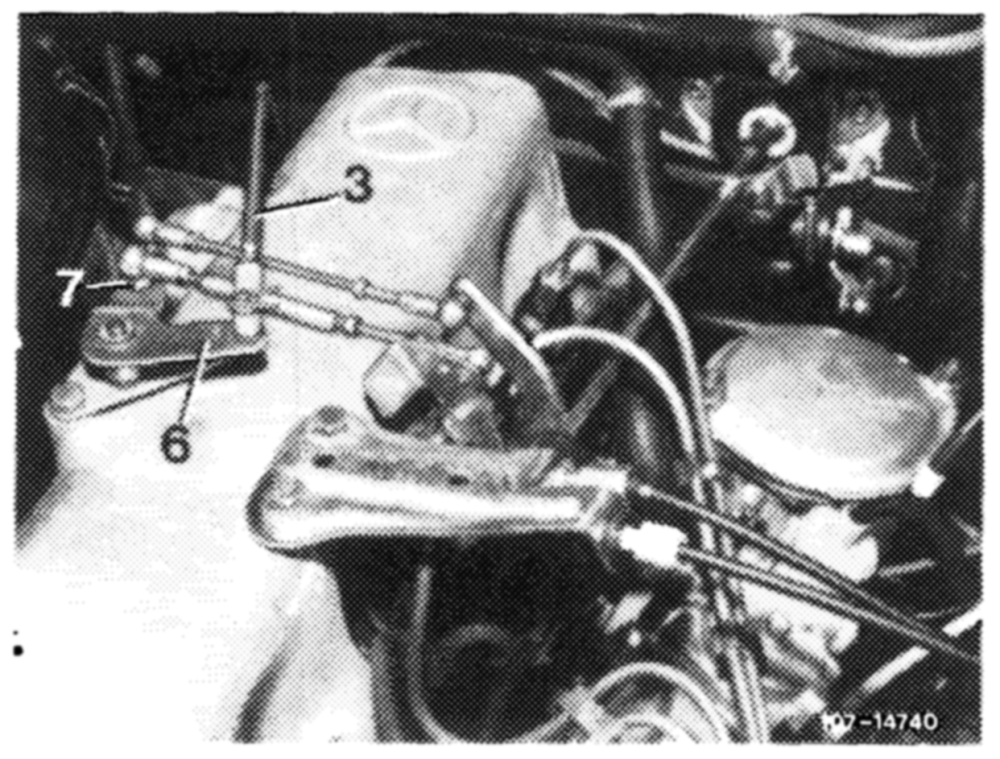
9 Move regulating lever (6) to full load. Regulating lever (1) should also rest against full load stop (2) (Fig. item 3 and 6).
Adjust adjustable ball head (7) in slot, if required.
3 Control pressure rod 6 Regulating lever 7 Adjustable bal! head
10 Adjust control pressure rod (3). Regulating lever (6) should rest against idle speed stop. Push control pressure rod carefully against idle stop on transmission, set to tension-free length, connect and secure.
Note: To facilitate assembly, make sure that trademark is facing in upward direction when connecting end piece.
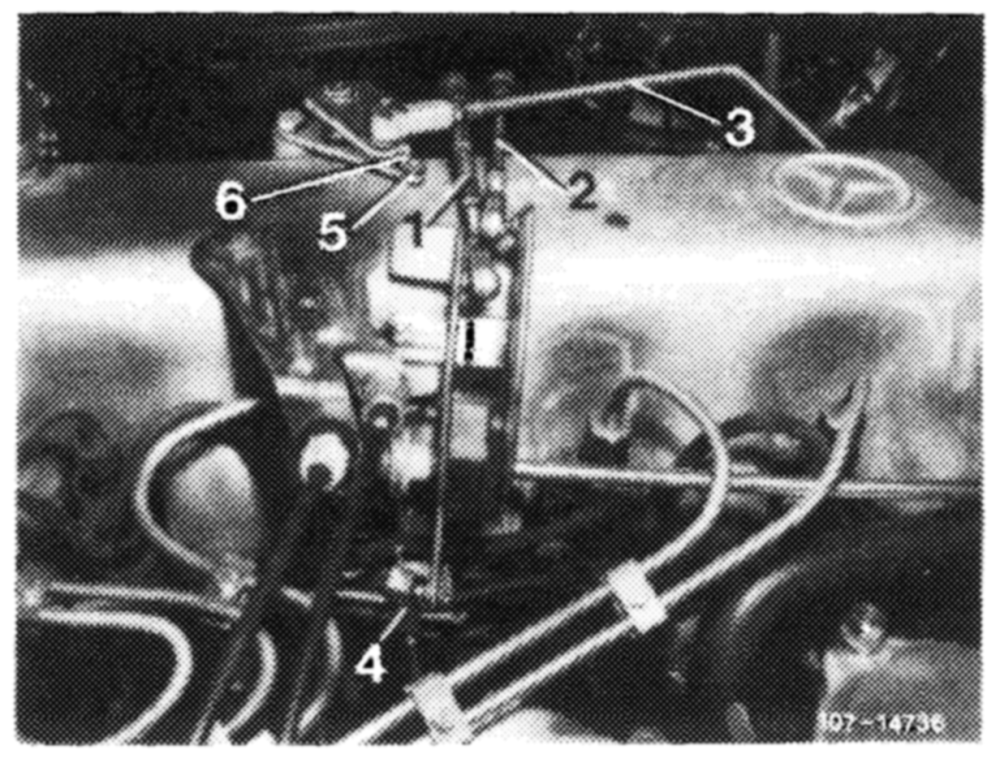
For longitudinal checkup, hold control pressure rod above test bore adjacent to bolt.
11. Remove adjusting sleeve (5).
12 Adjust connecting rod (2) to 140 mm, measured from center to center of ball head and connect.
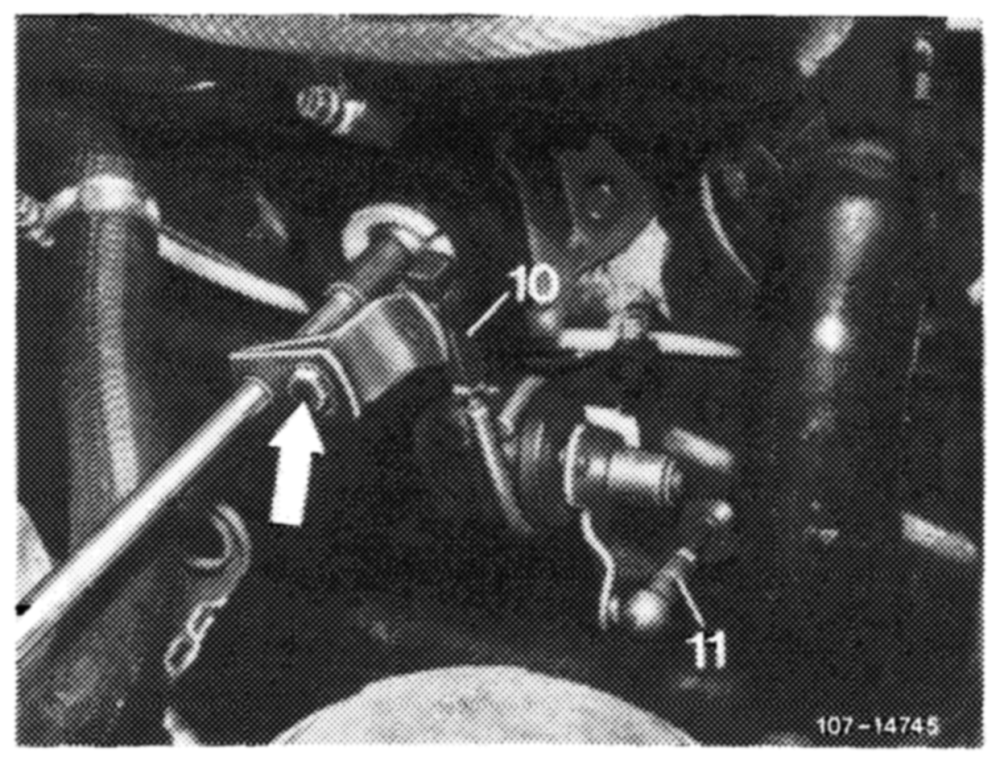
accelerator pedal from inside vehicle up to stop on kickdown switch. Accelerator pedal and regulating lever on injection pump should rest against full load stop. Loosen adjusting screw (arrow), if required, adjust throttle linkage in such a manner that regulating lever rests against full load stop.
Attention!
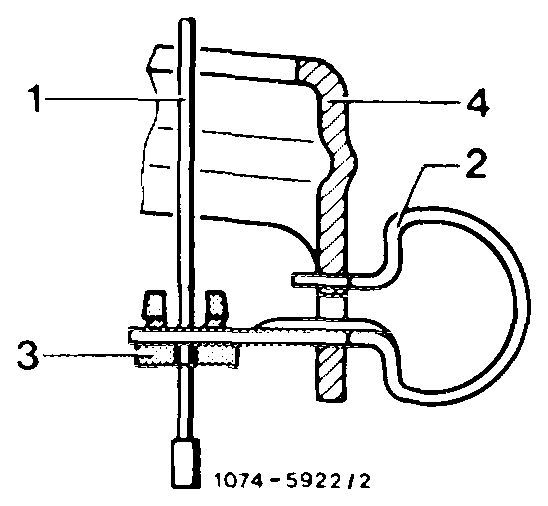
If throttle linkage is not moving to full throttle, check whether the contour spring for idle speed adjuster has been correctly installed.
The idle speed adjuster is no longer installed starting model year 1980.
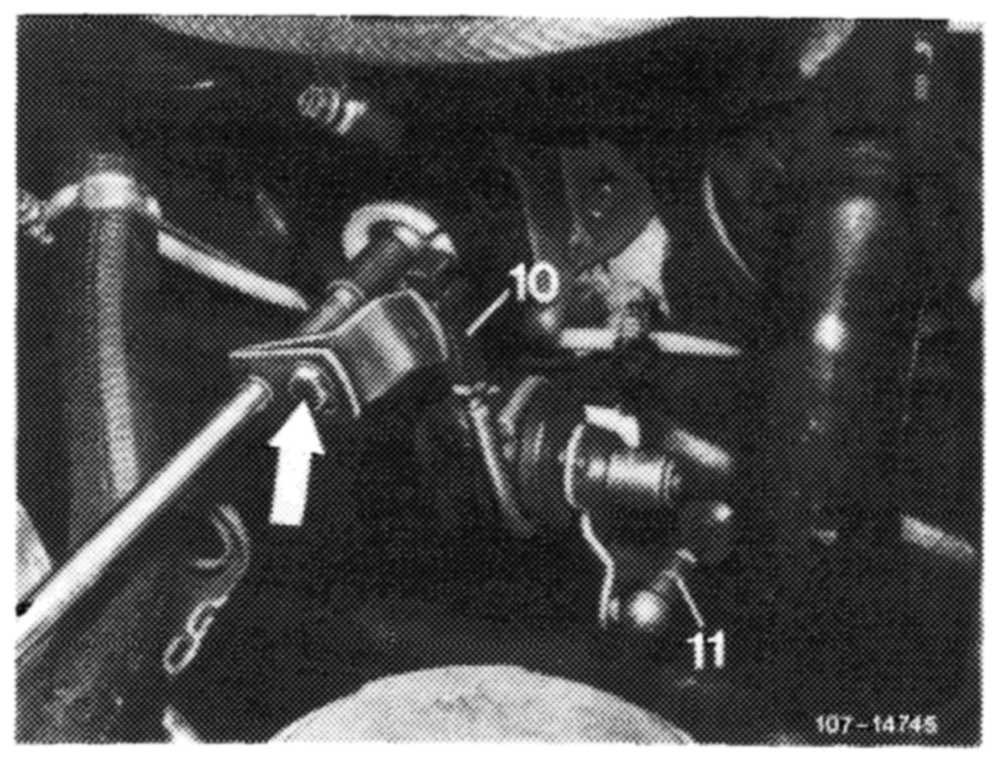
If full load or idle speed stop is not attained with this cdjustment, set pull rod (10) from longitudinal regulating shaft to accelerator pedal to 68 mm, measured from center of ball socket to center of damping ring.
If the above adjustment does not attain full load or idle speed stop, set connecting rod (11) from guide lever engine compartment to accelerator pedal to specified length, measured from center to center of ball socket.
10 Pull rod 11. Connecting rod
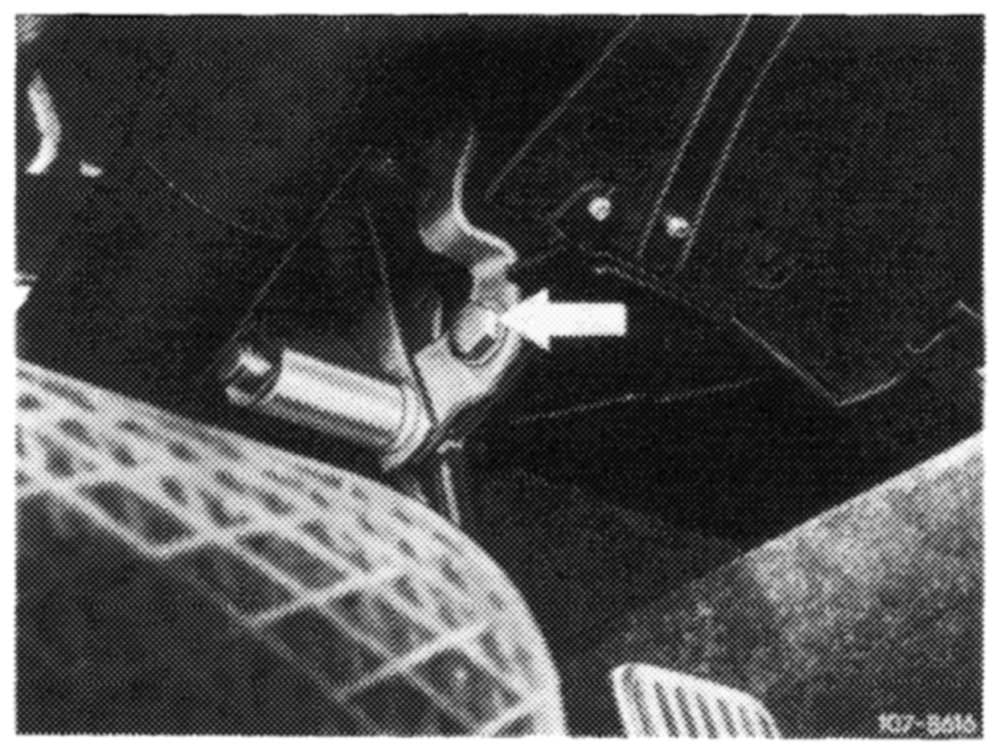
Adjust regulating lever inside vehicle, if required. For this purpose, loosen fastening screw (arrow), pull accelerator pedal slightly upward and tighten fastening screw again.
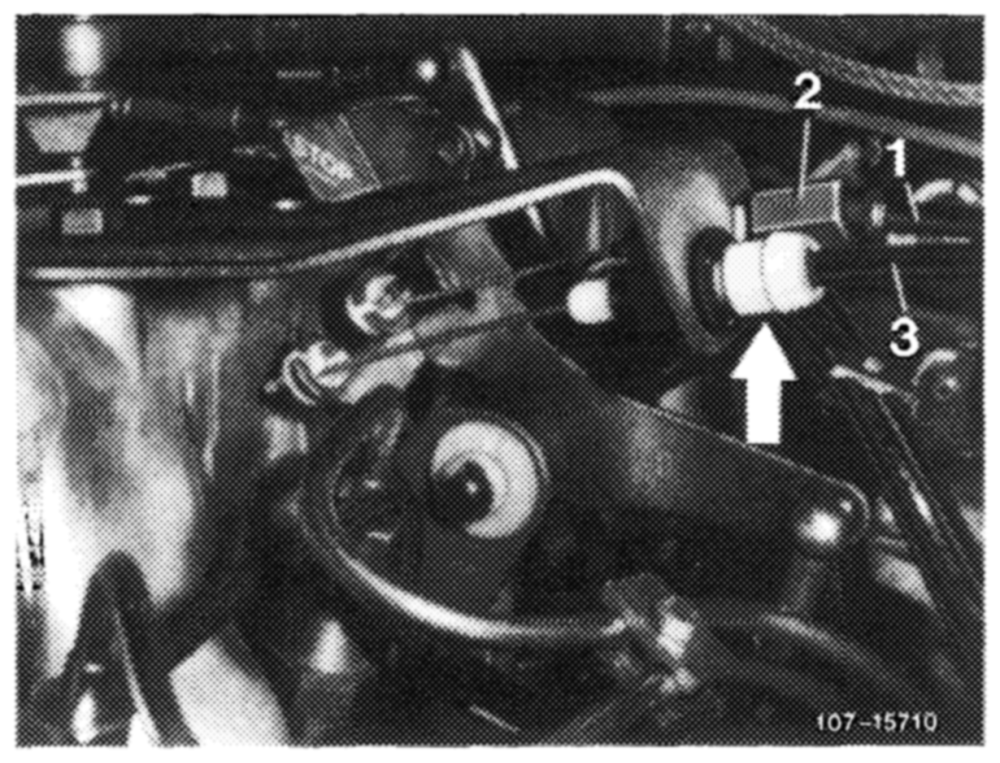
purpose, push shutoff lever up to stop. Bowden wire should rest free of tension against regulating lever.
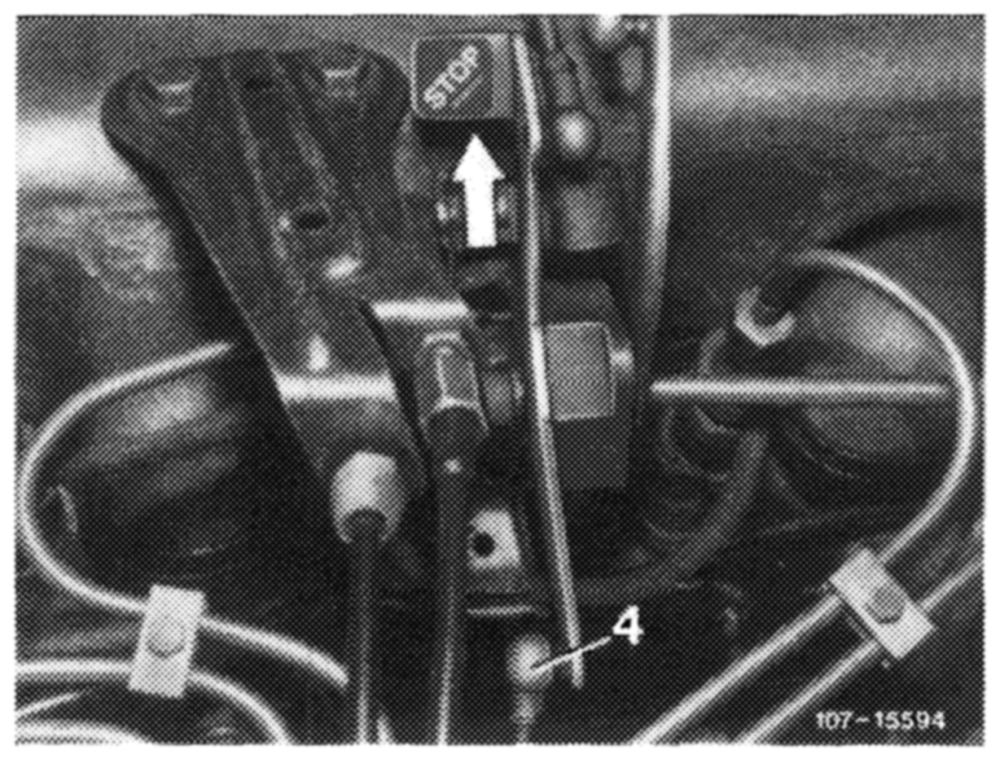
If required, adjust Bowden wire by means of adjusting nut (arrow). Release shutoff lever (idle speed position). In this position, Bowden wire has the required play.
15 Check operation of emergency stop button. For this purpose, run engine at idle, push emergency stop button (arrow). Engine should stop, adjust pushrod (4), if required.
Engine regulation
Plastic sleeve COMNHDMTAWN— FOODNADMNS OWN WN Guide lever Longitudinal regulating shaft Washer Corrugated washer Nut Screw Angle lever Holder mse eee NNONNHfA ae Lock Washer Control pressure rod Free travel rod Screw-type ball head Connecting rod Contour spring Lock Plastic bushing Holder Plastic hub Pushrod Holder Holder Hex. socket screw
Chassis regulation
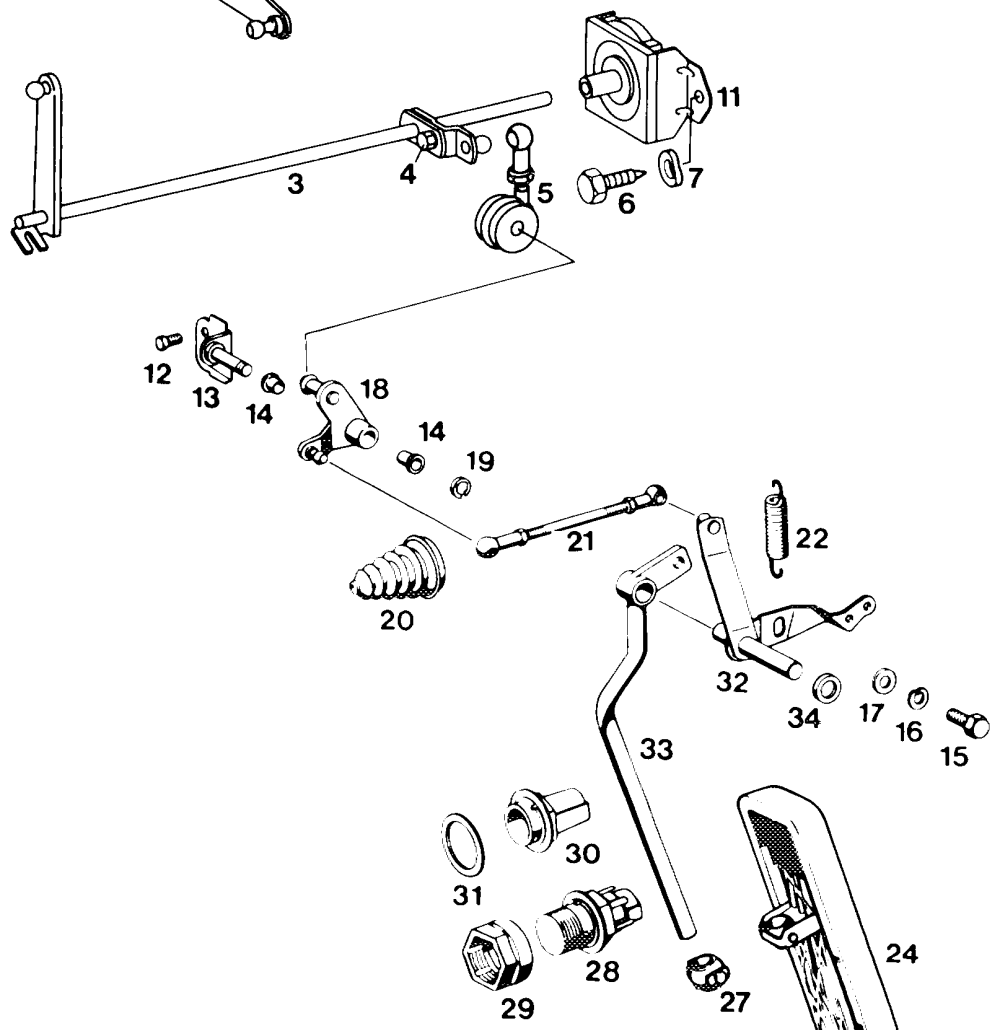
—-ODNOUL wor Plastic sleeve Longitudinal regulating shaft Hex. screw Pull rod Hex. screw Corrugated washer Angle lever Holder Holder for longitudinal regulating shaft
12 Hex screw
13 Bearing
14 Plastic bushing
15 Hex. screw
16 Corrugated washer
17 Washer
18 Guide lever
19 Lock
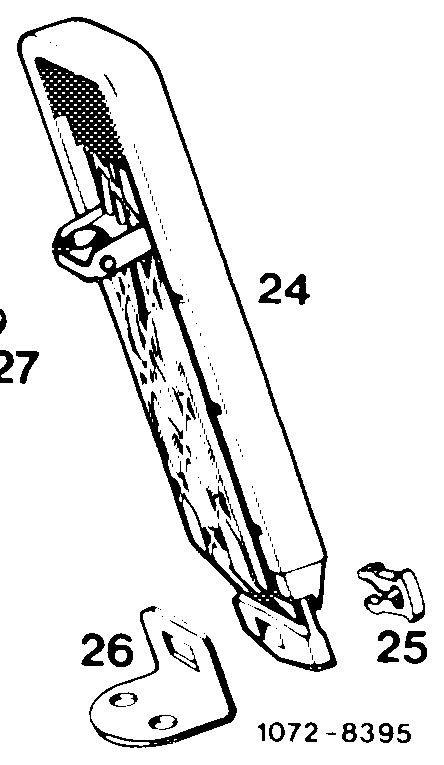
20 Rubber grommet
21 Connecting rod
22 Return spring
23 Lock
24 Accelerator pedal
25 Clip
26 Fastening plate
27 Joint
28 Kickdown switch
29 Adjusting nut
30 Full throttle stop
31 Washer
32 Guide lever
33 Accelerator pedal lever
34 Plastic spacing ring
35 Hex. screw
36 Corrugated washer
37 Bearing
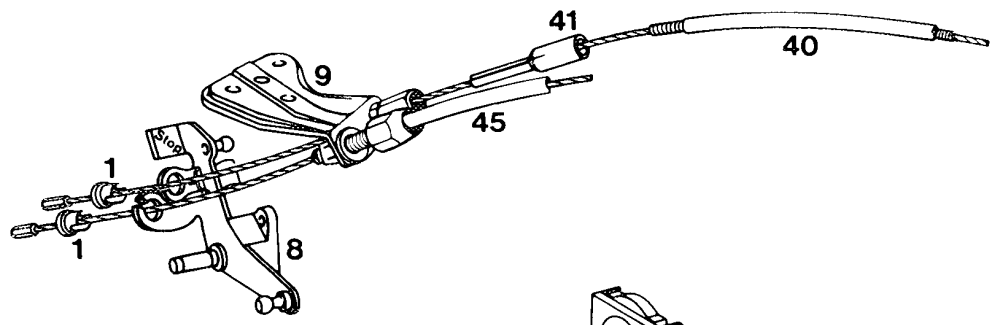
40 Bowden wire for idle speed adjuster ) .
41 Rubber sieeve 6 no longer required starting model year 1980
45 Bowden wire for cruise control
Length of regulating rods in mm
Free travel rod (63) in extended condition 154
| Pull rod (65) | 137 |
| . Pushrod (70) | 184 |
| Connecting rod (21 in Fig. chassis regulation) | 122 |
| Connecting rod (5 in Fig. item 4) | 122 |
| Pull rod (5 in Fig. chassis regulation) | 68 |
Auxiliary tool (spare part)
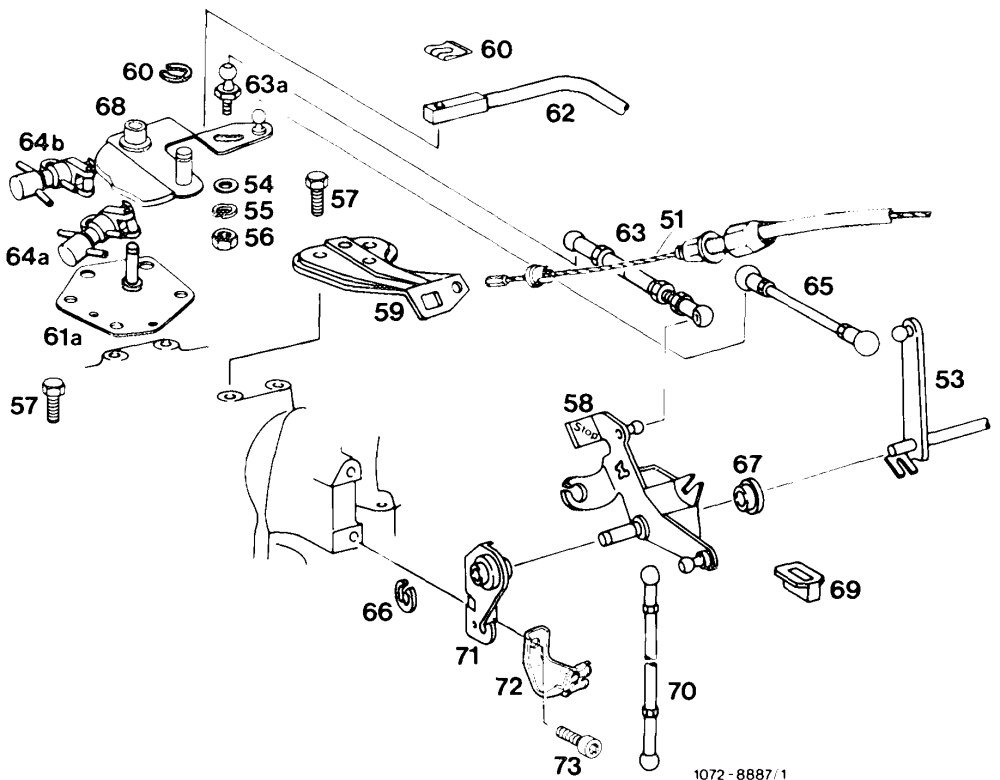
Adjusting sleeve 180 072 03 93 „oe 9996
Engine regulation
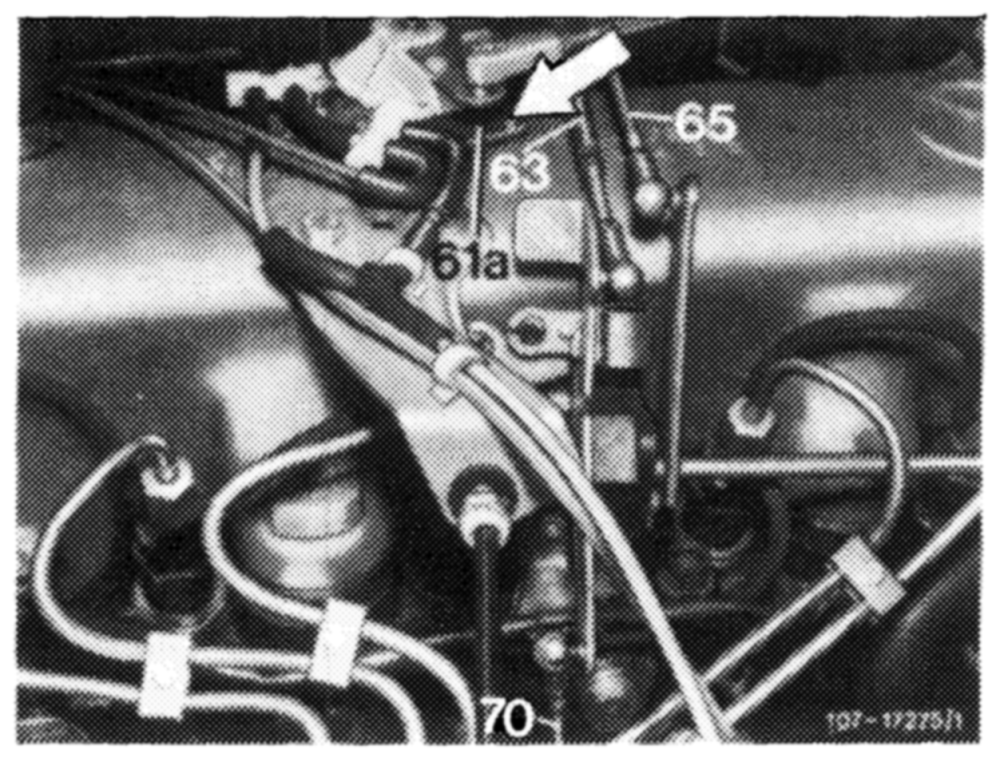
Bowden wire for cruise control Longitudinal regulating shaft Washer Corrugated washer Nut Screw Angle lever Holder Lock 61a Holder 62 Control pressure rod 63 Free travel rod 63a Screw-type ball head 64a Switchover valve 64b Switchover valve 65 Pull rod Lock Plastic bushing Guide lever Plastic hub Push rod Holder Holder Hex. socket screw
Chassis regulation
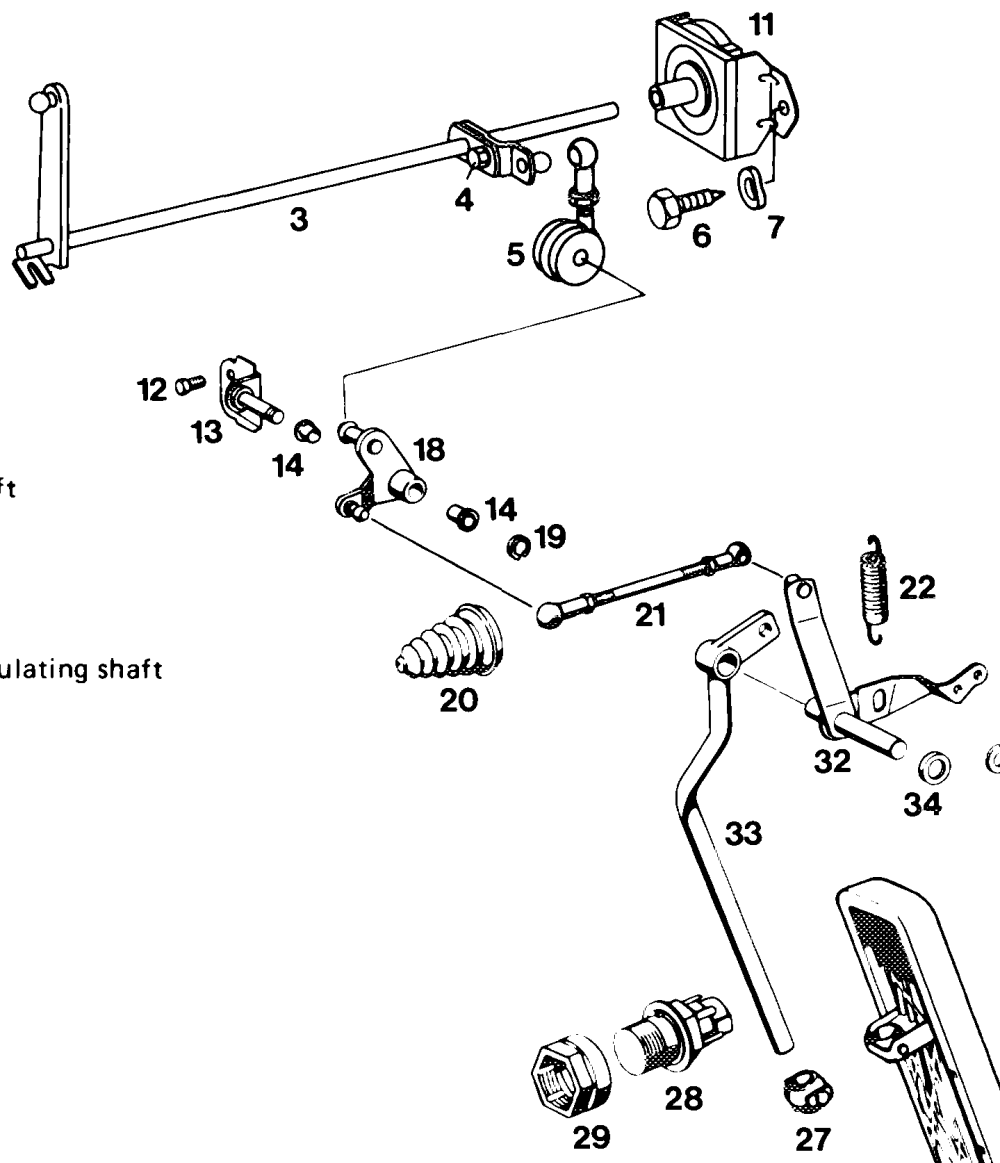
3 Longitudinal regulating shaft
4 Hex, screw
5 Pull rod
6 Hex. screw
7 Corrugated washer
9 Holder 11. Bearing for longitudinal
12 Hex. screw
13 Bearing
14 Plastic bushing
15 Hex. screw
16 Corrugated washer
17 Washer
18 Guide lever
19 Lock
20 Rubber grommet
21 Connecting rod
22 Return spring 23° Lock
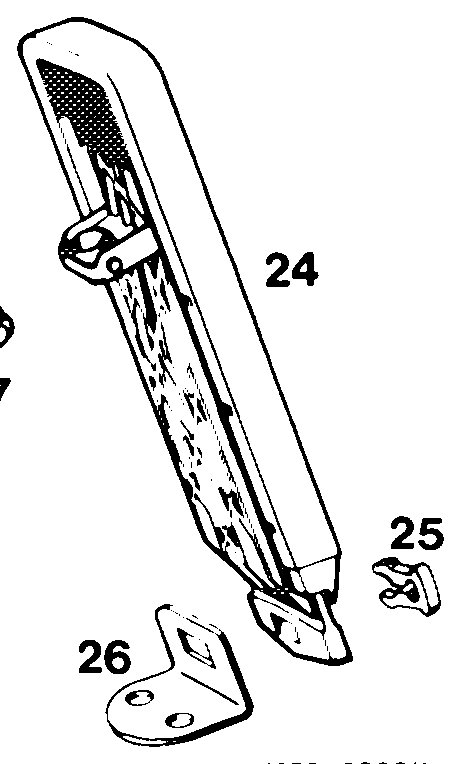
24 Accelerator pedal
25 Clip
26 Fastening plate 27° Joint
28 Kickdown switch
29 Adjusting nut
32 Guide lever
33 Accelerator pedal lever
34 Plastic spacing ring
35 Hex. screw
36 Corrugated washer
37 Bearing
Adjustment
1 Check regulating linkage for easy operation and bends. Replace damaged parts, if any.
2 Disconnect all regulating rods.
3 Check whether regulating lever (1) of injection pump rests against idle speed stop (3).
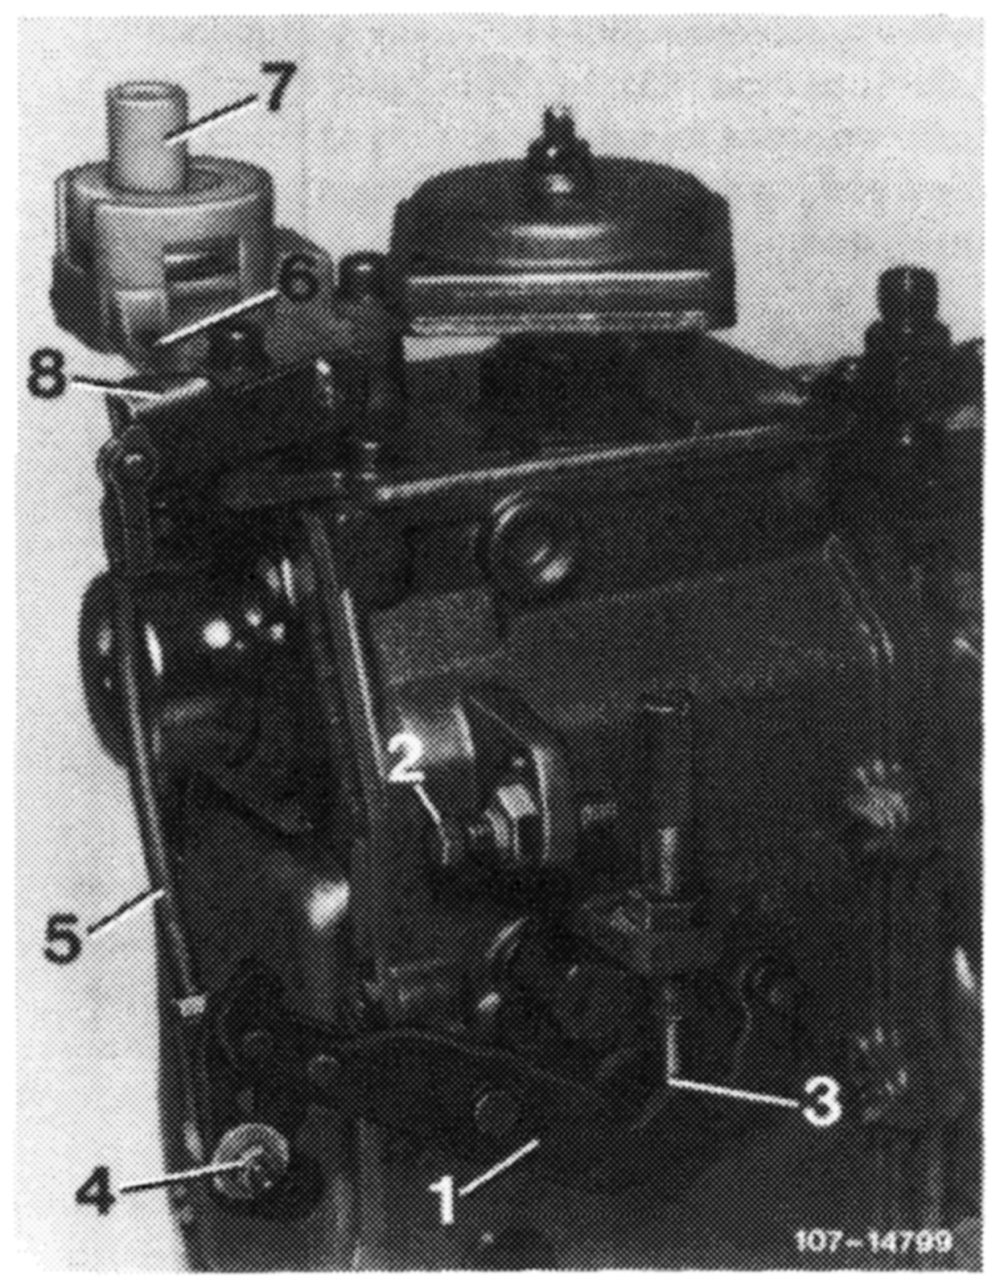
4 Check whether connecting rod (5) is correctly set. For this purpose, push regulating lever (1) to full load stop (2). Actuating lever (8) should have max. 0.5 mm play up to full load stop (6). Adjust connecting rod (5) with adjustable ball head (4), if required. Connecting rod (5) should be set to 122 mm, measured from center of ball socket to center of linkage.
BryMNnawn—- Regulating lever Full load stop Idle speed stop Adjustable ball head Connecting rod Full load stop on vacuum control valve Vacuum control valve Actuating lever for vacuum control valve
5 Plug adjusting sleeve on locating pin (arrow) of holder.
6 Set free travel rod (63) in fully extended condition to 154 mm, measured from center to center of ball head and connect.
63 Free travel rod 65 Pull rod 70 Pushrod
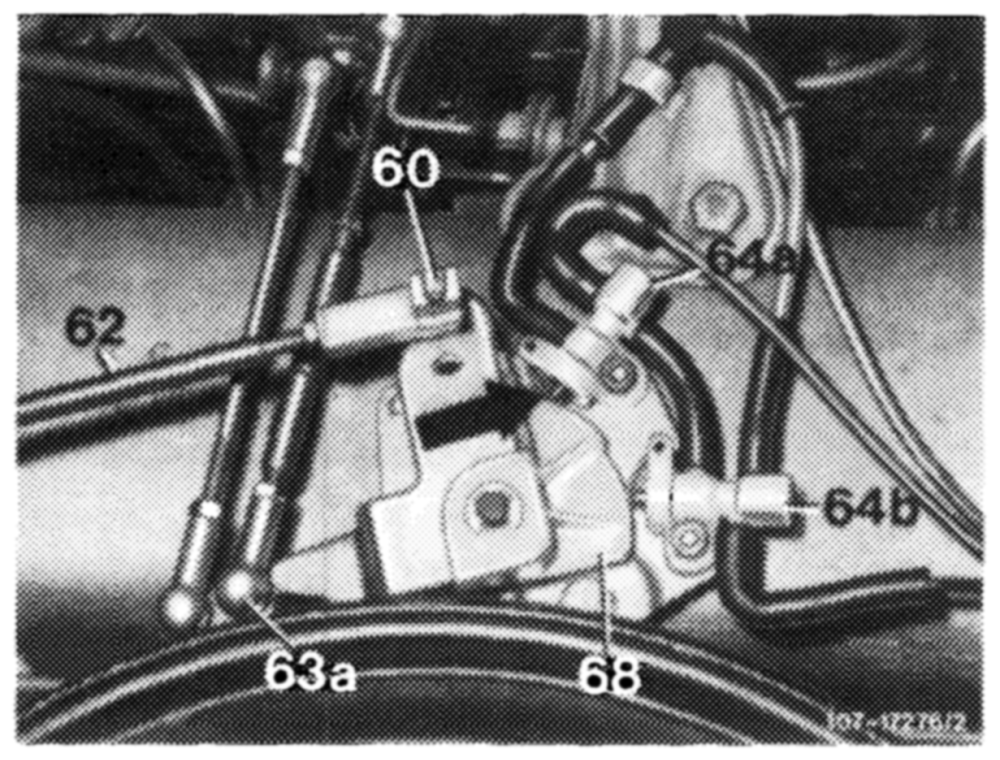
7 Adjust pushrod (70) in such a manner that max. 0.5 mm play is available between control cam lobe of guide lever (68) and link (arrow) of switchover valve (64a). Regulating lever on injection pump should rest against idle speed stop.
62 Control pressure rod 63a Adjustable ball head 64a Switchover valve idle speed shutoff EGR 64b Switchover valve full throttle shutoff EGR 68 Guide lever 60 Lock
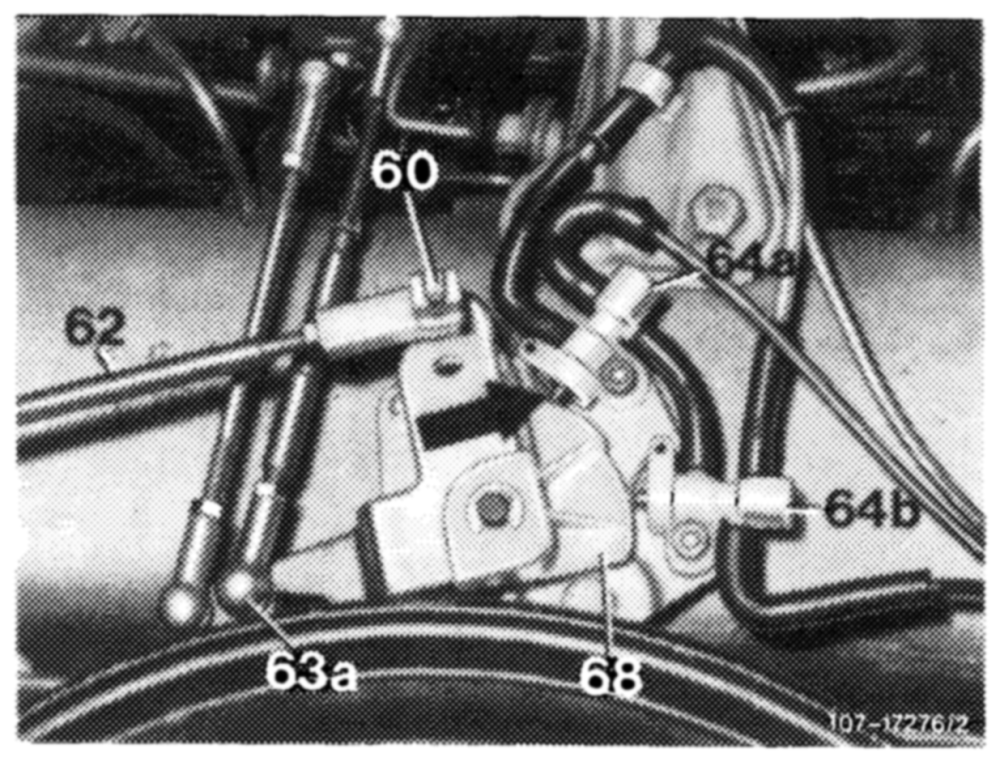
8 Push guide lever (68) in direction of full load. Adjust ball head (63a) in slot of guide lever (68) in such a manner that guide lever rests against adjusting sleeve and regulating lever on injection pump against full load stop.
9 Adjust control pressure rod (62). Regulating lever on injection pump should rest against idle speed stop (free travel rod should be extended). Carefully push control pressure rod on idle speed stop on transmission,
10 Hold control pressure rod (62) above check bore adjacent to bolt. Adjust end piece lengthwise in such a manner that bore in end piece is in agreement with test bore,
11. Connect contro! pressure rod (62), tighten counternut and secure with lock (60).
Note: When connecting end piece, trademark should face in upward direction.
12 Remove adjusting sleeve.
13. Adjust pull rod (65 in Fig. item 5) to 137 mm, measured from center to center of ball head and connect.
14 Check full throttle stop. With the engine stopped, push accelerator pedal from inside vehicle up to stop on kickdown switch. Accelerator pedal and regulating lever on injection pump should rest against full throttle stop. Loosen adjusting screw (arrow) if required. Adjust throttle linkage in such a manner that regulating lever rests against full throttle stop.
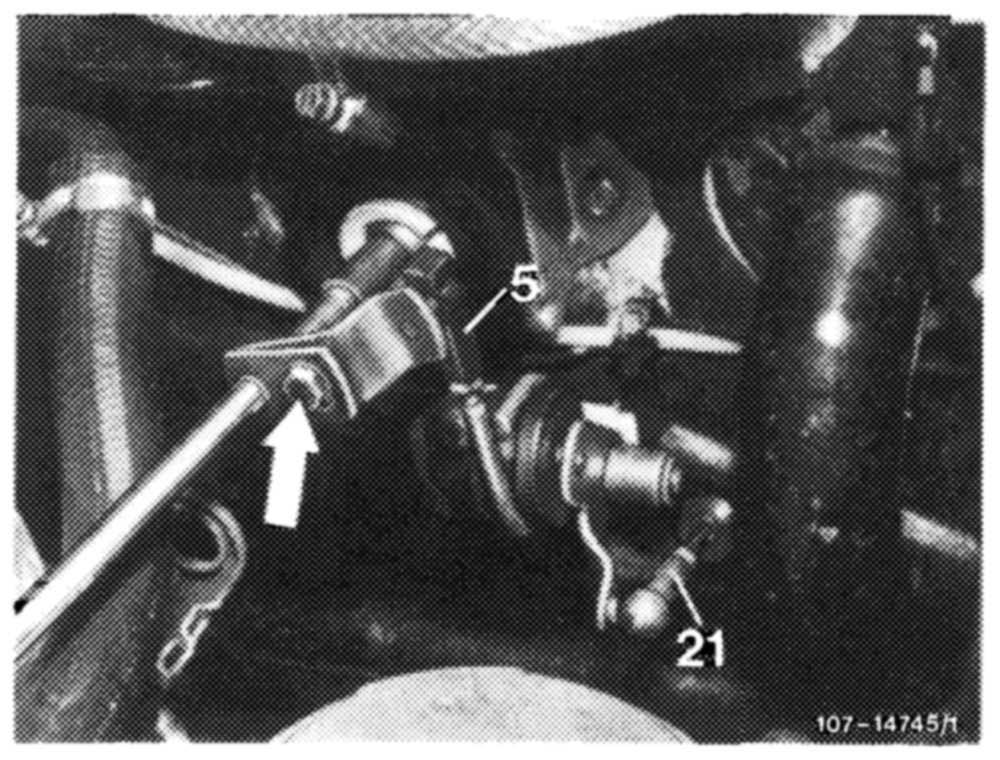
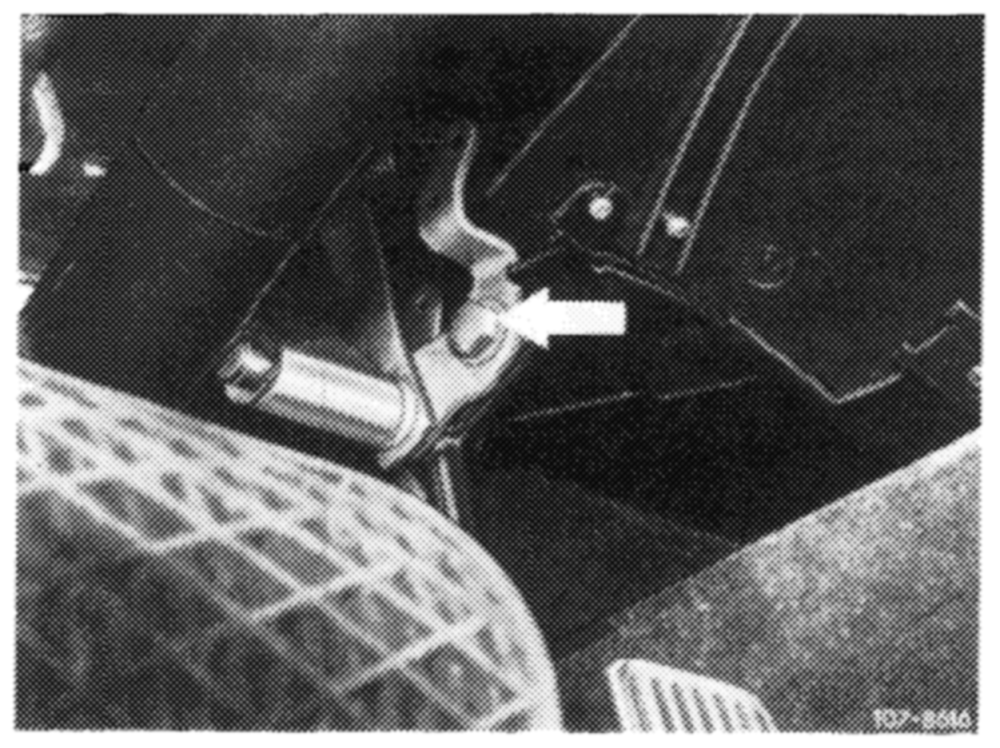
adjustment, set pull rod (5) from longitudinal regulating shaft to accelerator pedal to 68 mm, measured from center of ball socket to center of damping ring.
16 If the full throttle or idle speed stop is not attained with the above adjustment, set connecting rod (21) from guide lever engine compartment to accelerator pedal to 122 mm, measured from center to center of ball socket. Adjust regulating lever inside vehicle, if required, For this purpose, loosen fastening screw (arrow), pull accelerator pedal slightly up and tighten fastening screw again.
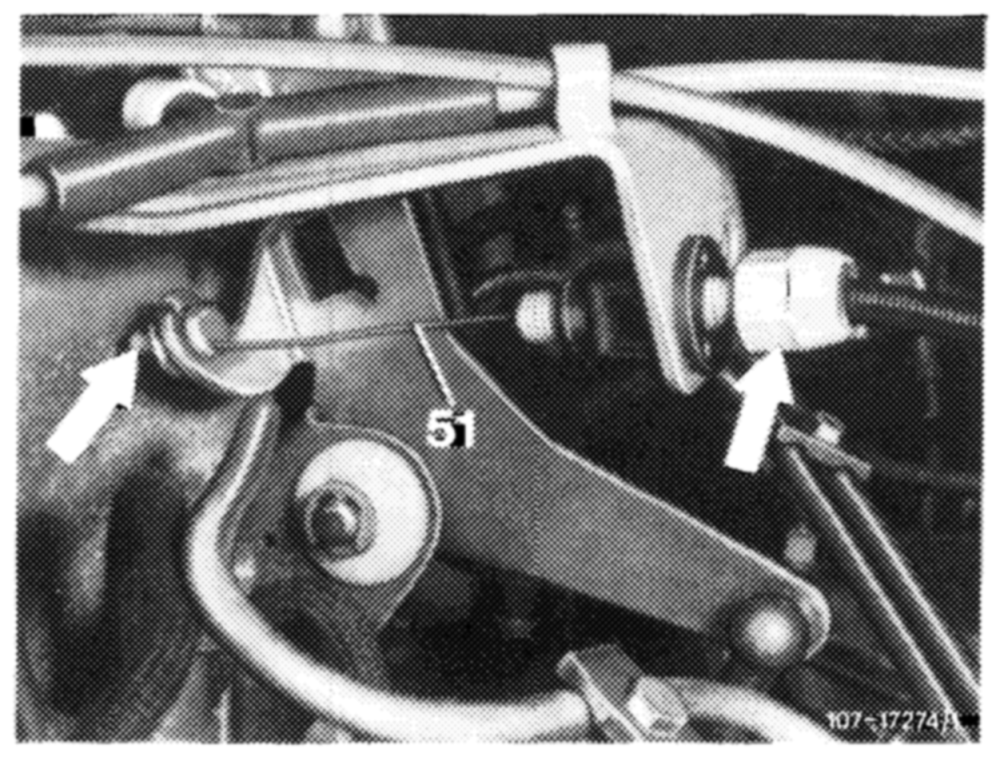
17 Set Bowden wire for cruise control. For this purpose, push shutoff lever up to stop. Bowden wire should rest free of play against regulating lever.
If required, adjust Bowden wire by means of adjusting screw (arrow). Release shutoff lever (idle speed position). In this position, Bowden wire has the required play (arrow).
51 Bowden wire for cruise control
C. Model 123.1, 126.120
@s& starting 1981 Federal and California version
Length of regulating rods in mm
| Pushrod (60) | 160 |
| Pull rod (61) | 100 |
| Pushrod (41) | 184 |
| Pushrod (5 in Fig. chassis regulation) | 222 |
| Connecting rod (80) | 196 |
| Connecting rod (5 in Fig. item 4) | 122 |
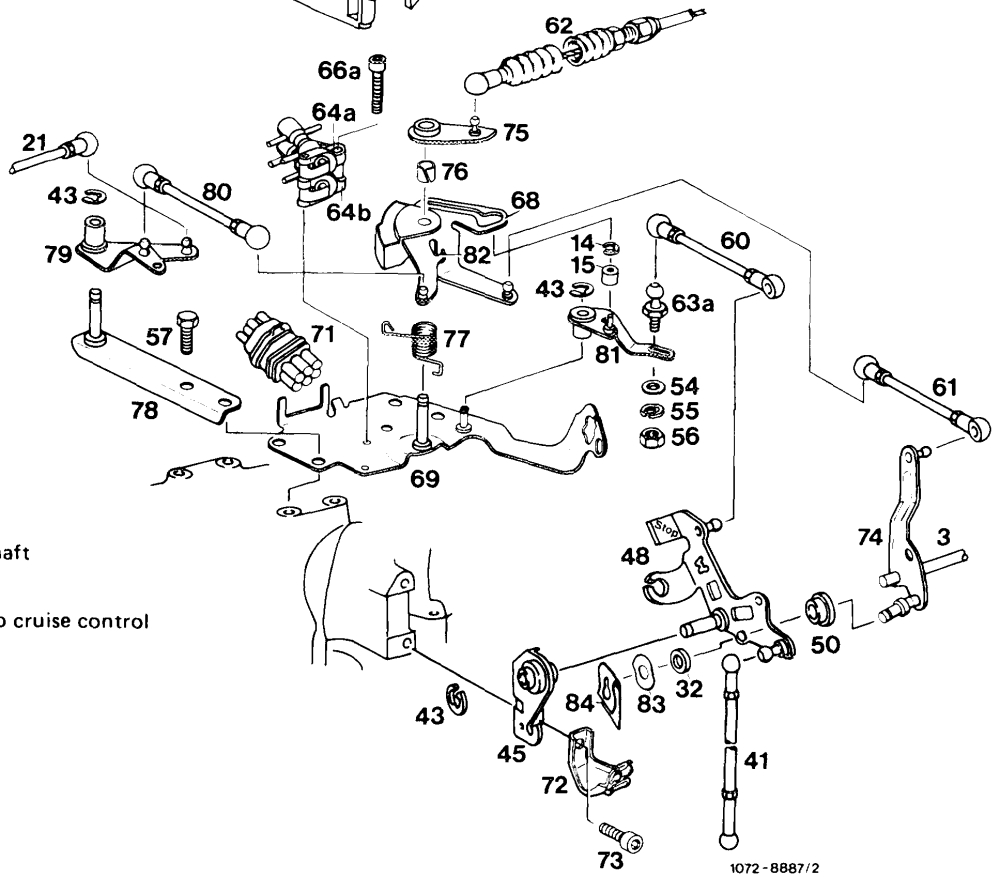
Engine regulation
3 Longitudinal regulating
14 Lock
15 Roller 21. Connecting rod for electro
32 Plastic spacing ring
41 Pushrod
42 Lock
44 Hex. screw
45 Bearing
47 Hex. socket screw
48 Angle lever
50 Plastic bushing
54 Washer
55 Spring washer
56 Nut
57 Screw
60 Pushrod
61 Pull rod
62 Bowden wire for automatic transmission Guide lever 63a Adjustable ball head Drag lever 64a Switchover valve idle speed shutoff — EGR Plastic bushing
64b Switchover vaive full throttle shutoff — EGR
Spring 66a Hex. socket screw Holder
68 Guide lever Guide lever
69 Valve plate Connecting rod
70 Cap Lever
71 Central plug Stop
72 Cable holder Corrugated washer
73 Hex. socket screw Lock
Chassis regulation
Model 123.1
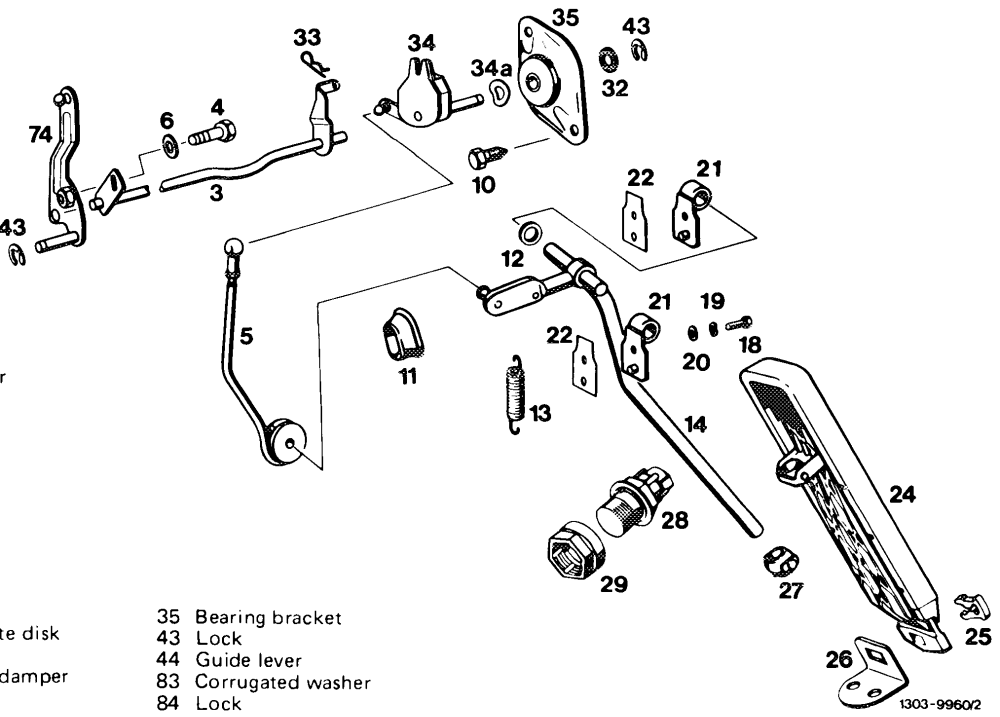
Longitudinal regulating shaft Adjusting screw Pushrod Washer Screw Rubber grommet Plastic spacing ring Return spring Accelerator pedal lever Hex. screw Corrugated washer Washer Bearing Gasket Accelerator peda! Clip Fastening plate Joint Kickdown switch Adjusting nut Copper netting-graphite Lock . Regulating lever with 34a Corrugated washer
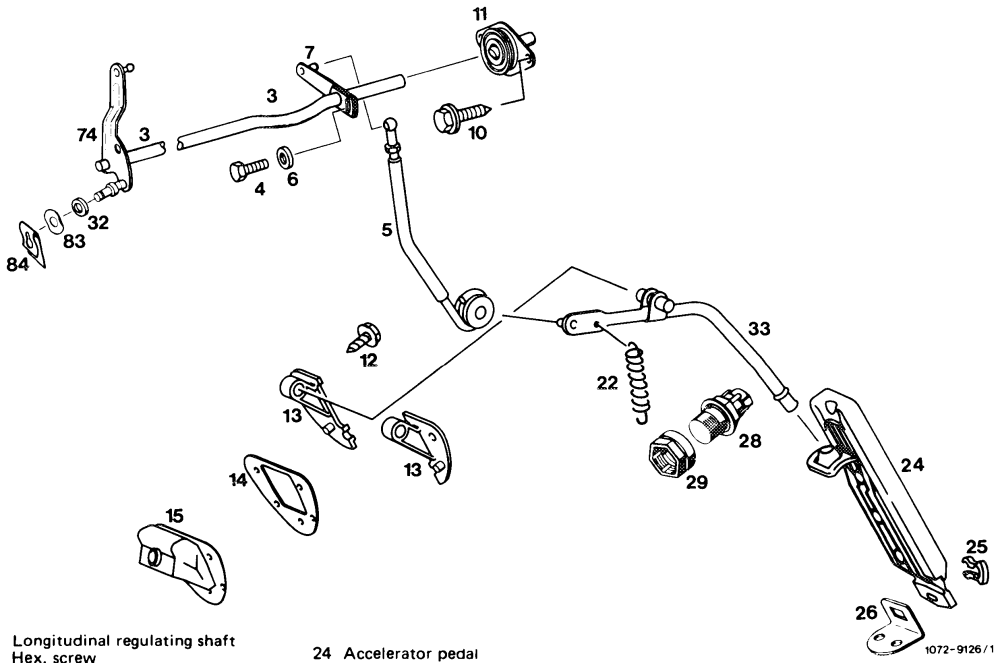
Model 126.120
SH OYOMN AW Pushrod 25 Clip Washer 26 Fastening plate Guide shaft 28 Kickdown switch Hex. screw 29 Adjusting nut 1 Bearing for longitudinal 32 Plastic spacing ring 1 regulating shaft 33 Accelerator pedal lever Hex. screw 74 Guide lever 12 Bearing 83 Corrugated washer 13 intermediate plate 84 Lock 14 16 Rubber sleeve 22 Return spring
Two switchover valves (64a, 64b) are mounted ona valve plate (69) to control EGR. Connection is made by means of a central plug (71). A cap (70) is fitted to prevent dirt from settling on plastic running surface.
64a Switchover valve idle speed shutoff-EGR 64b Switchover valve full throttle shutoff-EGR
68 Guide lever
69 Valve plate
70 Cap 71. Central plug
Adjustment
1 Check throttle linkage for easy operation and bends. Replace damaged parts.
2 Disconnect all regulating rods and bowden wire (62).
3 Check whether regulating lever (1) of injection pump rests against idle speed stop (3).
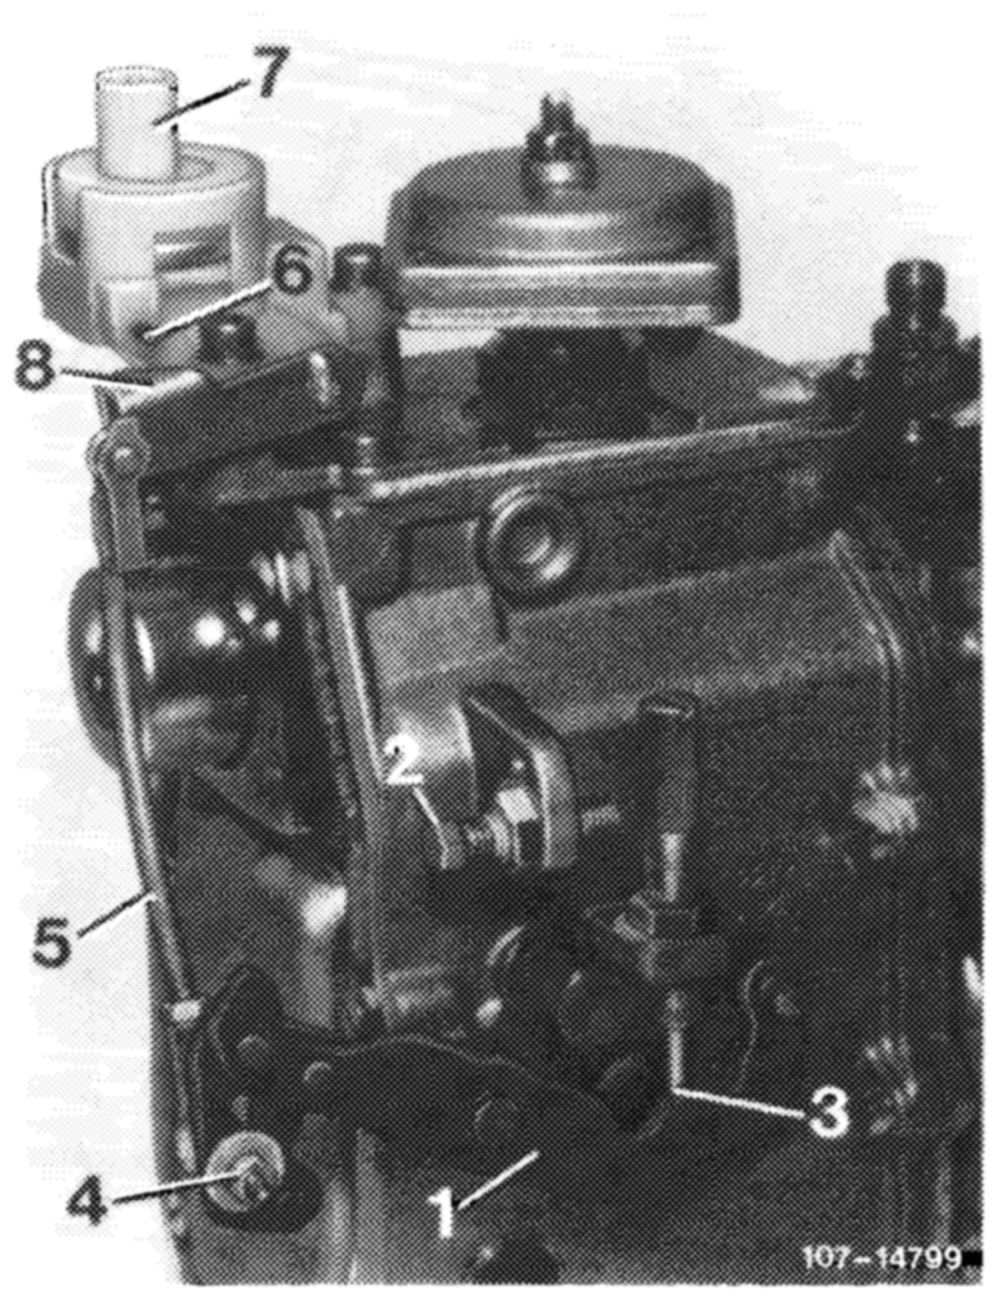
4 Check whether connecting rod (5) is correctly set. For this purpose, push regulating lever (1) to full throttle stop (2). Actuating lever (8) should have max. 0.5 mm play up to full throttle stop (6). Adjust connecting rod (5) with adjustable ball head (4), if required. The connecting rod (5) should be set to 122 mm, measured from center of ball socket to center of linkage.
WANMNNRWN— Regulating lever Full throttle stop Idle speed stop Adjustable ball head Connecting rod Full throttle stop on vacuum control valve Vacuum control valve Actuating lever for vacuum control valve
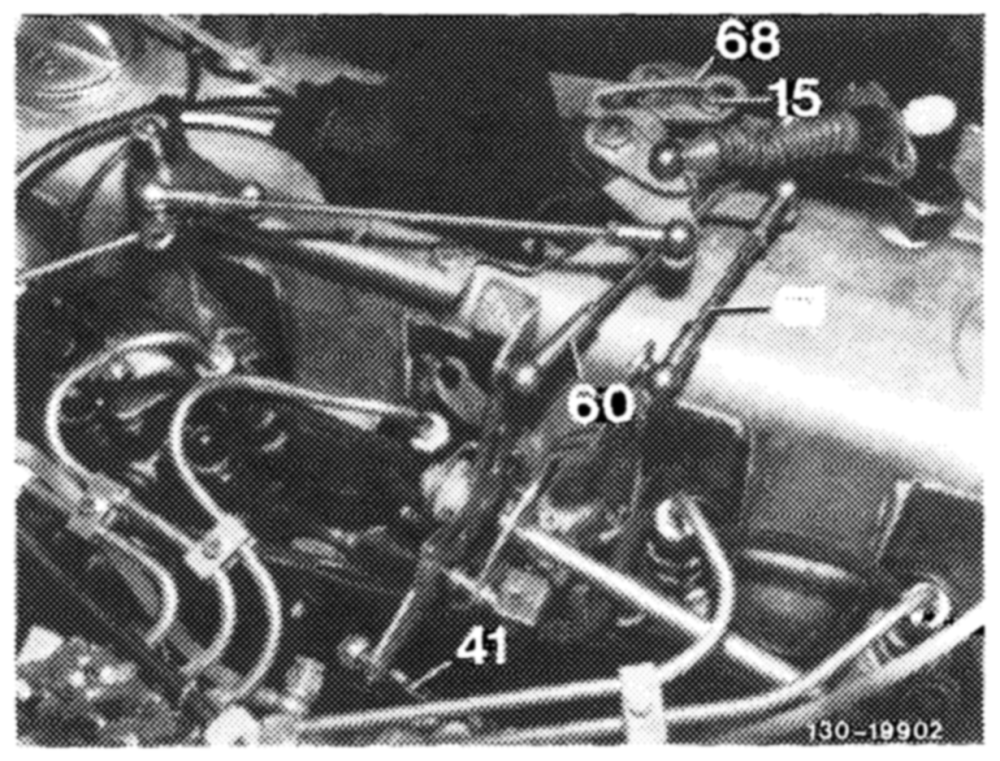
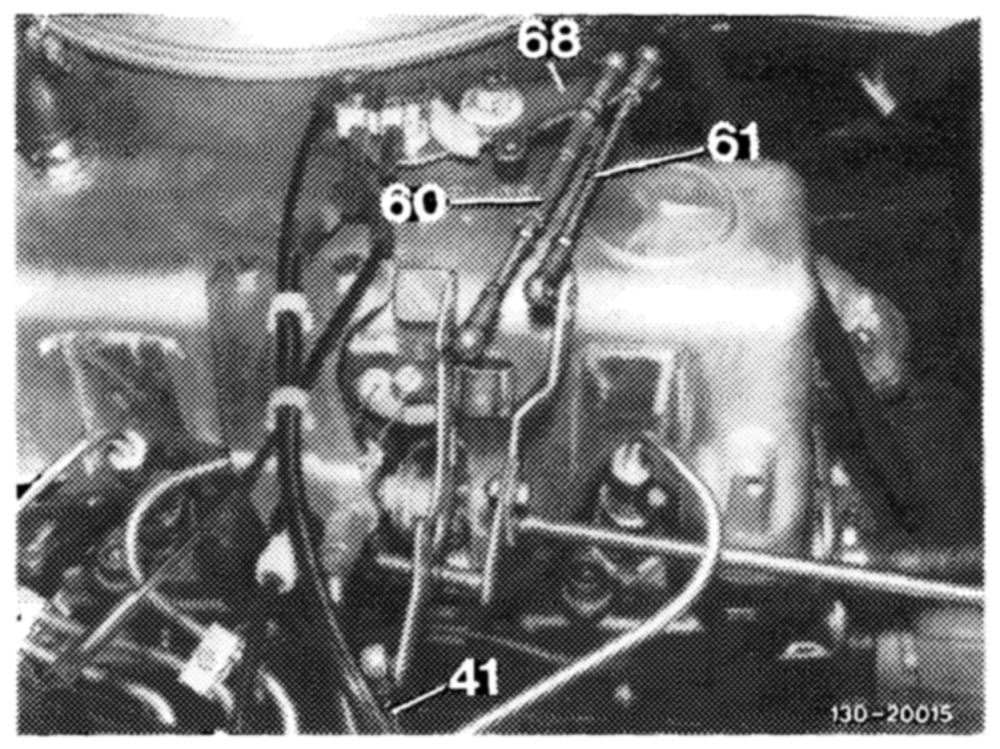
5 Set pushrod (41) to 184 mm measured from center to center of ball socket and connect.
6 Adjust guide lever (68):
a) Idle speed position: Set pushrod (60) in such a manner that roller (15) in guide lever (68) rests free of tension against end stop.
b) Full throttle position: Push guide lever (68) to full throttle, roller (15) should have approx. 1 mm distance in quide lever (68).
Set adjustable ball head (63a), if required. When adjusting ball head, readjust pushrod (41). (Fig. engine regulation),
Regulating lever on injection pump should also rest against full throttle stop.
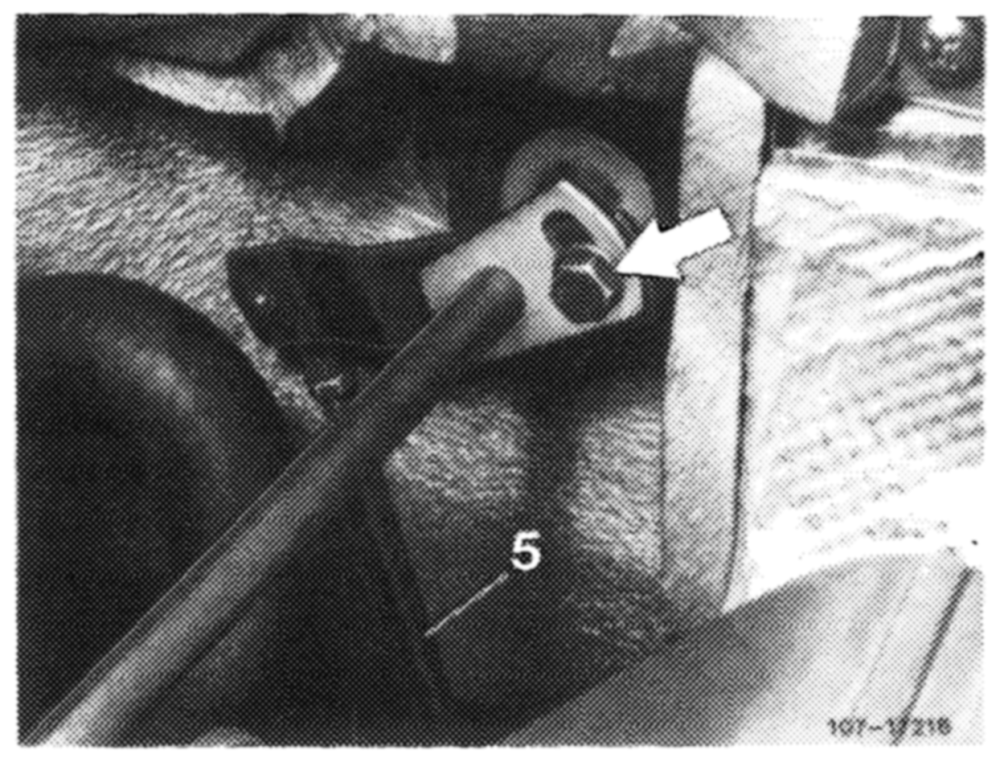
7 Check full throttle stop. With engine stopped, step on accelerator pedal from inside vehicle up to stop on kickdown switch. Regulating lever on injection pump should rest against full throttle stop. Loosen adjusting screw (arrow), if required. Set throttle linkage in such a manner that regulating lever rests against full throttle stop.
If full throttle or idle speed stop is not attained with this adjustment, set pushrod (5) from longitudinal regulating shaft to accelerator pedal to 222 mm, measured from center of ball socket to center of damping ring.
8 Set pull rod (61) to 100 mm, measured from center to center of ball socket and connect.
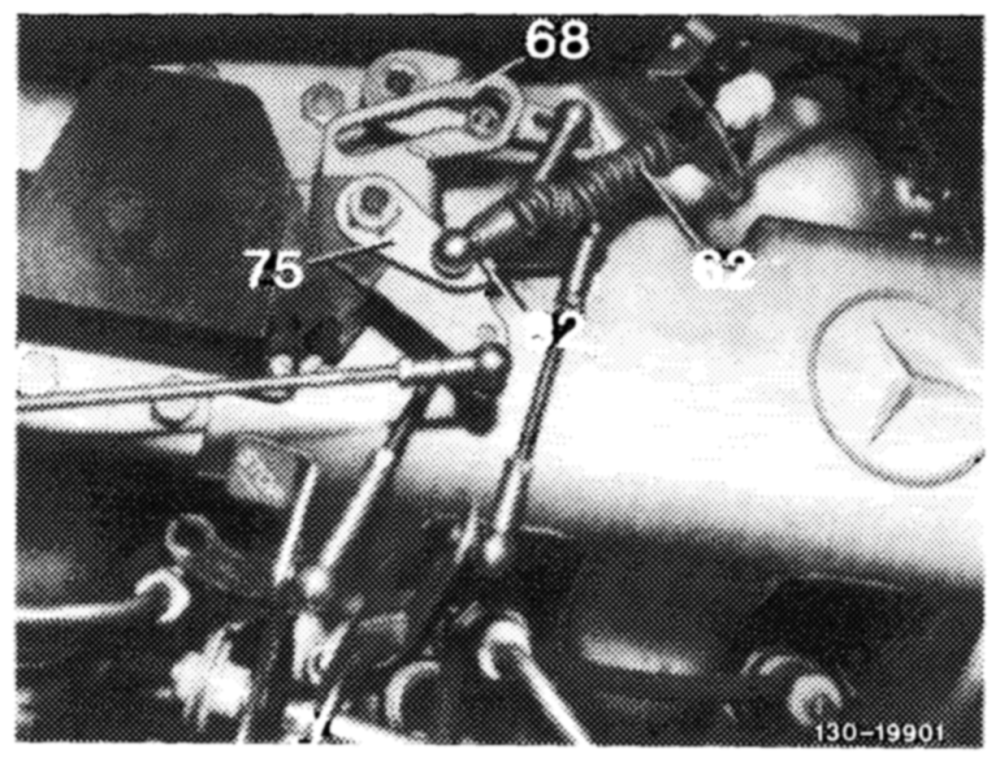
9 Adjust Bowden wire (62). Guide lever (68) should rest against idle speed stop and drag lever (75) against stop (82). Pull Bowden wire (62) against noticeable idle speed stop on transmission, adjust to tension-free length and connect.
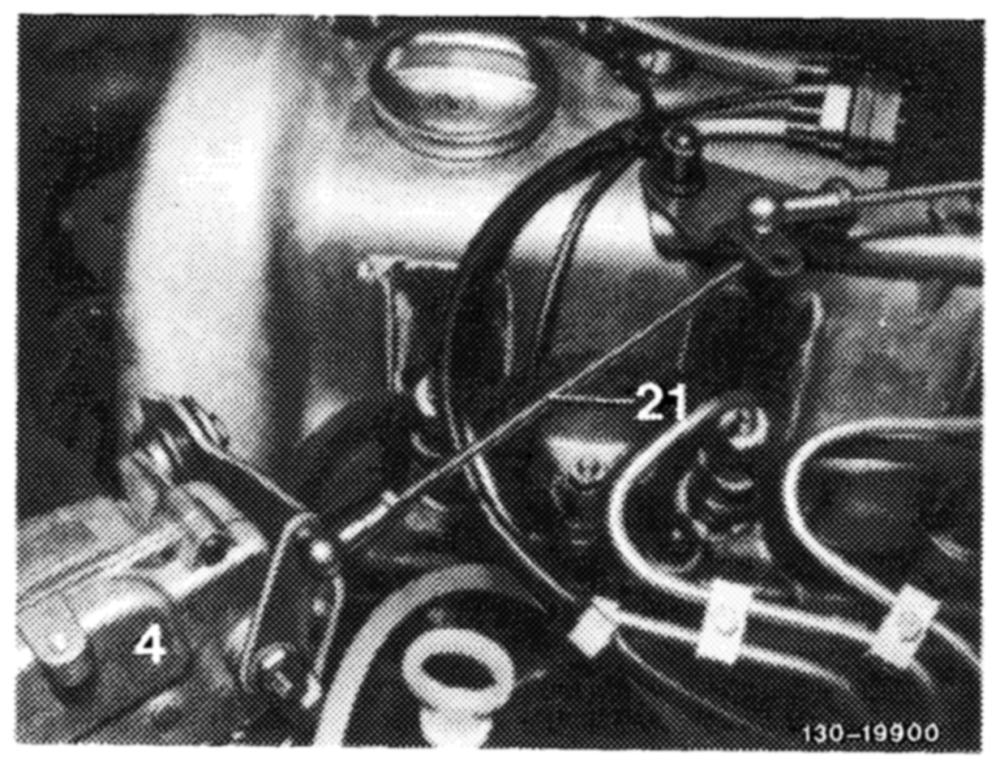
10 Adjust cruise control. Check whether actuator rests against idle speed stop of cruise control. For this purpose, disconnect connecting rod (21) and push lever of actuator (4) clockwise to idle speed stop. When attaching connecting rod (21), make sure that lever of actuator is pushed away from idle speed stop by approx. 1 mm. Adjust connecting rod, if required,