Mounting
WIS 03-3200
Preceding work: Operation no. of operation texts and work units or standard texts Enging removed and disassernbled. and flat rates Oil galleries in crankcase and in crankshaft cleaned. 03-4700, 6401, 7021 Crankshaft examined for cracks, dimension of tolerance, hardness and concentricity.
4. Engine 119.96/97 with fit bearing
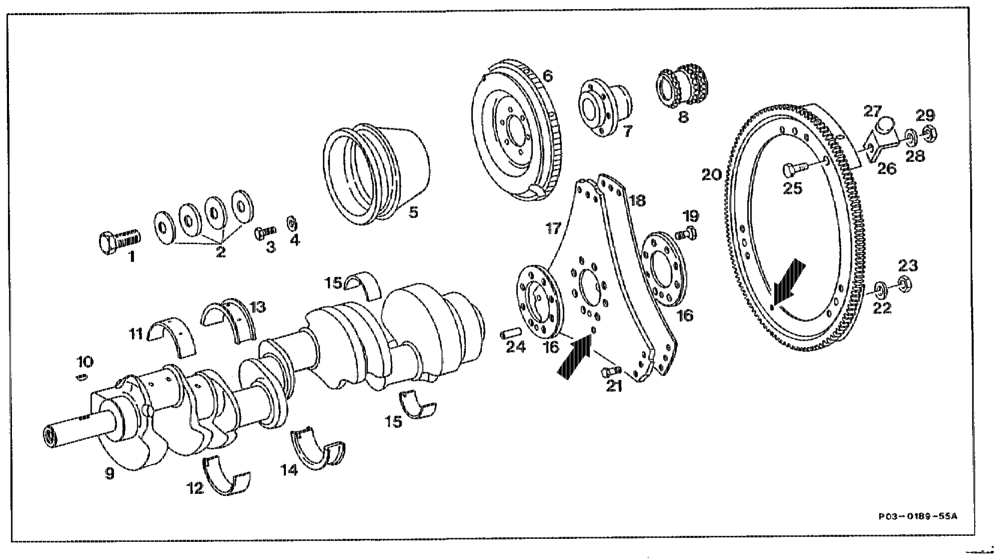
1 BoltM18x1.5%45 mm 15, Conrod bearing shells
2 Belleville spring washers (4 ea.), 16 Discs 4.5 mm thick
3 Bolt M 8x 22 (6 ea.) 17 Driven plate 1.5 mm thick, 296 mrn cia.
4 Spring lock washer A8 18 Driven plate 1 mim thick, 287 mm dia. Stretch bolt for driven plates
5 Belt pulley 19
6 Vibration damper M 12x 1.5% 23 (8 ea.)
7 Hub 20 Ring gear with segments
8 Crankshaft gear 21 Fit bolts M612 mm
9 Crankshatt 22 Spring washer B 6
10 Woodruff key 23 Nut M 6 nN Crankshaft bearing shell in crankcase 24 Locating pin
12 Crankshaft bearing shell in bearing cap 25 Bolt M5 x10
13 Fit bearing shell in crankcase with oil 26 Bracket groove and drilling 27 Magnet
14 Fit bearing shell in bearing cap 28 Washer A 5.3 Nut M5 29
wth RA 03.1313-3200/1
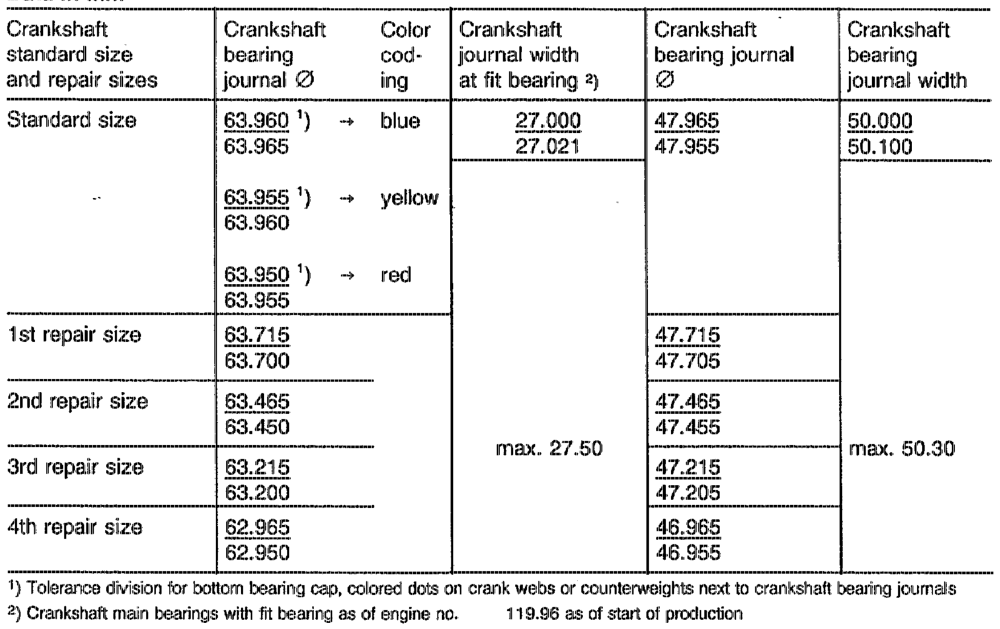
Data in mm
up to engine no. 119.970 12 036277 119.971 12 017447 119.972 12 004797 119.974 12 008072 119.975 12 010516
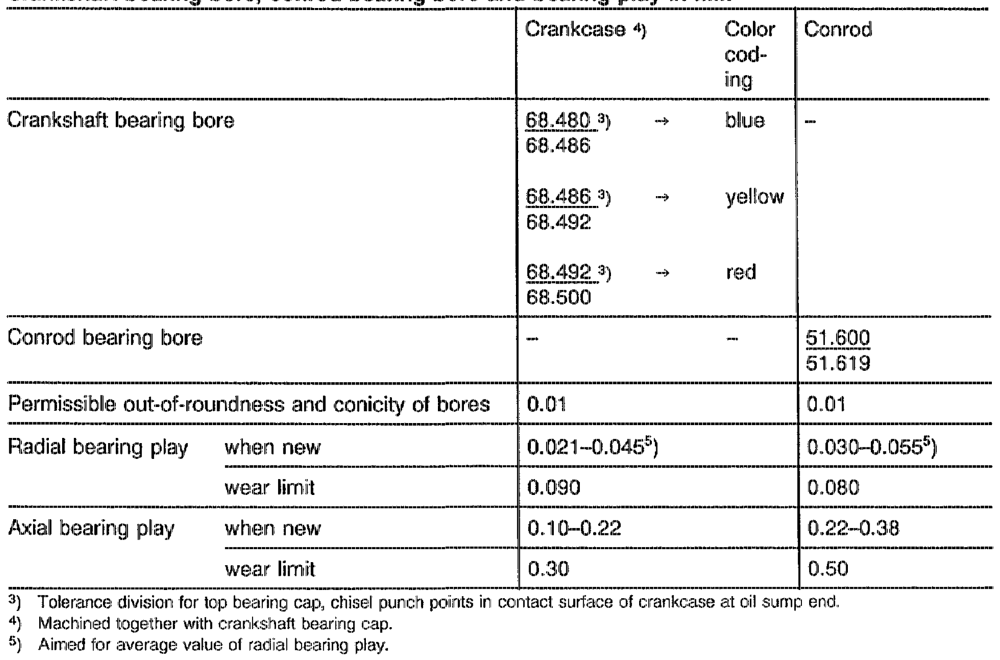
Crankshaft bearing bore, conrod bearing bore and bearing play in mm
tian RA 03.1313-3200/2
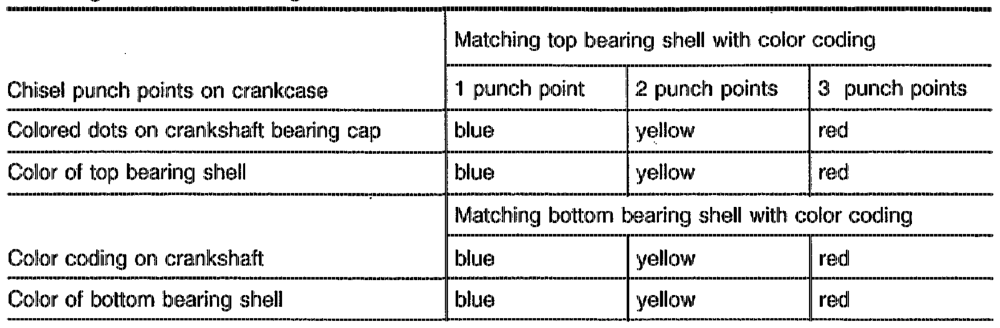
Matching crankshaft bearing shells to crankcase
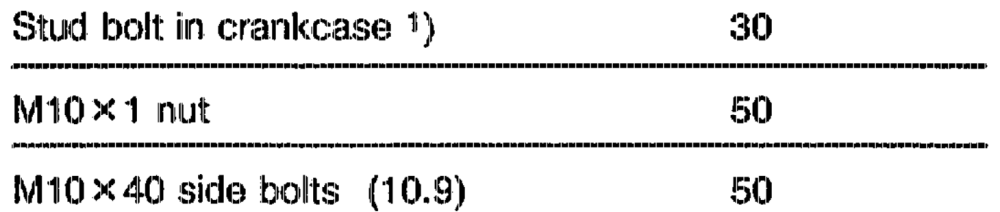
Crankshaft bearing stud bolt
1) The stud bolts lose their locking effect after being unscrewed and must therefore only be used once.
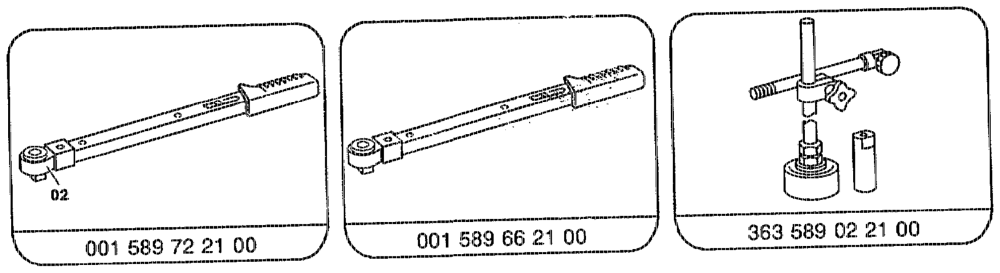
Special tools
Quick-callipers for internal measurements, e.g. Hahn und Kolb dia. 40 60 mrn BorsigstraBe 50 D-7000 Stuttgart 30 Order no. G 222 K

Quick-callipers for internal measurements, Order no. G 322 K
wth RA 03.1913-3200/3
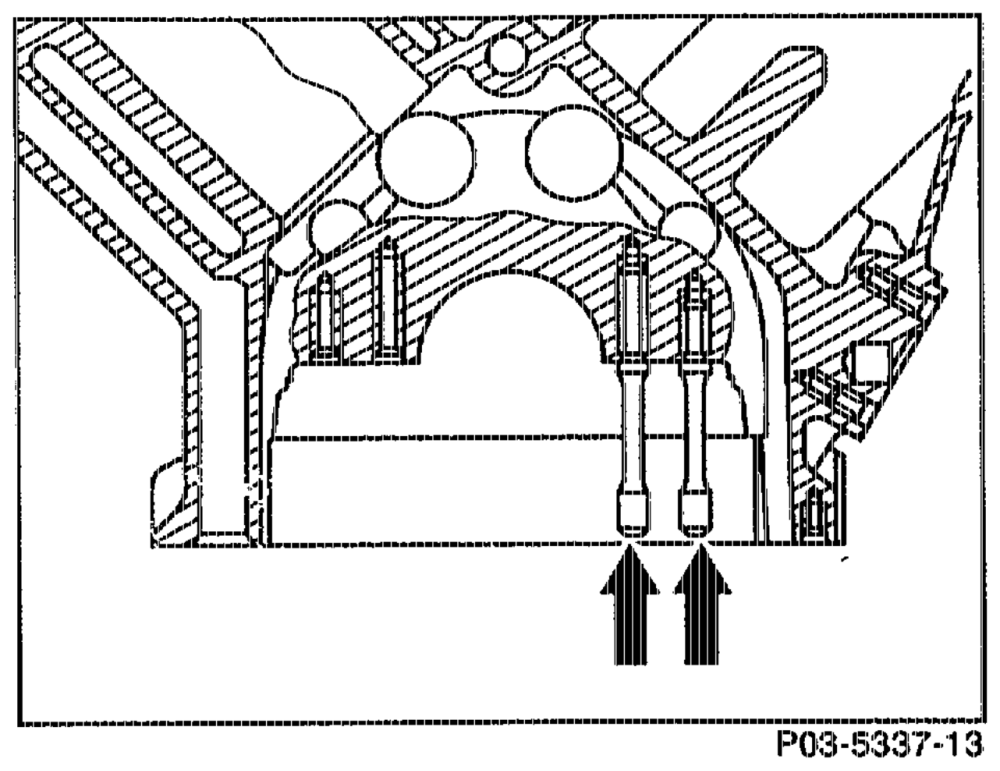
Note Self-locking stud bolts are screwed into the crankcase for securing the crankshaft bearing caps. These stud bolts may only be used once as the locking adhesive applied over approx. 8 mm length of the thread is no longer effective when they are removed. Pay attention to the different insertion depth and collar dia. when replacing the stud bolts.
L When performing repairs, no HELI-COIL inserts may be used for the self-locking stud bolts of the crankshaft bearing caps.
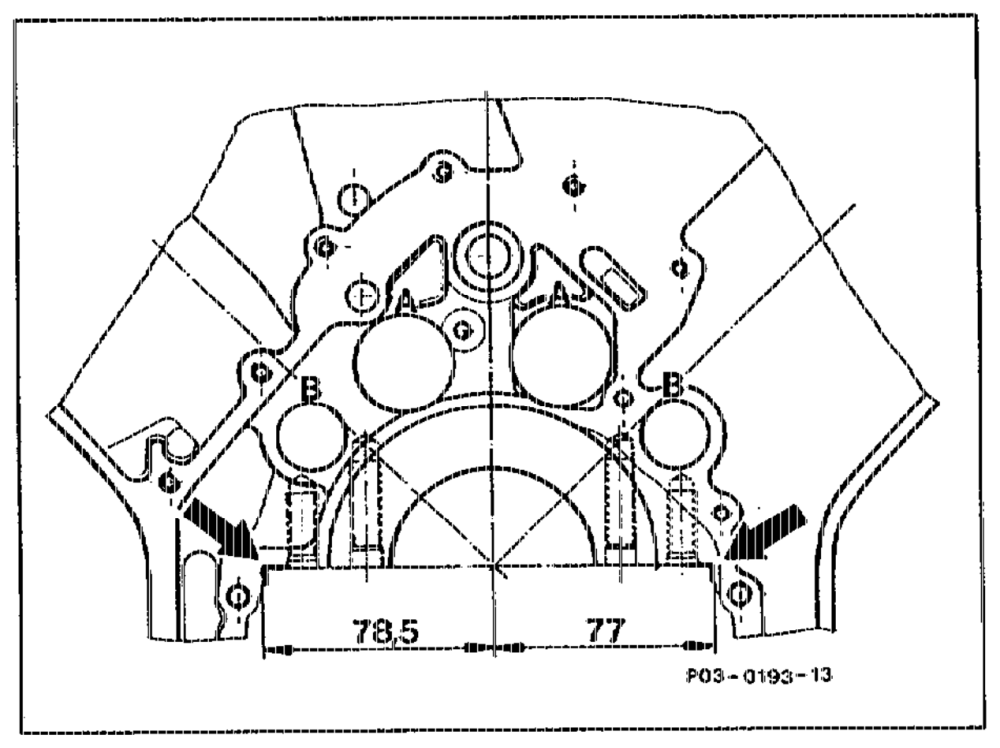
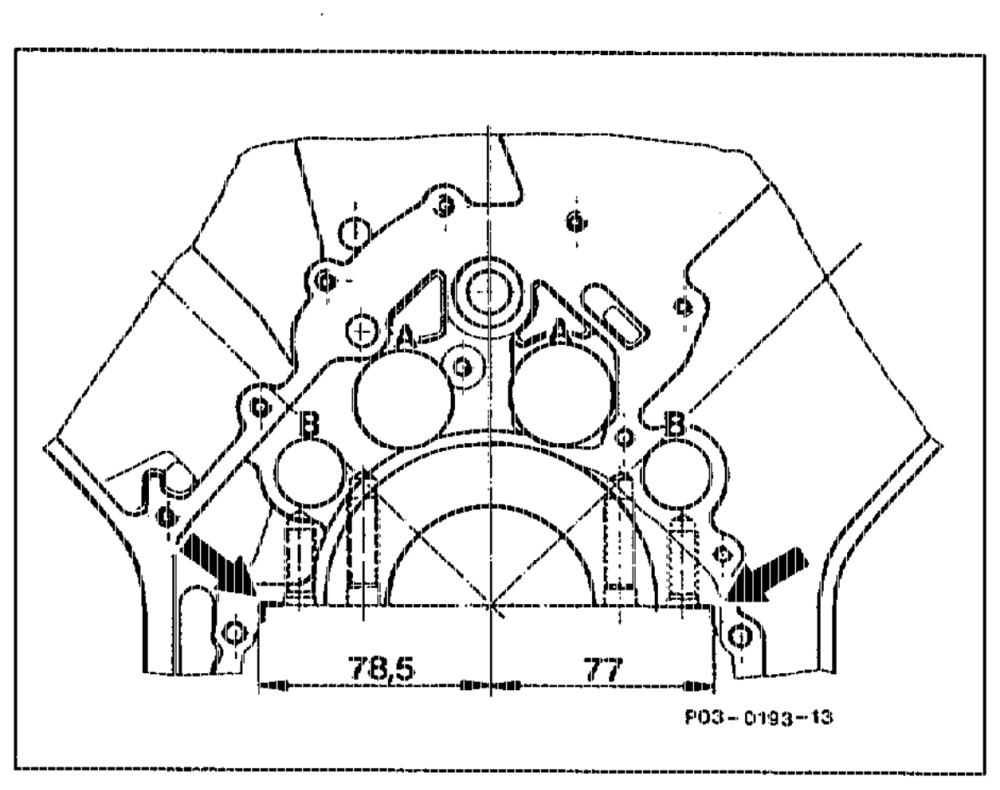
The 5 crankshaft bearing caps manufactured from malleable cast iron are fitted into the side in the crankcase (arrows). The fitting face (arrows) is positioned off-centre so that the bearing caps can only be installed in one position.
The three centre bearing caps are additionally bolted to the housing side walls.
The crankshaft bearing caps are machined together with the crankcase and are not available as a replacement part.
othe RA 03.1913-3200/4
\f bearing damage has occurred, the conrods must be removed and any swarf removed from the conrod bores and the oil passages of the crankshaft.
Carefully clean the oil passages in the crankcase, crankshaft, timing case cover, oil filter housing, closing cover, oil pump etc.
Examine crankshaft for cracks, dimensional tolerance and hardness (08-3180).
Matching crankshaft bearings, Installing crankshaft
1 Install crankshaft bearing caps, pay attention to marking, 1 is to the front.
The fit face is asymmetrical (arrows); the crankshaft bearing caps can thus only be installed in one position.
2. Oil thread and contact surface of nuts, tighten nuts to 50 Nm.
3. Oil thread and head contact surface of side bolts (M10 40), install with the washers and tighten to 50 Nm.
wihin RA 03.1913-3200/5
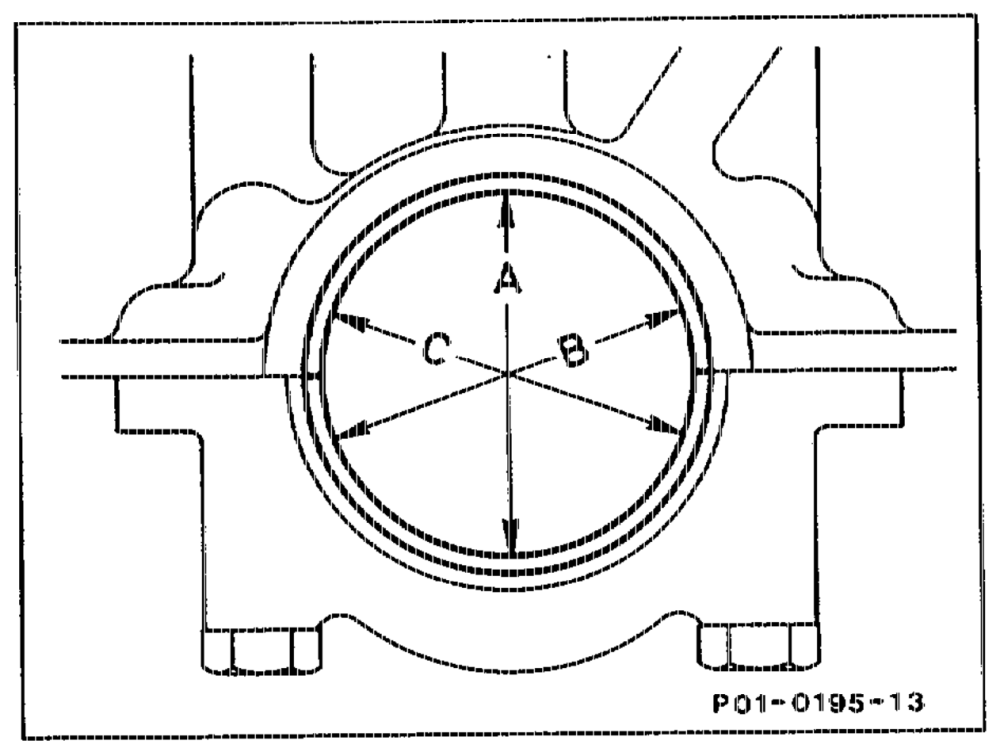
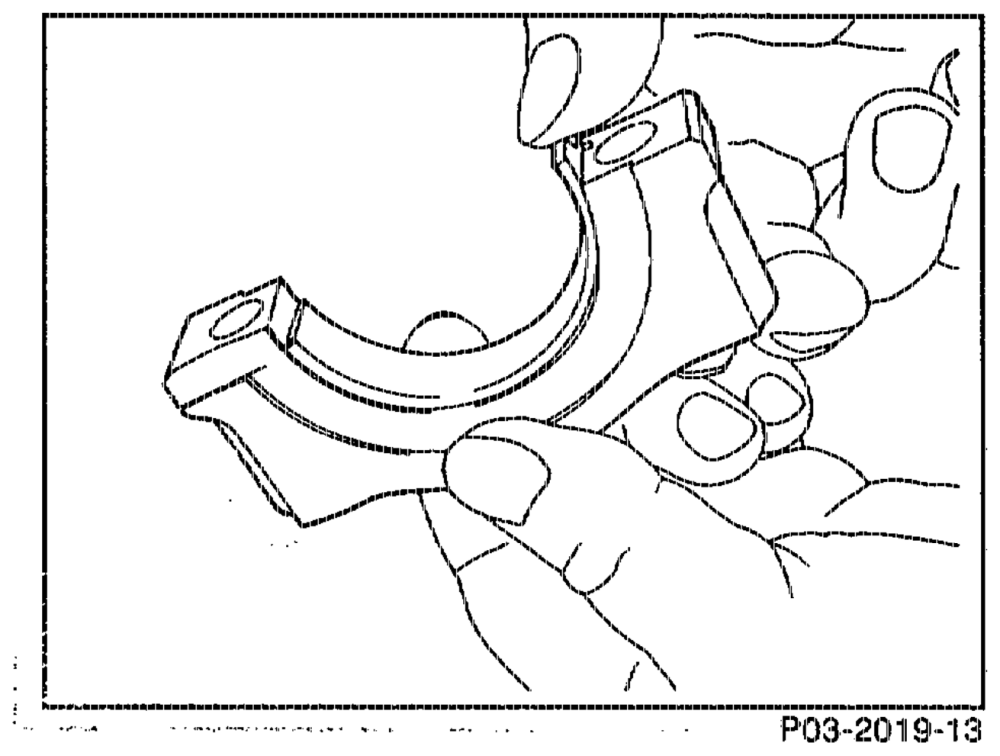
4 Measure crankshaft bearing bore in direction A, B and C at two levels (conicity); note measured values. lf a crankshaft bearing bore exceeds the specified value or is conical, dress bearing cap at its mating surface on a dressing plate up to max. 0.02 mim.
5 Insert bearing shells, install crankshaft bearing cap.
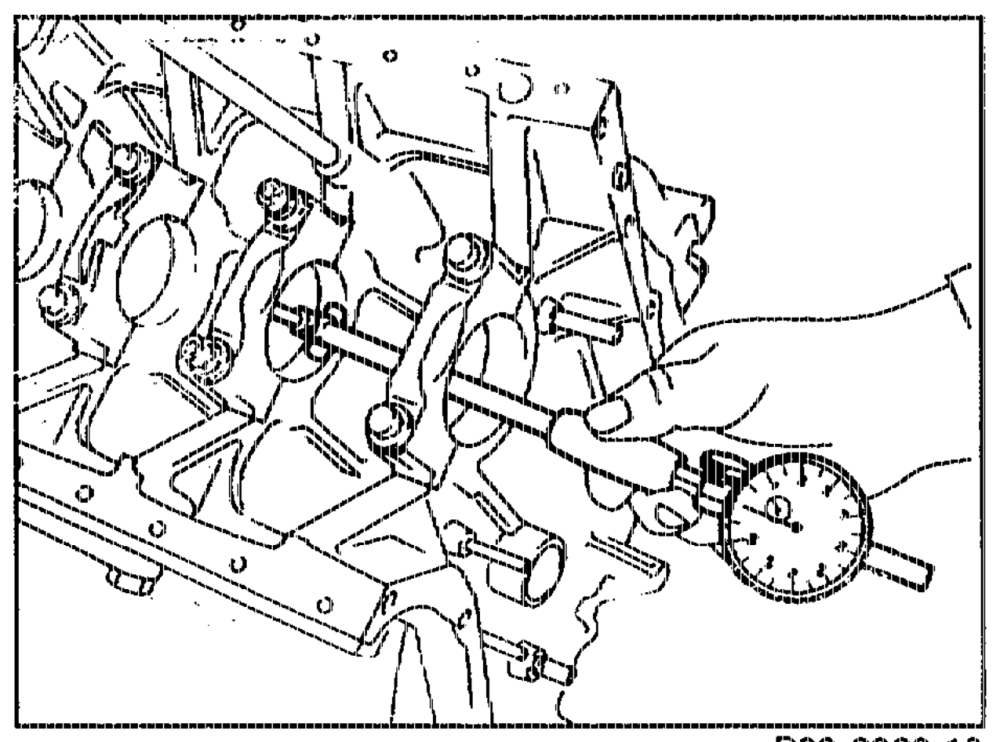
Tighten nuts and side bolts to 50 Nm.
6 Measure bearing diameter and note.
P03-2020–13
tin ~RA 03.1313-3200/6
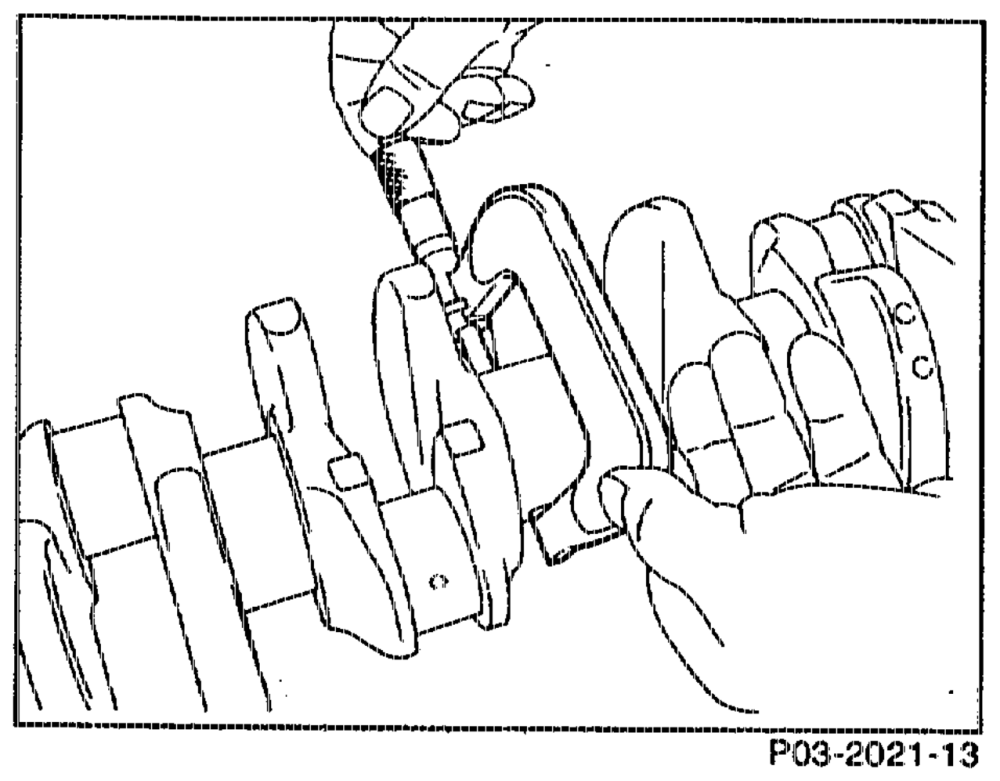
7 Measure crankshaft bearing journals, determine radial play of crankshaft bearing.
Note
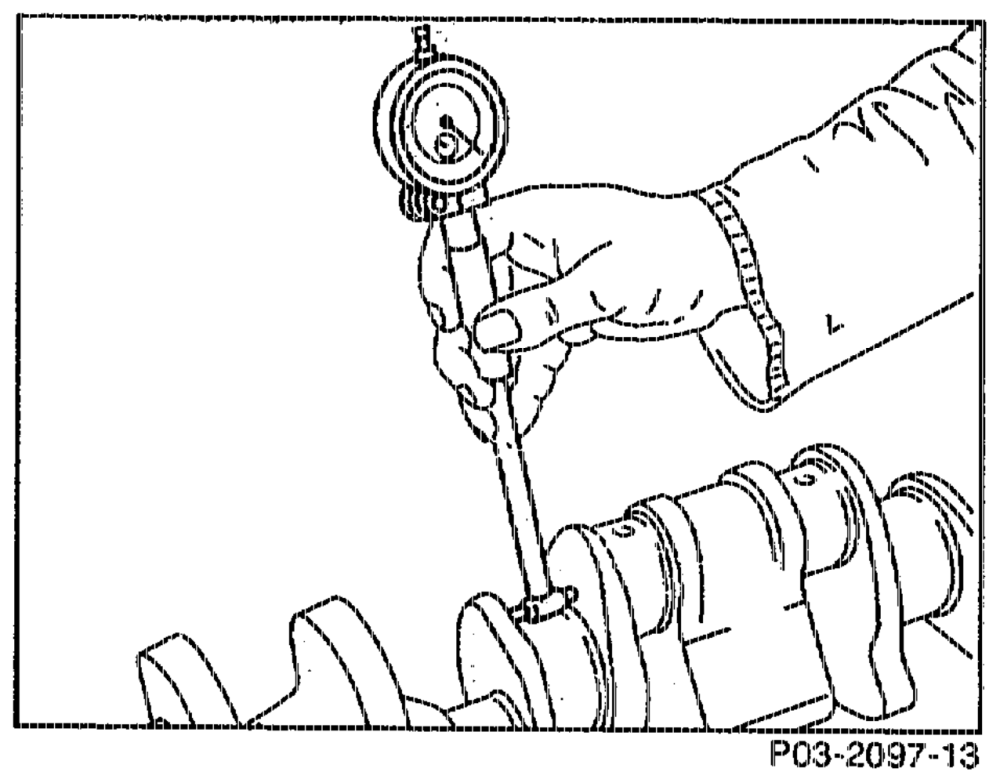
The bearing play can be connected by replacing the bearing shells (see table Matching crankshaft bearing shells to crankcase); in this case, aim for the average value of the bearing play stated.
8 Measure width of fit bearing journal and of fit bearing. Determine axial play of crankshaft.
The fit bearing shells of the repair sizes are supplied oversized.
9 Moisten bearing shells and crankshaft with SAE 30 engine oil and insert crankshaft.
aN Install bearing shells with oil drilling into the crankcase.
otis RA 03.1313-3200/7
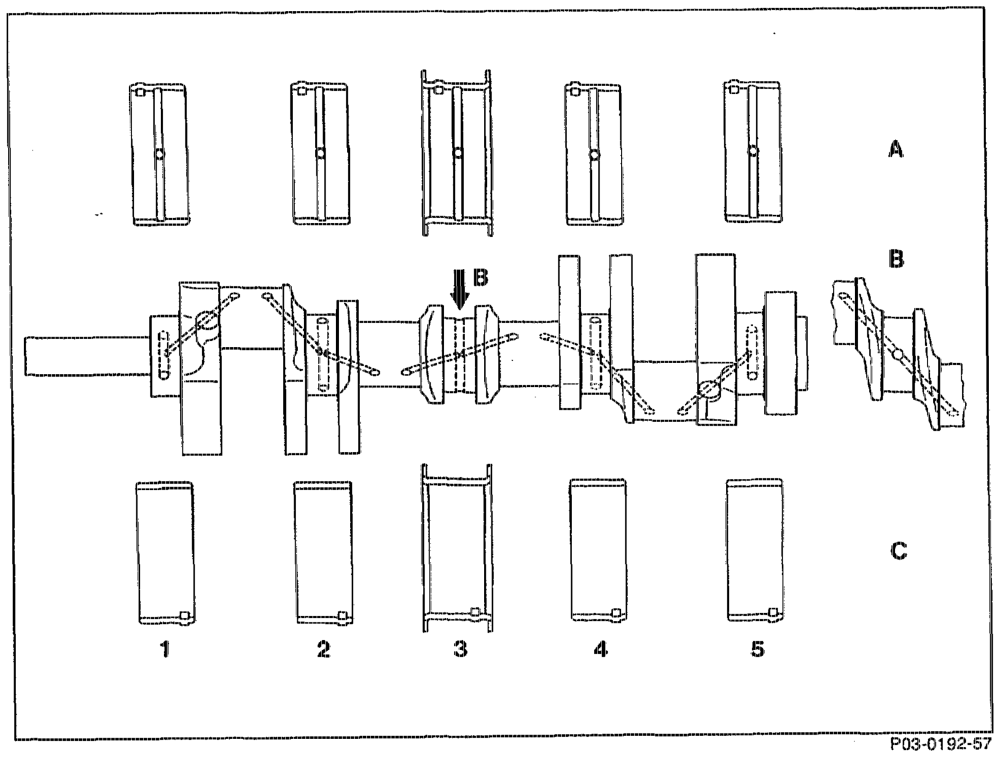
A Crankease B Fit bearing CG Crankshaft
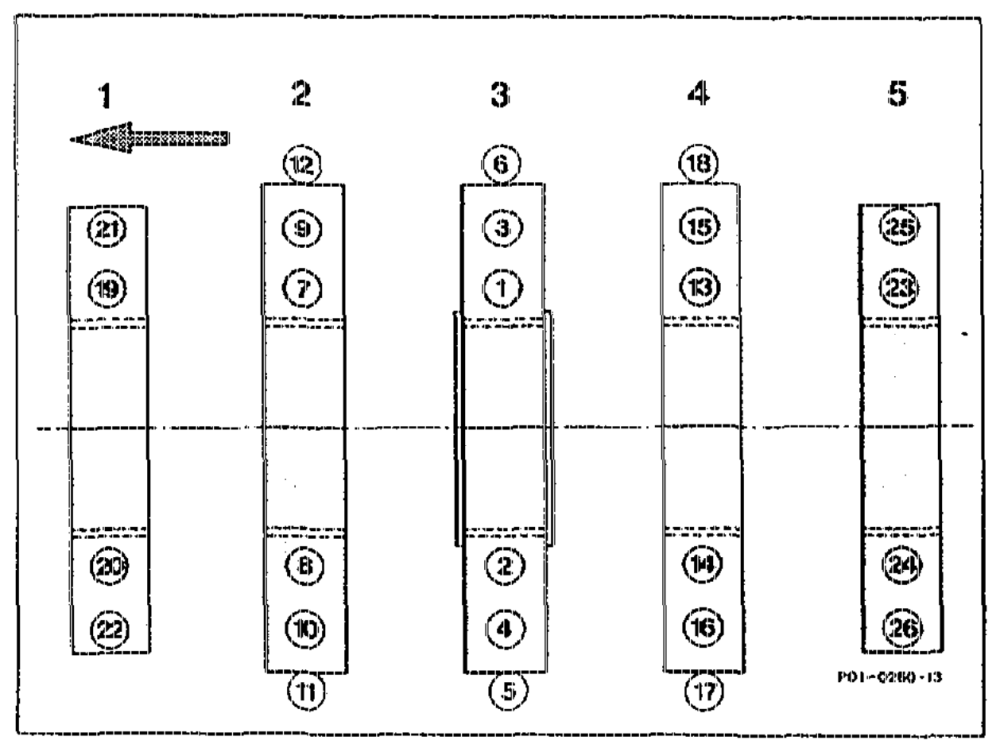
10 Tighten crankshaft bearing caps to the specified torque in the order of the tightening diagrarn. Oil the thread and the bolt head or nut contact surface for this step.
Nuts 50 Nin. Side bolts 50 Nm
Note Bolts of quality 10.9 should be used for the side bearing cap fixture.
athe = RA 03.1313-3200/8
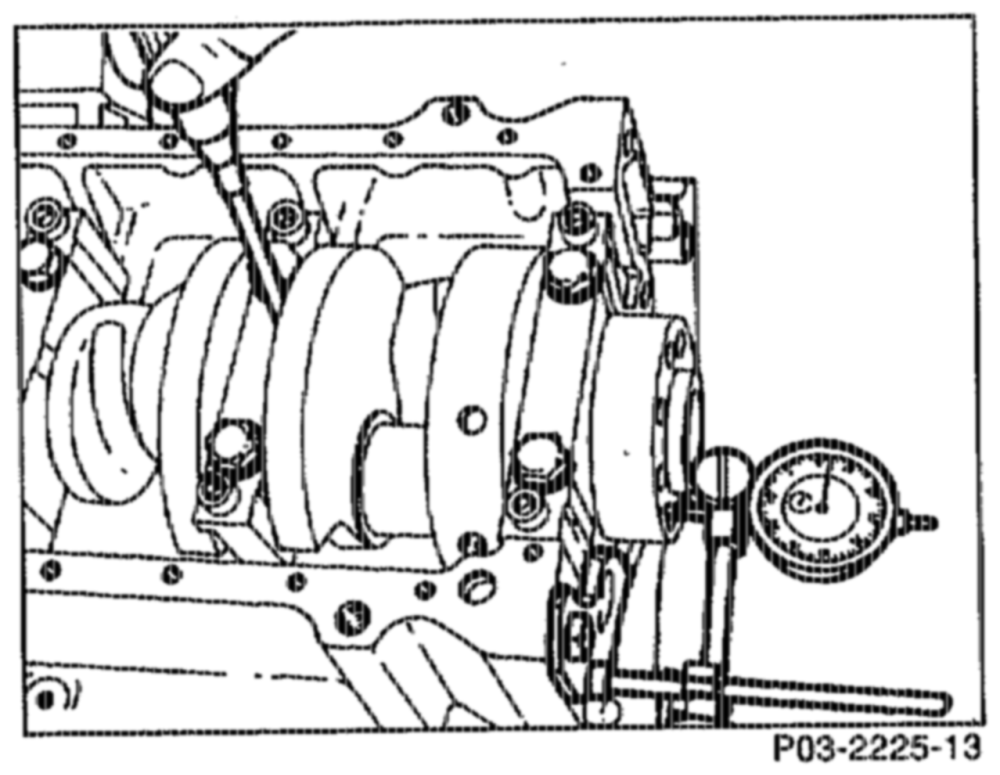
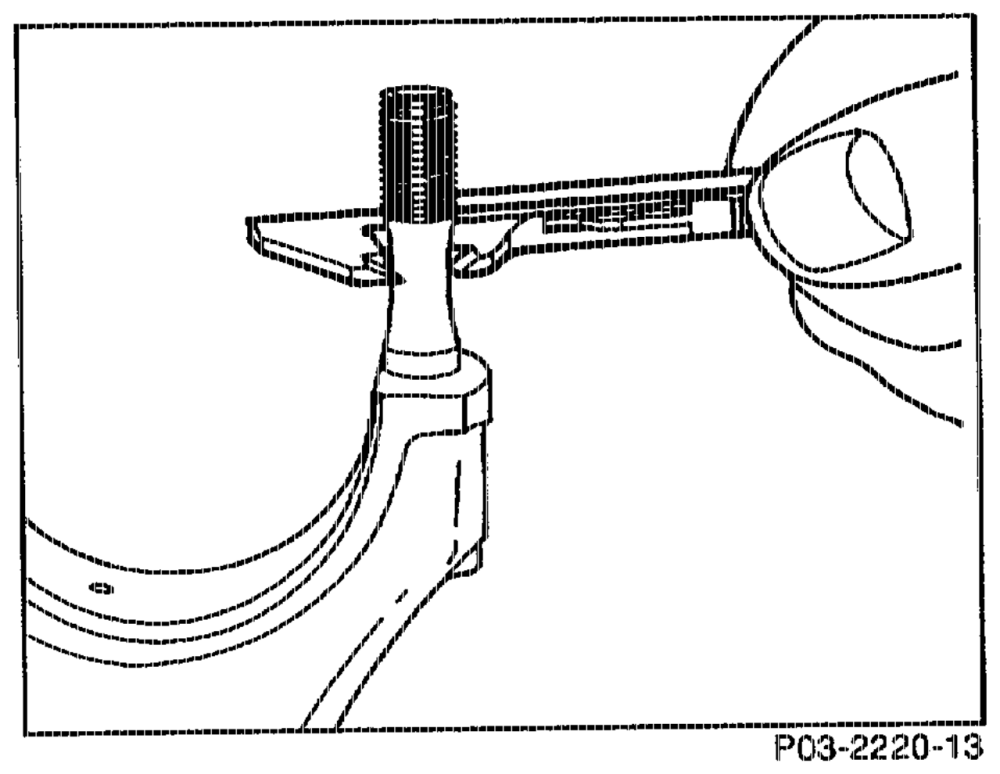
12 Rotate crankshaft by hand and check whether it runs freely.
Matching conrod bearings and installing
13 Examine conrod bolts (03-3100).
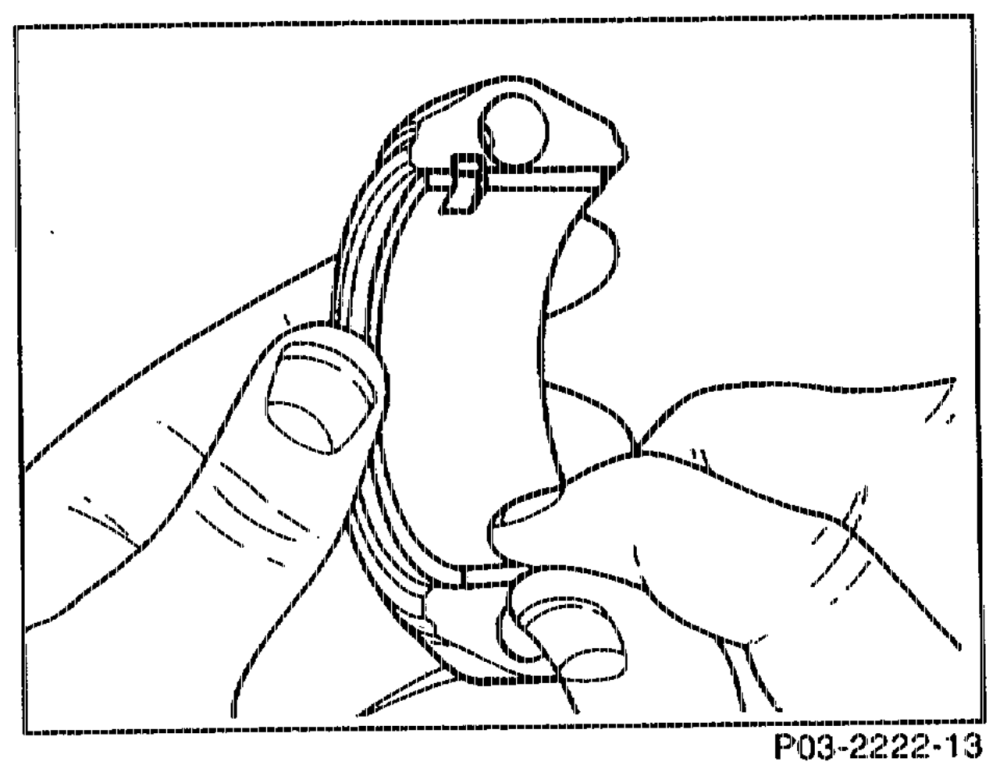
14 Repair and align conrod (03-3130).
15 Insert conrod bearing shells, install conrod bearing caps with conrod bearing shells and tighten conrod nuts or bolts to 35 Nrn.
16 Measure bearing diameter and note.
17 Measure conrod bearing journal. Determine racial play of conrod bearing.
Note The bearing play can be corrected by replacing the conrod bearing shells; if this step is performed, aim for the average value of the specified bearing play. Crankshaft bearing shells without colour coding are thicker than those with blue colour coding, although it should be noted that the wail thicknesses without and with colour coding may overlap.
athe RA 03.1313-3200/9
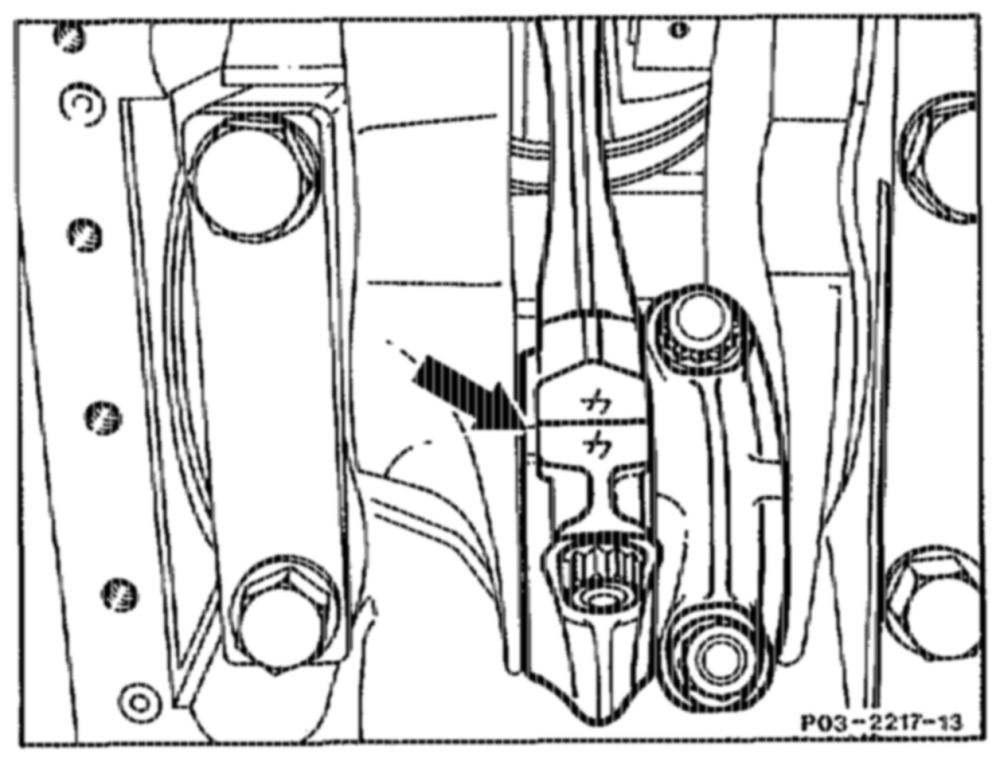
19 Moisten bearing shells, crankshafts, pistons and cylinders with SAE 30 engine oil. Install conrod with pistons (03-3160).
A Pay attention to marking.
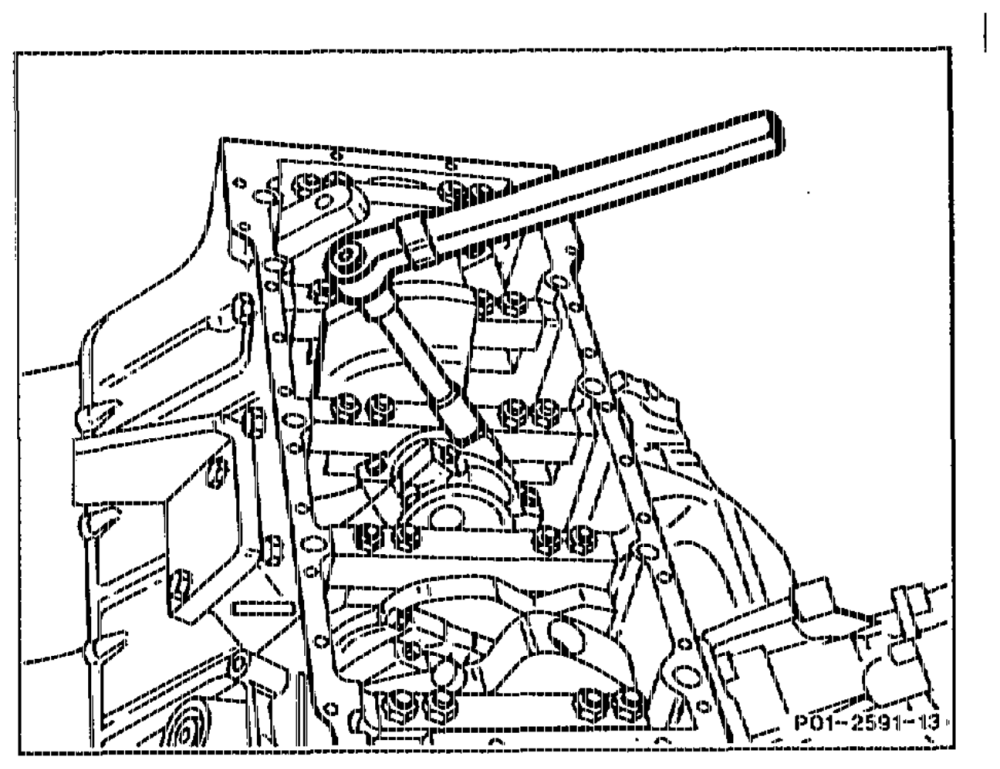
Install the bearing shells with the oil drilling in the conrod otherwise the conrad bushes will not be lubricated.
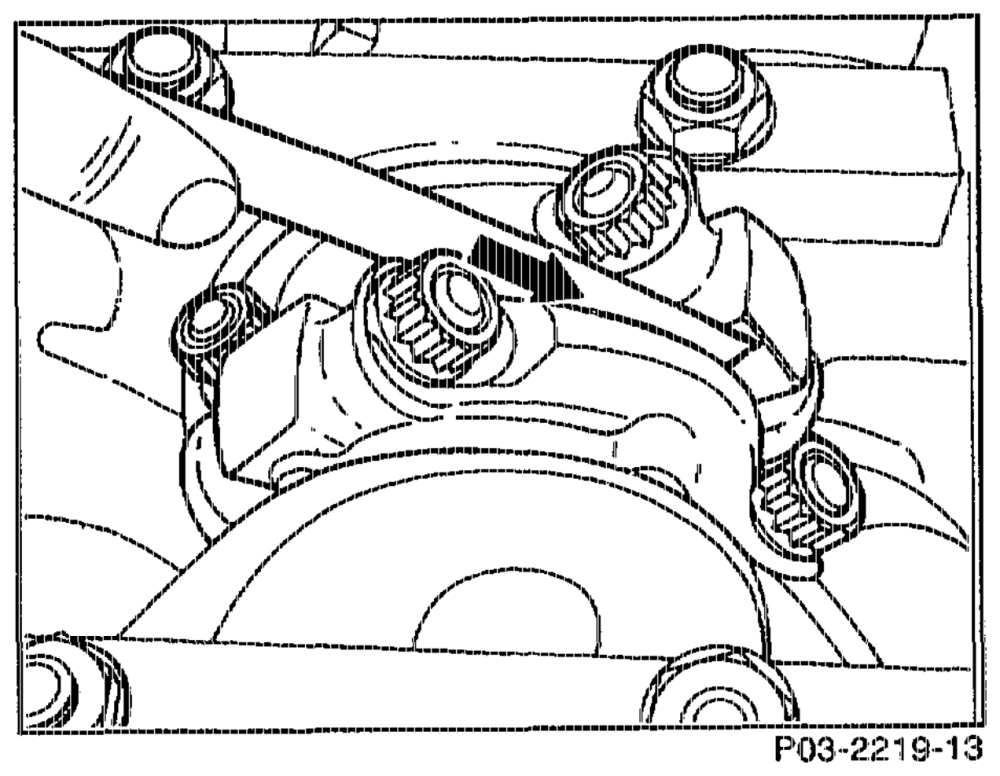
20 Tighten conrod nuts and conrod bolts (03-3100).
21 Measure axial play of conrod bearings. Examine clearance of conrod in the piston.
LN Disassemble oil pump, clean, renew if necessary. Replace oil delivery valve. Clean oil filter, carefully clean air-to-oil cooler or replace.
Install initial operation oil filter element. Change engine oil and oil filter element after 1000 1500 km.
ohbie RA 03.13913-3200/10
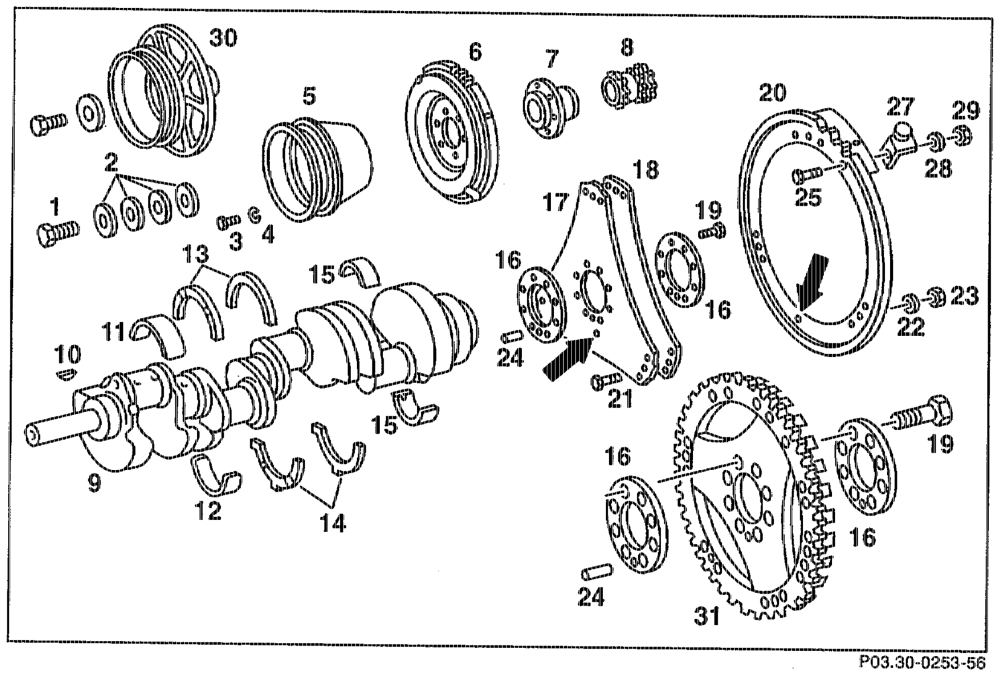
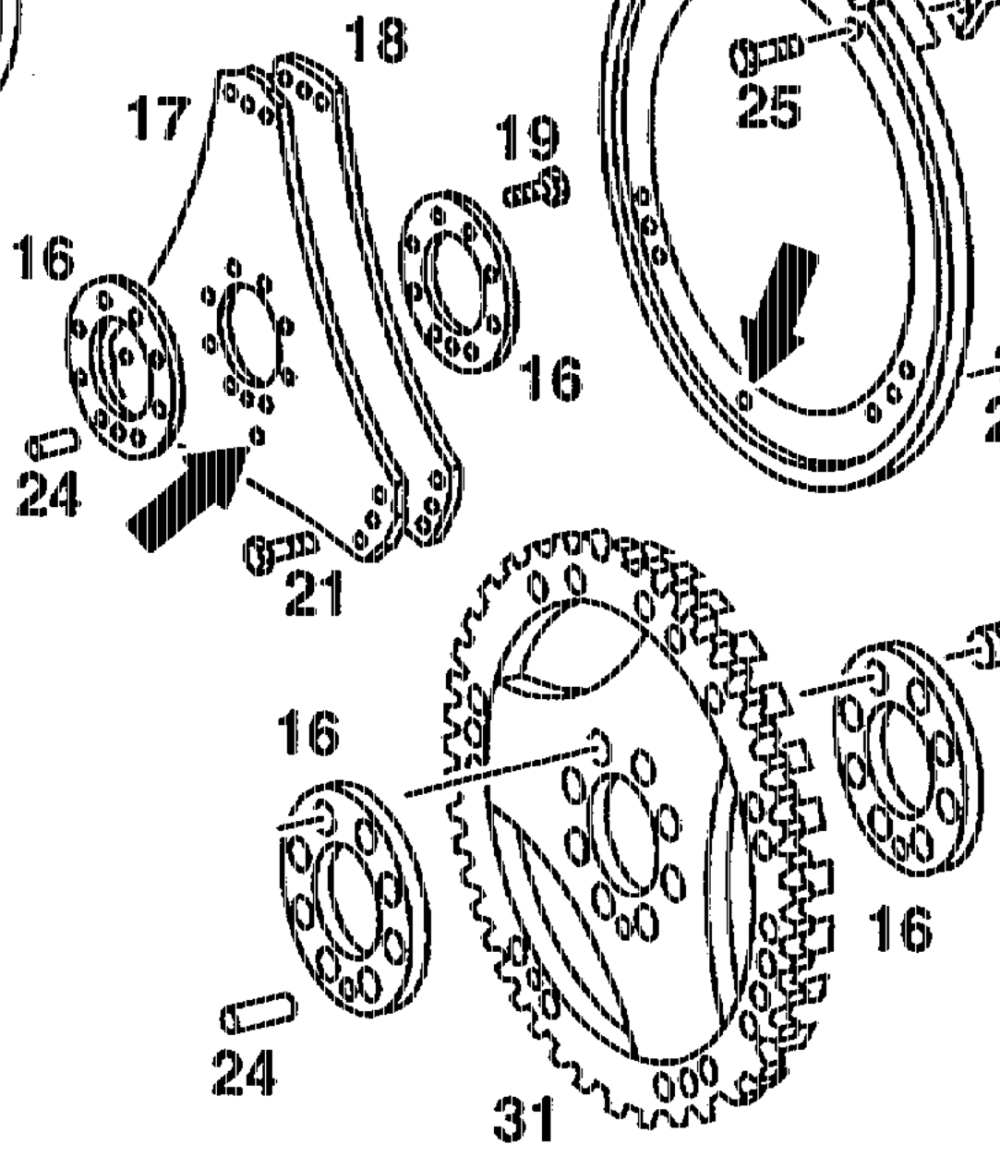
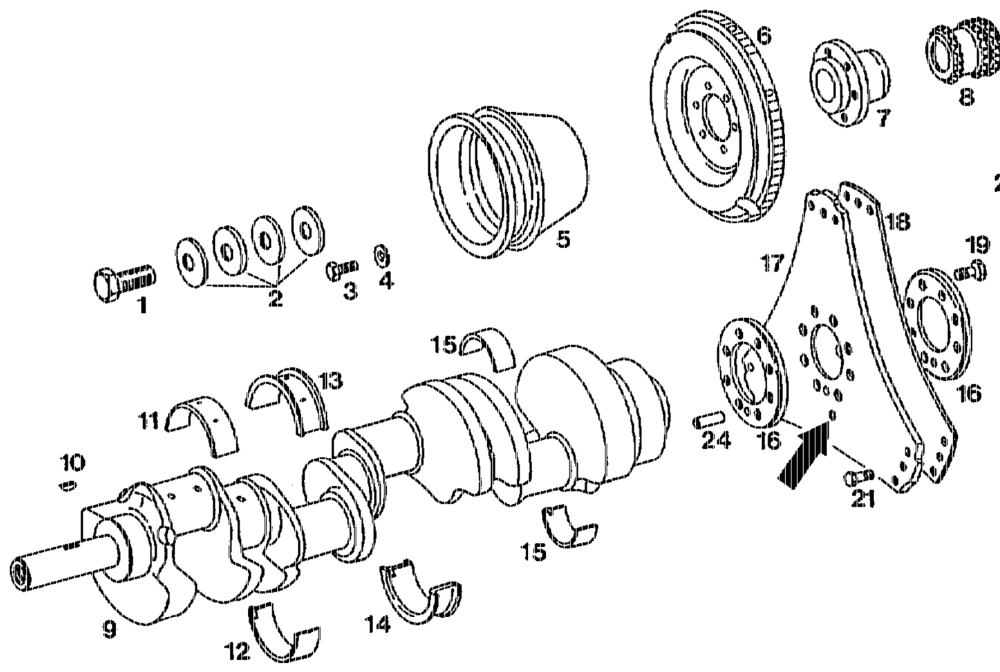
1 Bolt M 181.545 mm 16 Discs 4.5 mm thick
2 Belleville spring washers (4 @a.), 17 Driven plate 1.5 mm thick, 296 mm dia.
3 Bolt M 8x 22 (6 ea) 18 Driven plate 1 mn thick, 287 mm dia.
4 Spring lock washer A& 19 Stretch bolt for driven plates
5 Belt pulley M 124.5% 23 (8 ea.)
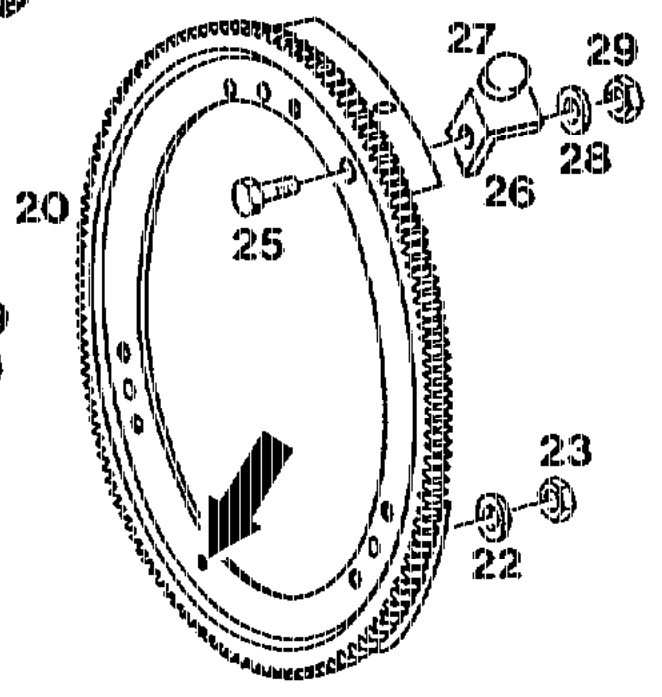
6 Vibration damper 20 Ring gear with segrnents
7 Hub 21 Fit bolts M 6×12 mm
8 Crankshaft gear 22 Spring washer B 6
9 Crankshatt 23 Nut M6
10 Woodruff key 24 Locating pin W Crankshaft bearing shell in crankcase 25 Bott M5 x10
12 Crankshaft bearing shell in bearing cap 26 Bracket
13 Fit bearing shell in crankcase with oil 27 Magnet groove and drilling 28 Washer A 5.3
14 Fit bearing shell in bearing cap 29 Nut M5
15 Conrod bearing shells 30 Integrated vibration damper with belt pulley
31 Starter ring gear increment (as of Motronic)
uhh RA 03.1313-3200/11
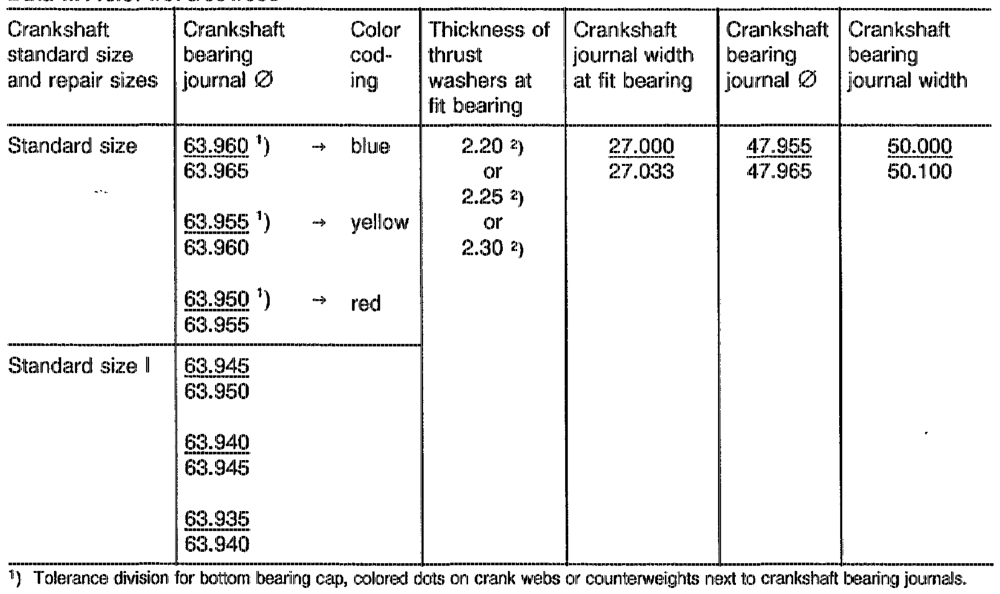
Data M119.971/975/981/985.
2) Crankshaft main bearing with thrust washers as of engine no. 119.970 12 036277 971 12 017447 972 12 004797 119.974 12 008072 119.975 12 010516 119.98 as of start of production
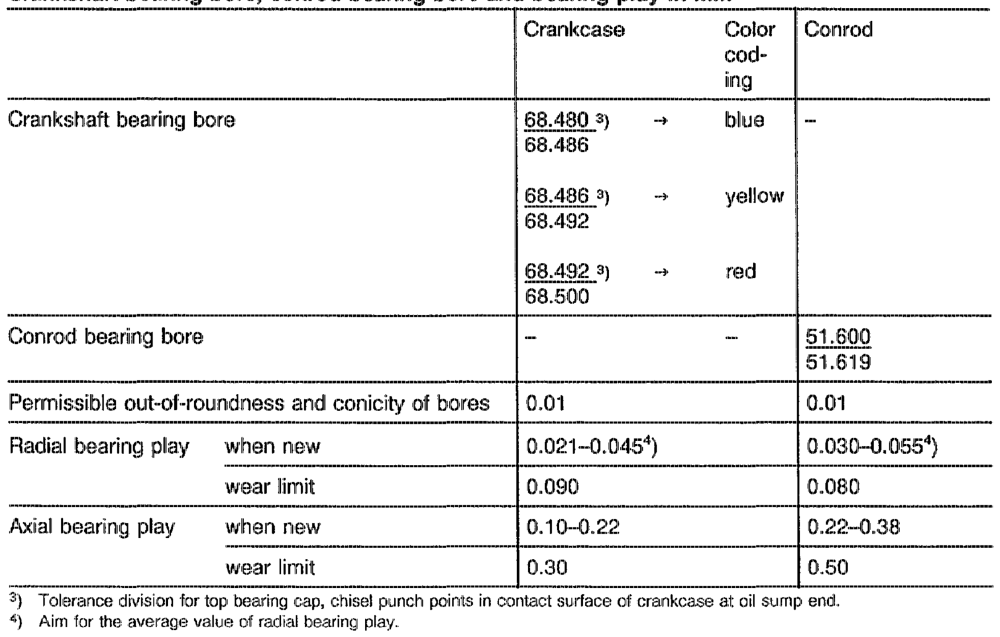
Crankshaft bearing bore, conrod bearing bore and bearing play in mm
othin = RA 03,1313-3200/12
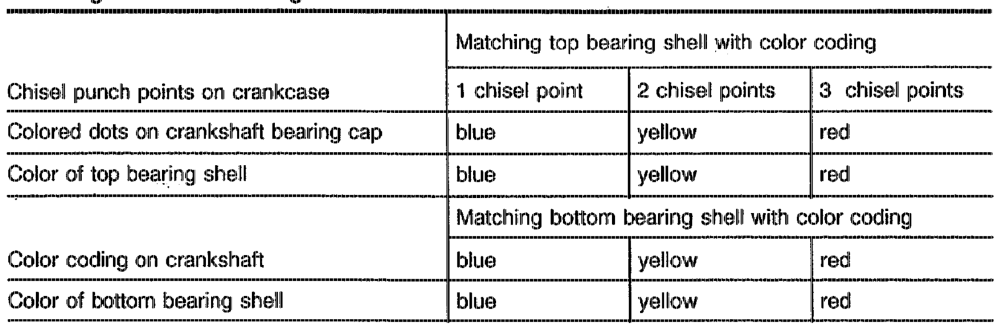
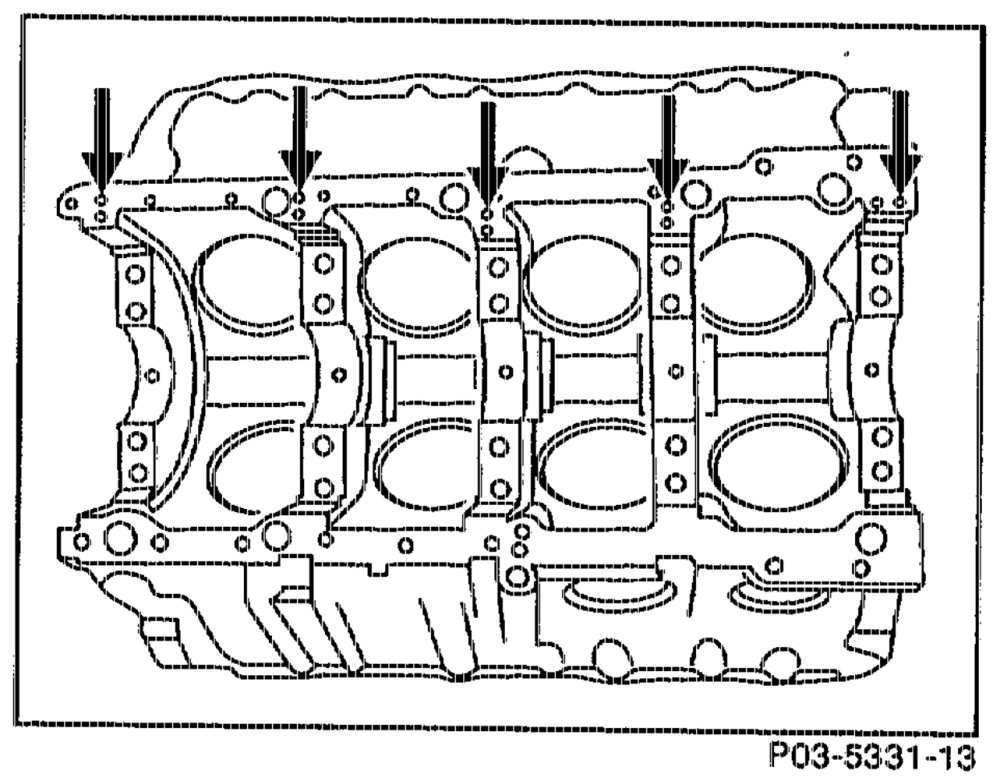
Matching crankshaft bearing shells to crankcase
The top and bottom standard size crankshaft bearing shells are supplied as replacement parts with the color codings blue, yellow and red. They should be matched according to the table. It is then no longer necessary to gage the bearing clearances.
Chisel punch points for matching crankshaft bearing shells
Tightening torques in Nm
stud bolt in crankcase 5) 30
orankshaft bearing stud bolt M101 nut 50
M1040 side bolts (10.9) 50
5) The stud bolts lose their locking effect after being unscrewed and should therefore be used only once.
ati RA 03.1313-320013
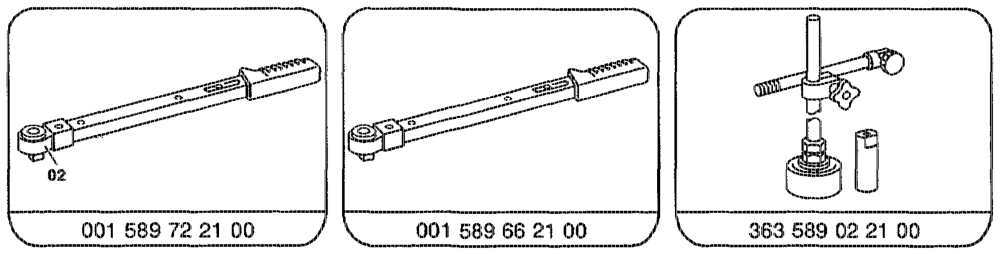
Special tools

Quick calipers for internal measurements, 2 40 — 60 mm e.g. Hahn und Kolb BorsigstraBe 50 D-7000 Stuttgart 30
Note
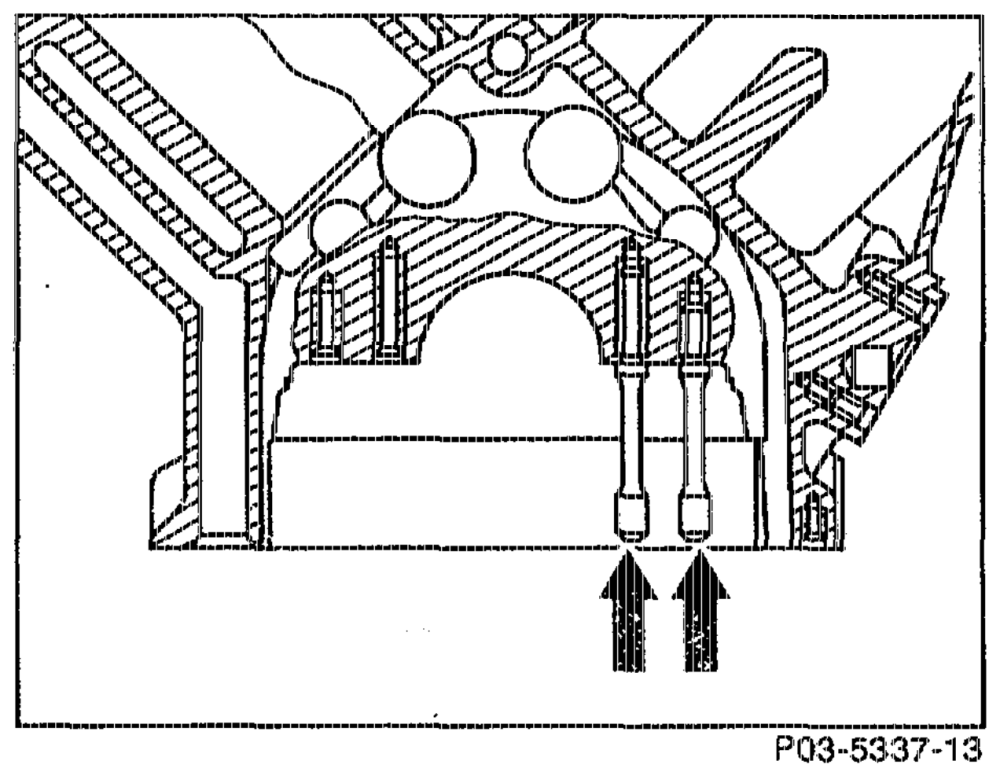
Self-locking stud bolts are inserted into the crankcase for attaching the crankshaft bearing caps. The stud bolts should only be used once as the locking fluid applied over a length of about 8 mm of the thread is rendered ineffective when the bolts are unscrewed. Pay attention to different insertion depth and
collar @ wi raplaci es aH
collar @ when replacing the stud bolts.
A When performing repairs, do not use HELI-COIL inserts for the self-locking stud bolts of the 9 crankshaft bearing caps.
atin RA 03.1313-3200/14
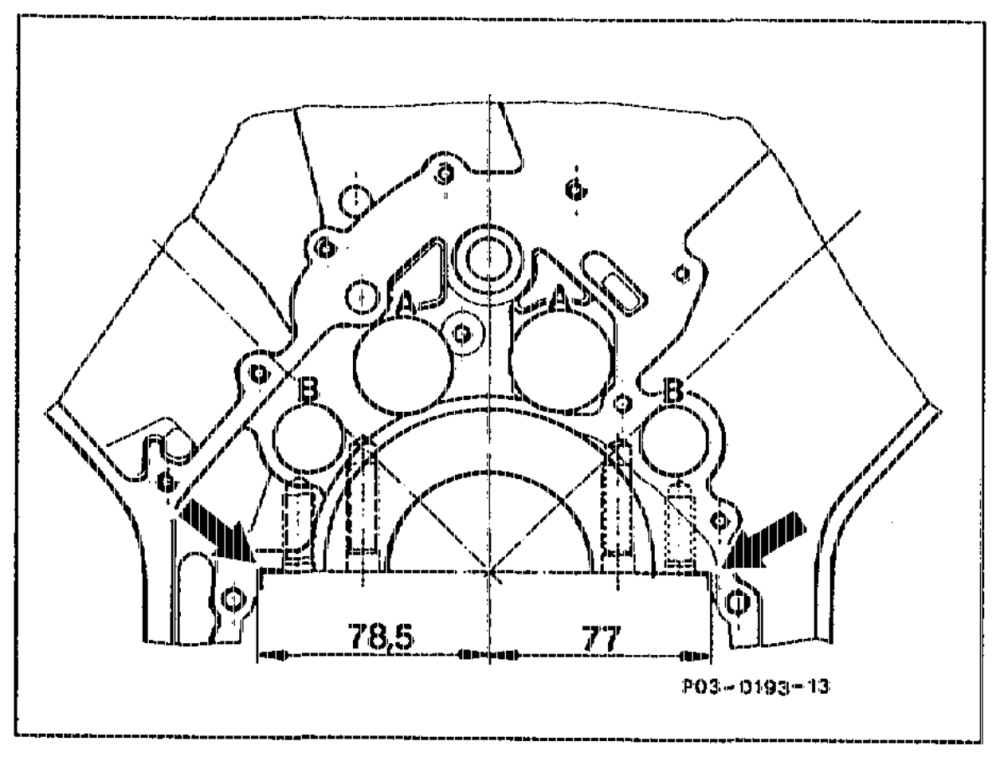
The 5 crankshaft bearing caps are manufactured from malleable cast iron and are interferencefitted in the side of the crankcase (arrows). The fit (arrows) is off-centered with the result that the bearing caps can only be installed in one position.
The three center bearing caps are additionally bolted to the side walls of the housing.
The crankshaft bearing caps are machined together with the crankcase and are not available as a replacement part.
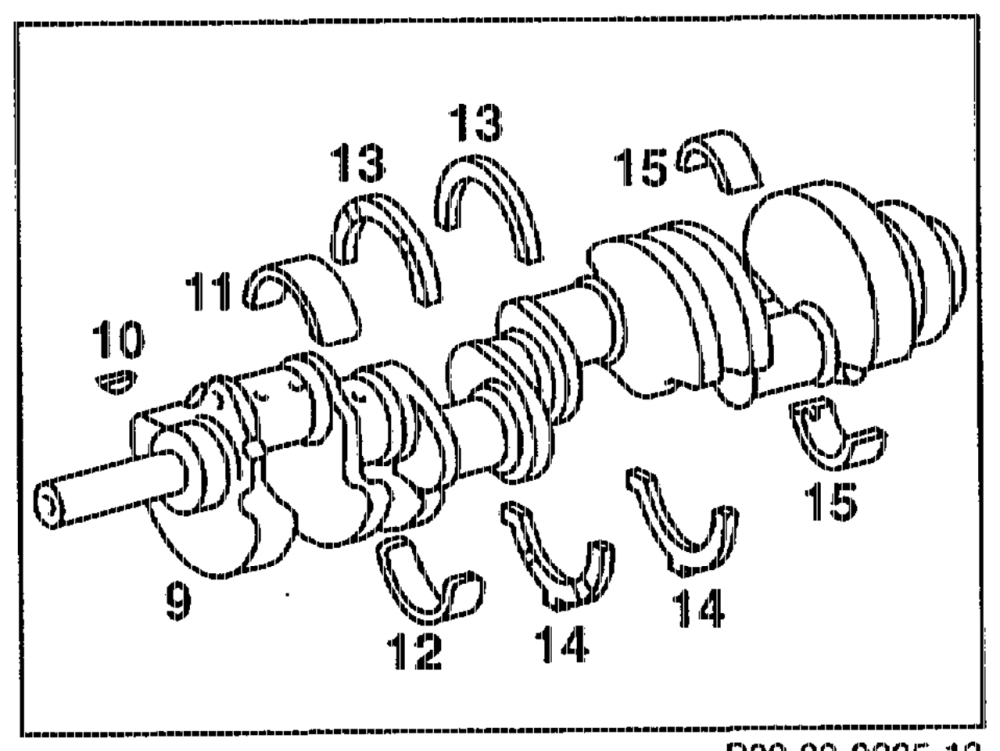
Standard bearing shells and thrust washers are installed at the 3rd crankshaft bearing (fit bearing). The thrust washers absorb the axial forces of the crankshaft.
The thrust washers (13 and 14) inserted on both sides of the crankcase and the bearing cap, are identical. The thrust washers in the bearing cap each have two retaining lugs, the bottom lugs being positioned off-center, as an anti-twist lock and to avoid incorrect installation. In addition, all the thrust washers are chamfered at one end. The two oil grooves in the thrust washers must face towards the crank webs. When repairing crankshafts, the fit bearing journals should be re-ground in width to one of P03.20-0225–13 the dimensions stated in the table (section „Data”).
After bearing damage has occurred, the conrod should be taken out and any swarf present in the conrod bores and in the crankshaft oil galleries, removed.
Carefully clean oil galleries in crankcase, crankshaft, timing case cover, oil filter housing, end cover, oil pump etc.
Inspect crankshafts for cracks, dimensional tolerance and hardness.
athe RA 03.1313-3200/15
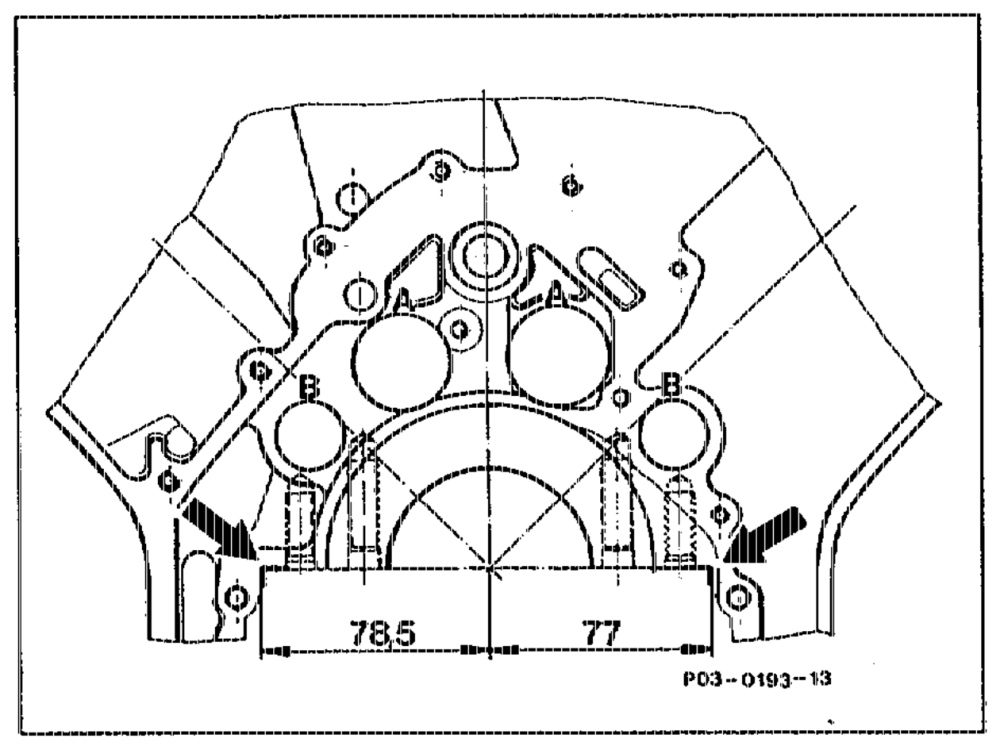
Matching crankshaft bearings, Installing crankshaft
1 Install crankshaft bearing caps; pay attention to marking, 1 is at the front.
The fit is asymmetrical (arrows) with the result that the crankshaft bearing caps can only be installed in one position.
2 Oil contact surface of nut and thread and tighten nuts to 50 Nm.
3 Oil the thread and the bolt head contact surface of the side bolts (M1040), install with the washers and tighten to 50 Nim.
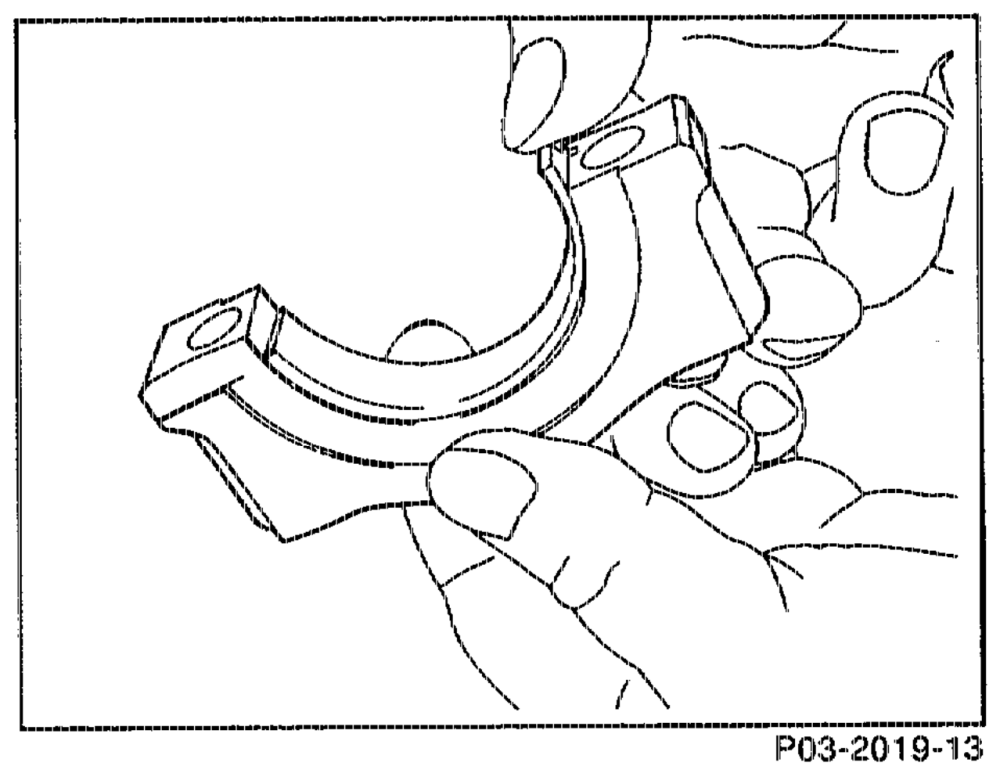
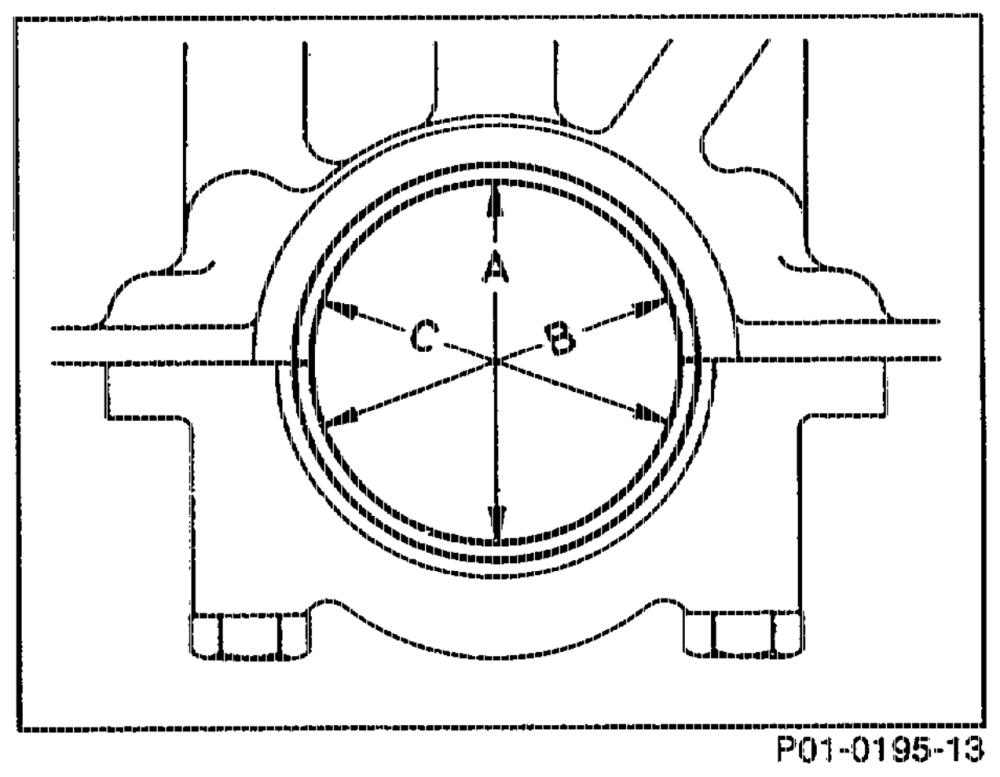
4 Measure crankshaft bearing bore in the direction A, B and C at two planes (conicity) and note the measurements obtained. If a crankshaft bearing bore exceeds the specified data or is conical in shape, dress the contact surface of the bearing cap on a dressing plate to not more than 0.02 mm.
§ Insert bearing shells and install crankshaft bearing cap.
Tighten nuts and side bolts to 50 Nm.
athe RA 03.1313-3200/16
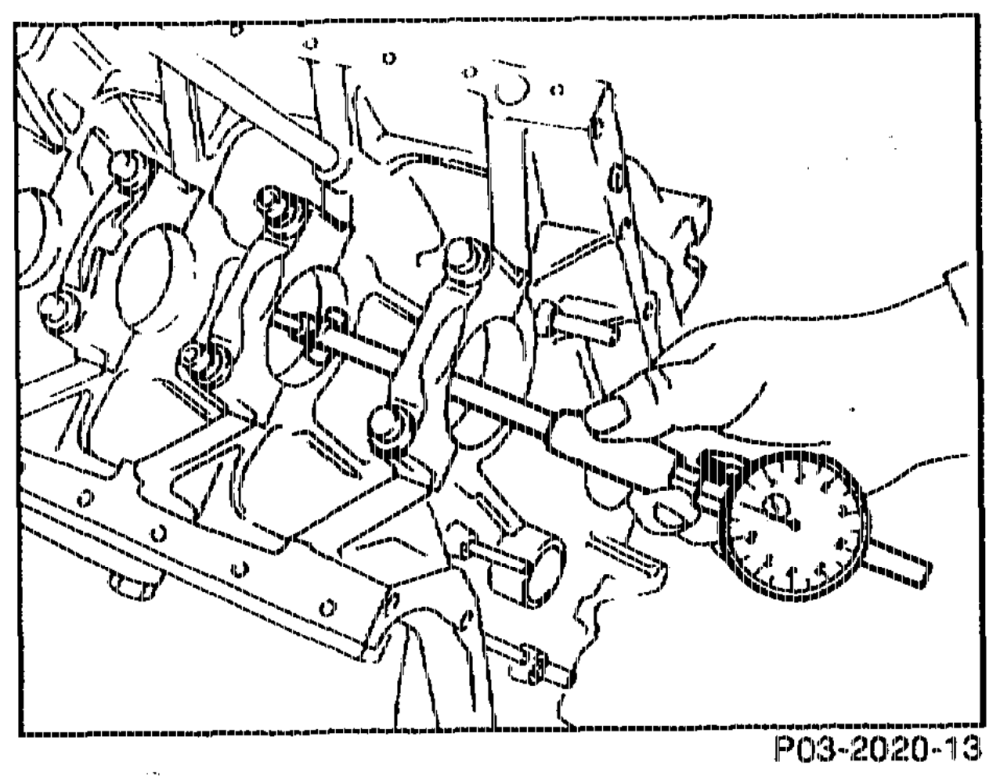
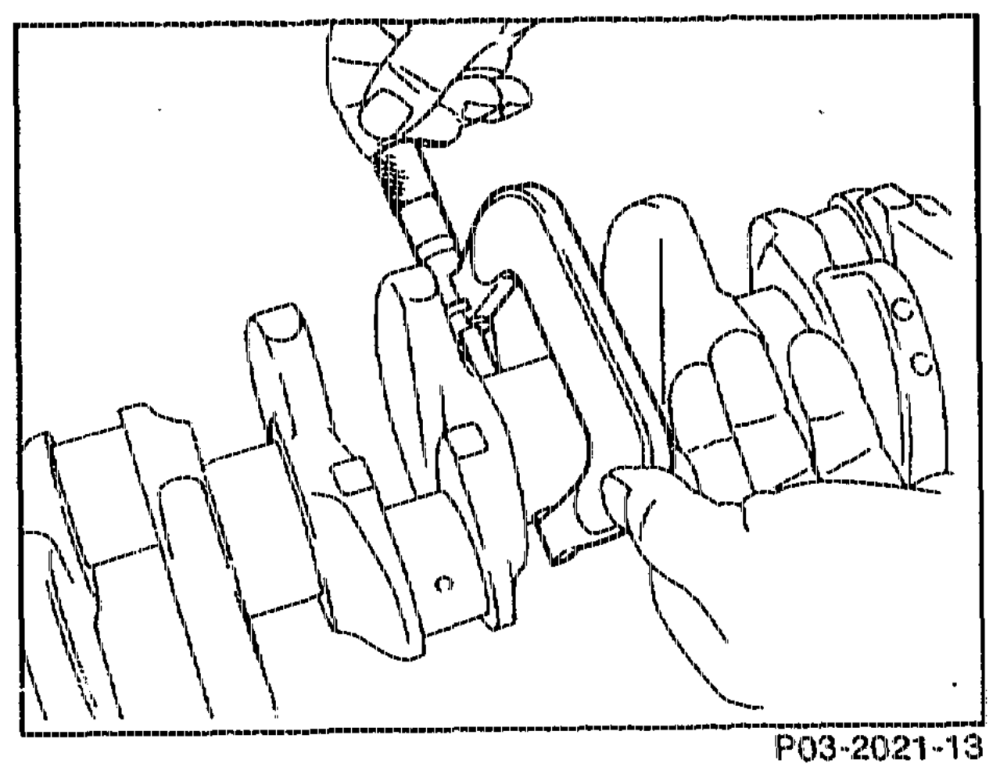
6 Measure bearing diameter and note.
7 + Measure crankshaft bearing journal and determine radial crankshaft bearing play.
Note
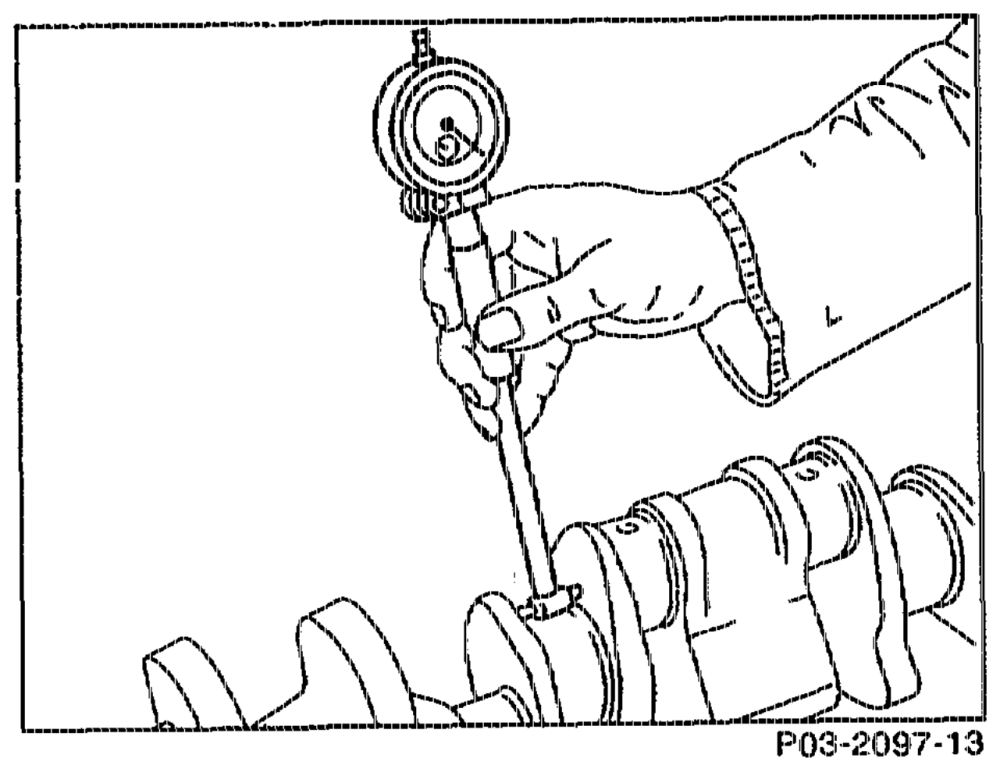
The bearing play can be corrected by replacing the bearing shells (see table Matching crankshaft bearing shells to crankcase).
8 Measure width of fit bearing journal and of fit bearing and determine axial crankshaft bearing play. (See table of Data)
The repair size fit bearing shells are supplied oversized,
9 Moisten bearing shells and crankshaft with SAE 30 engine oil and insert crankshaft.
AN Install bearing shells with cil drilling in the crankcase.
seth RA 03.1913-3200/17
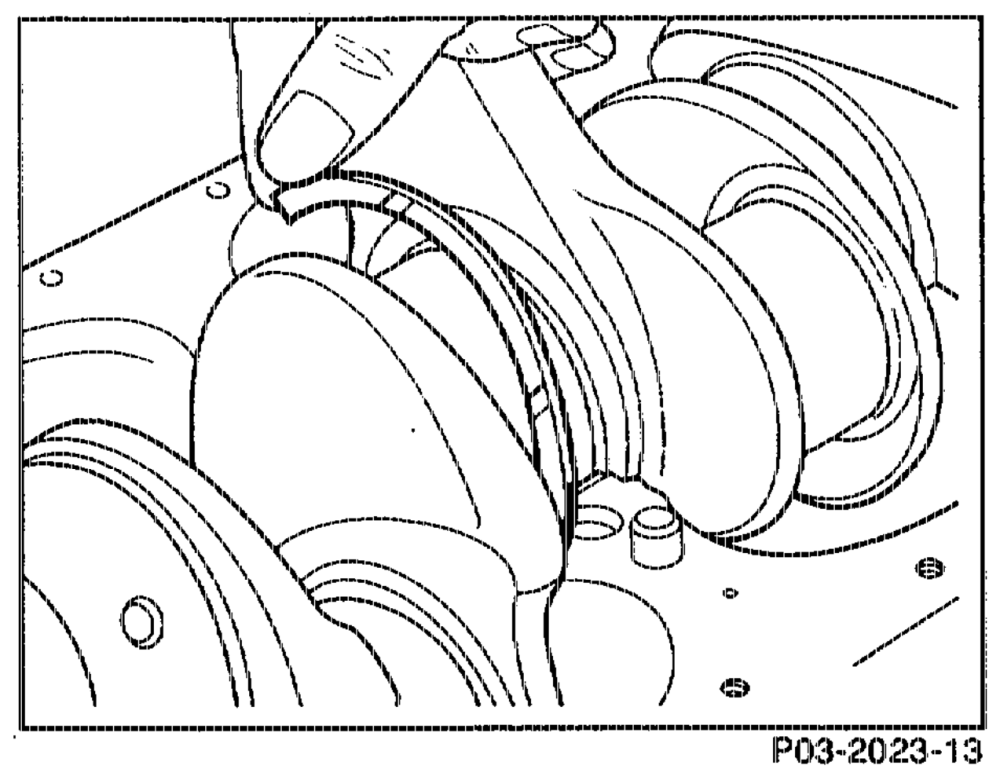
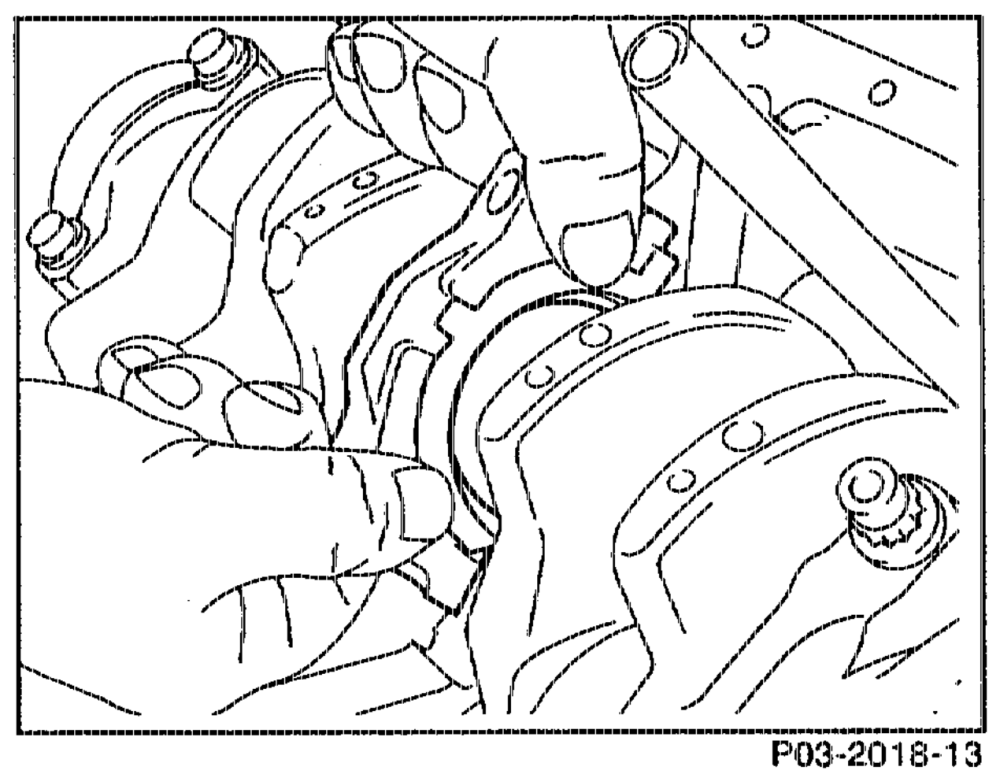
into the grooves at the fit bearing (crankcase).
11 Install fit bearing cap.
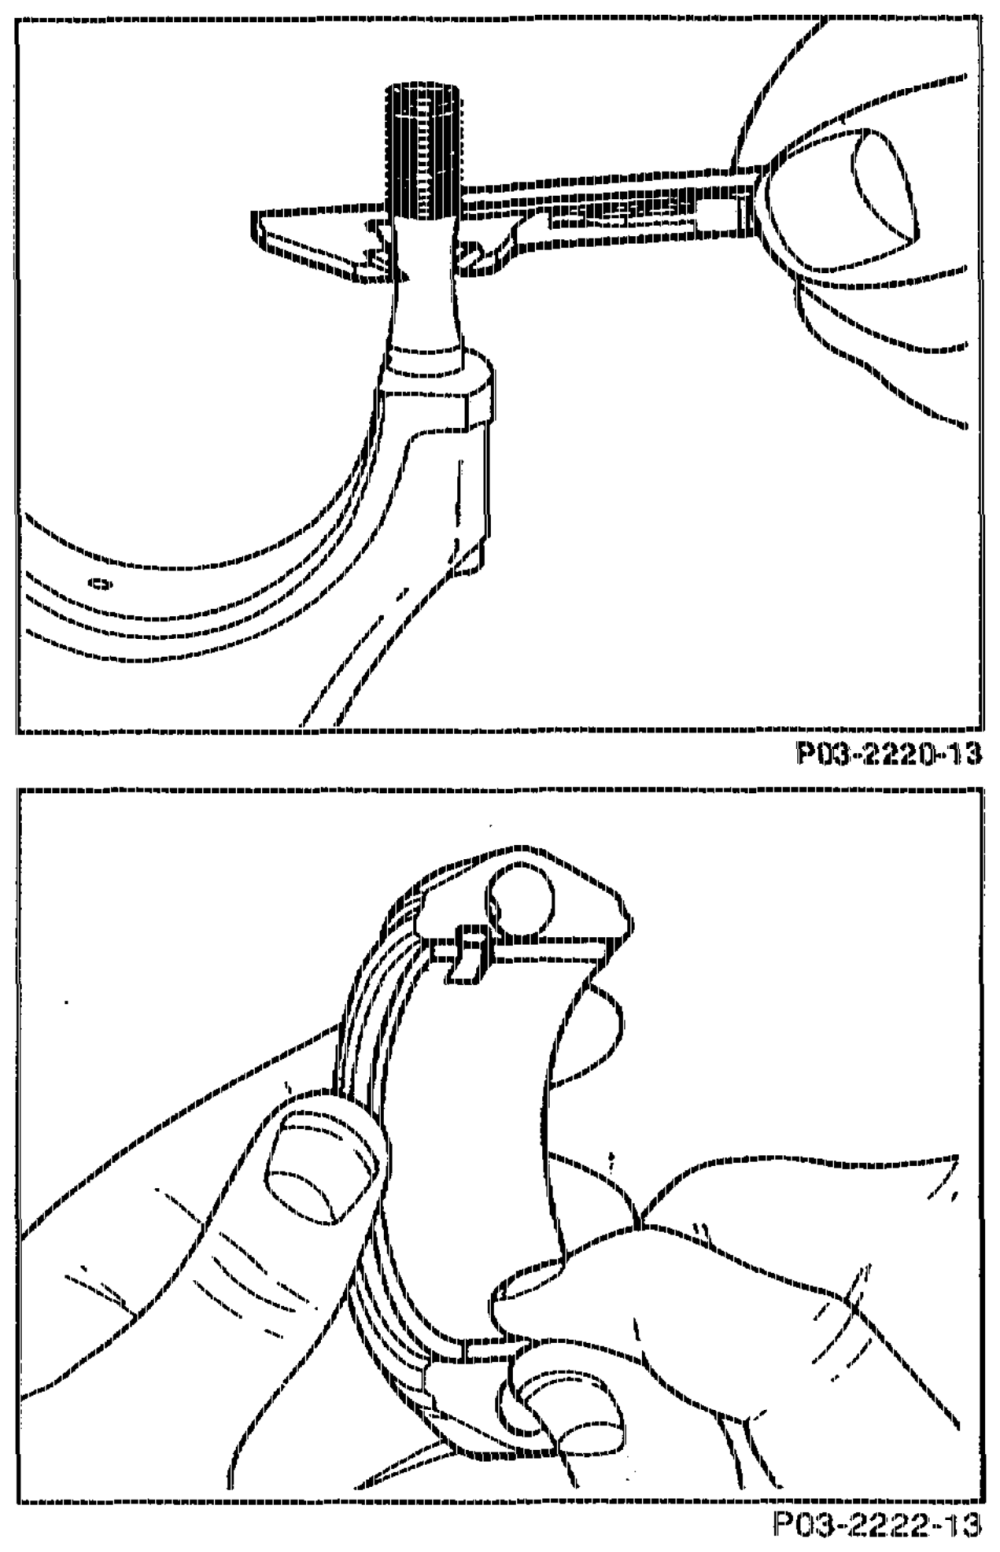
A Zi Hold both thrust washers tight when installing the fit bearing cap.
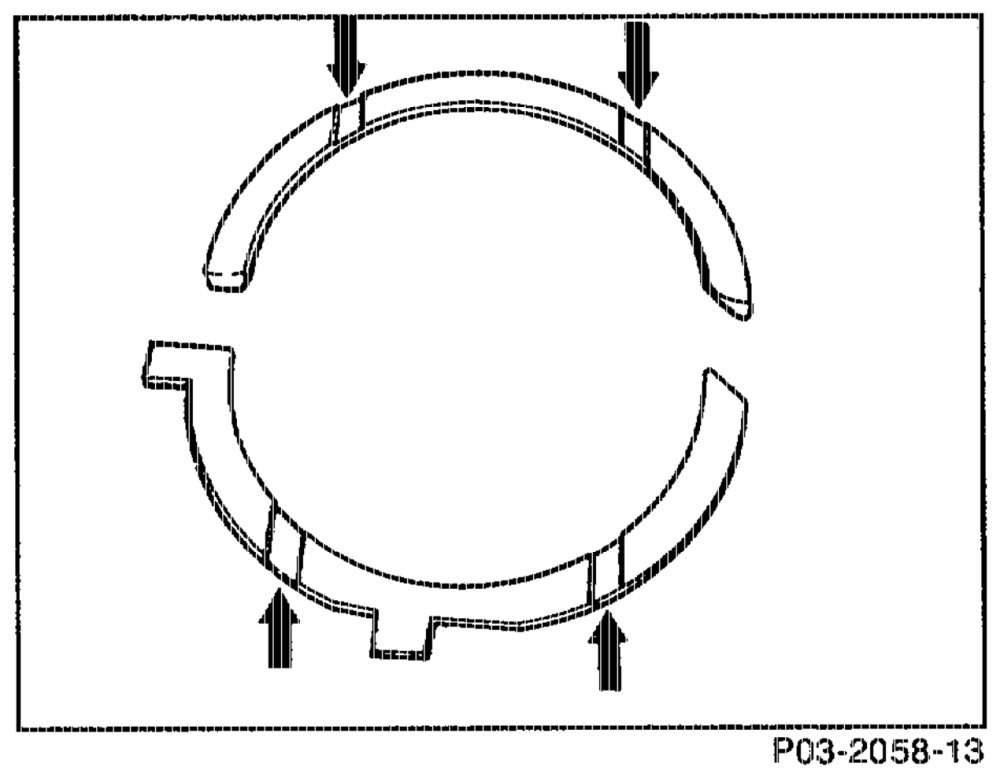
A The two oi! grooves (arrows) in the thrust washers must face toward the crank webs.
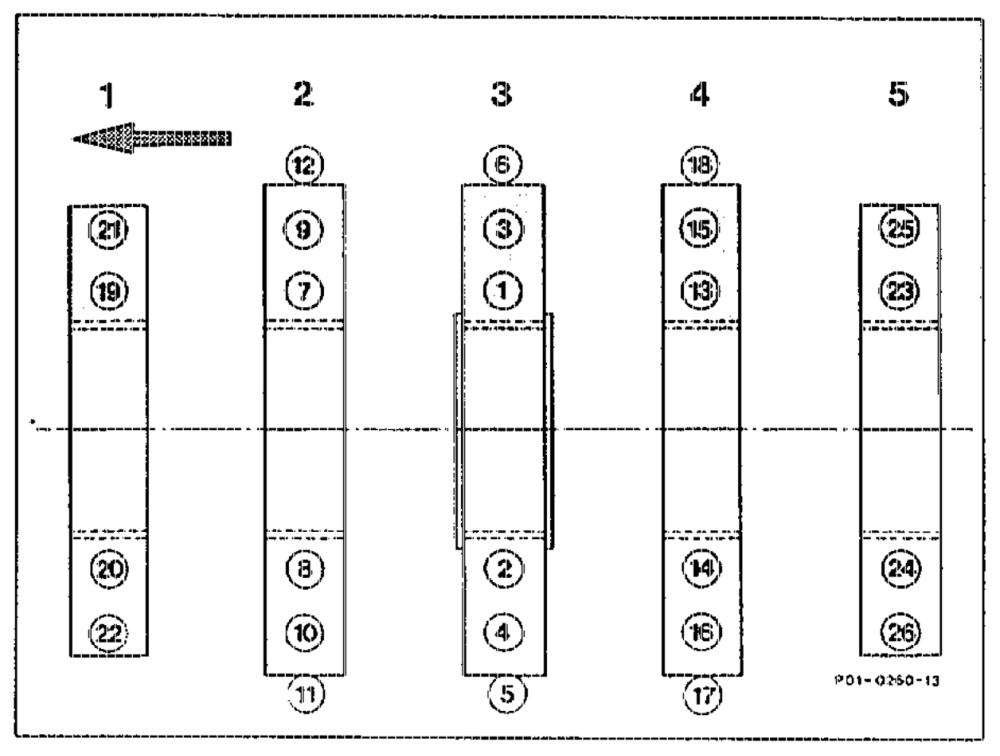
12. Install crankshaft bearing caps.
43 Tighten crankshaft bearing caps to the specified torque in the order of the tightening diagram. Oil the thread and the bolt head and nut contact surface for this step.
Nuts 50 Nm. Side bolts 50 Nrn
Note Bolts of quality 10.9 should be used for the side bearing cap connection.
winn RA 03.1313-3200/18
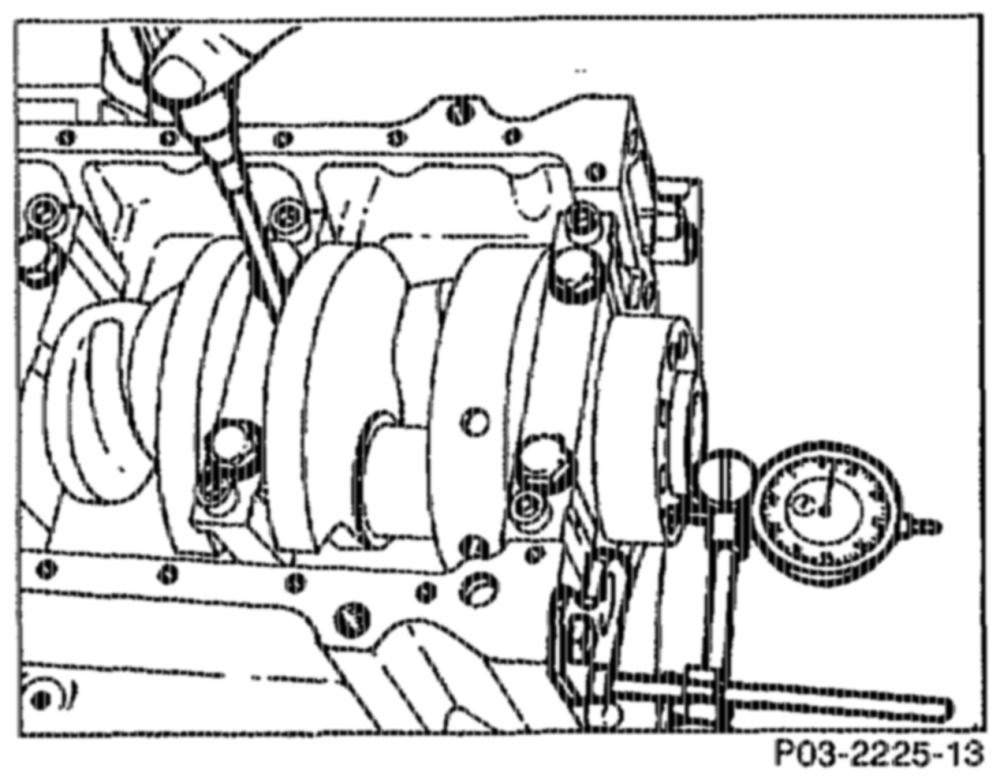
5 Rotate crankshaft by hand and check we ether it rotates freely.
Matching conrod bearings and Installing
16 Inspect conrod bolts (03-3100).
17 Repair conrod and align (03-3130).
18 Insert conrod bearing shells, install conrod bearing caps with conrod bearing shells and tighten conrod nuts and bolts to 35 Nm.
19 Measure bearing diameter and note.
20 Measure conrod bearing journals and determine conrod bearing radial play.
Note The bearing play can be corrected by replacing the conrod bearing shells. Airn for the average value of the bearing play stated. Conrod bearing shells without color coding are thicker than those with blue color coding; note, however, that the wall thicknesses with and wihtout color coding may overlap.
atkins = RA 03.1913-3200/19
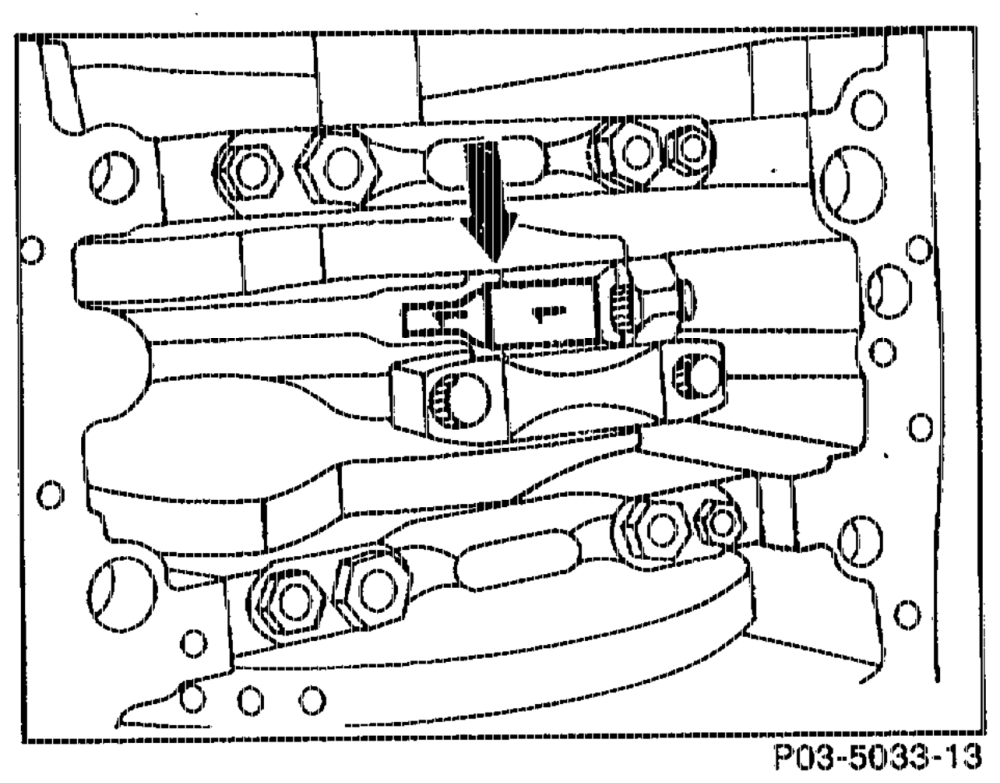
22 Moisten bearing shells, crankshafts, pistons and cylinders with SAE 30 engine oil. Install conrod with pistons (03-3160).
LN Pay attention to identification.
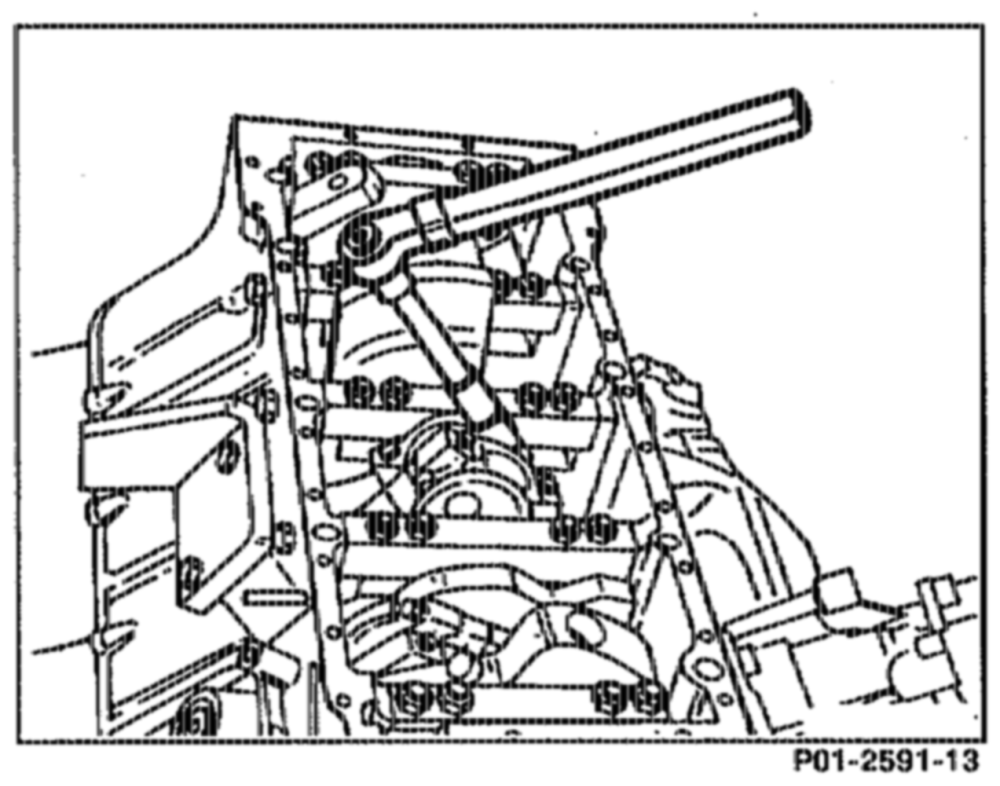
Install the bearing shells with the oil drilling in the conrod otherwise the conrod bushes will not be lubricated.
23 Tighten conrod bolts (03-3100).
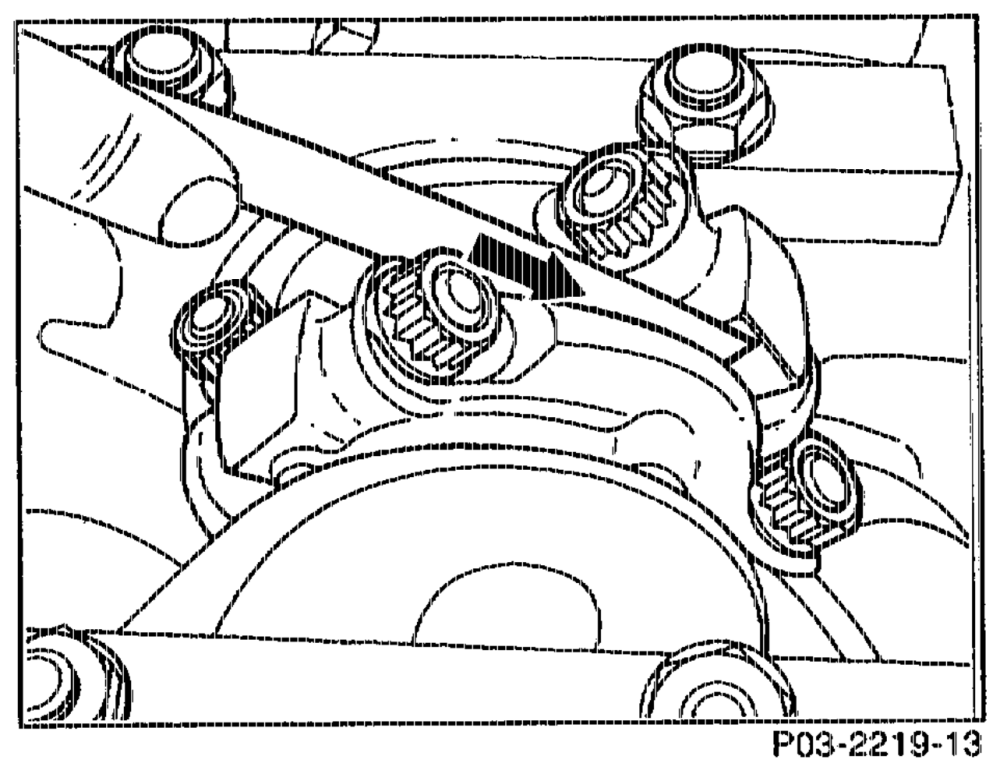
21 Measure conrod bearing axial play. Inspect clearance of conrods in piston.
aN Disassemble oi! pump, clean, replace if necessary. Replace oil delivery valve. Clean oil filter, carefully clean air-oil cooler or replace.
Install initial operation oil filter element. Change engine oi! and oil filter element after 1000-1500 km.
wibin RA 03.1313-3200/20